
1. Introduction
This manual provides essential information for the installation, operation, and maintenance of ZDTOPA Glow Plugs, specifically model Y-1013J. Glow plugs are critical components in diesel engines, designed to preheat the combustion chamber to facilitate cold starting. Proper installation and maintenance are crucial for optimal engine performance and longevity.
2. Product Overview
The ZDTOPA Glow Plug Y-1013J is an aftermarket replacement part engineered for reliability and performance. This set includes four glow plugs, designed to meet or exceed original equipment specifications.
2.1 Key Features:
- Reference OE Numbers: 19850-67020, 1985067020, 19850-67030, 1985067030.
- Material: Constructed from high-quality stainless steel for durability.
- Corrosion Resistance: Designed to be waterproof and anti-corrosion, ensuring a long service life.
- Efficient Heating: Heats the mixed gas in the intake pipe, facilitating good heat conduction to the preheater tube.
- Temperature Stability: Features rapid heating and lasting high-temperature state to increase cylinder temperature for improved starting.
2.2 Vehicle Compatibility:
These glow plugs are compatible with Toyota 1KZ-TE engines in various models from 1996-2012, including:
- Toyota Land Cruiser Prado, Colorado
- Toyota Hilux Vigo, Hilux-Surf, Hilux/4Runner (4WD)
- Toyota Hiace, Fortuner, Kijang & Innova
- Toyota Picnic (CXM10, SXM10) [EU]
- Toyota Land Cruiser 90 (KDJ9#, KZJ9#, VZJ9#) [EU]
- Toyota 4Runner (KZN185, RZN18#, VZN18#) [GR], (GRN21#, KZN215) [GR]
- Toyota Hilux (KZN165, 190, KDN, LN, RZN, YN, VZN14#, 15#, 16#, 17#, 19#) [GR]
- Toyota Land Cruiser Prado (GRJ12#, KDJ120, KZJ120, LJ12#, RZJ12#, TRJ12#) [GR]
- Toyota Carina FF (AT21#, CT21#, ST215) [JP]
- Toyota Corona (AT21#, CT21#, ST21#) [JP]
- Toyota Caldina (AT211, CT216, ST21#) [JP]
- Toyota Camry/Vista (SV4#, CV4#) [JP]
- Toyota Ipsum (CXM10, SXM1#) [JP]
- Toyota Gaia (ACM1#, CXM10, SXM1#) [JP]
- Toyota Lite/Townace Noah, V (CR4#, 5#, KR4#, 52, SR40, 50) [JP]
- Toyota Hilux Surf (KDN185, KZN185, RZN18#, VZN18#) [JP]
- Toyota Hiace/Regiusace (KZH1##, LH1##, RZH1##, TRH1##) [JP]
- Toyota Regius/Touring Hiace (KCH4#, LXH4#, RCH4#) [JP]
- Toyota Granvia/Grand Hiace (KCH1#, RCH11, VCH1#, 2#) [JP]
- Toyota Land Cruiser Prado (KDJ9#, KZJ9#, RZJ9#, VZJ9#) [JP]
2.3 Product Visuals:

Figure 1: Overview of four ZDTOPA Glow Plugs.
Video 1: A brief demonstration showcasing the ZDTOPA Glow Plug Y-1013J, highlighting its design and components.
3. Safety Information
WARNING: Always exercise caution when working on vehicle electrical systems and engine components. Failure to follow safety guidelines can result in serious injury or damage to the vehicle.
- Disconnect the vehicle's battery before beginning any work to prevent electrical shock or short circuits.
- Allow the engine to cool completely before attempting to remove or install glow plugs. Hot engine components can cause severe burns.
- Wear appropriate personal protective equipment (PPE), including safety glasses and gloves.
- Ensure the work area is well-ventilated.
- If you are unsure about any step, consult a qualified automotive technician.
4. Installation and Setup
The installation of glow plugs requires mechanical aptitude and specific tools. It is recommended that installation be performed by a certified mechanic or experienced individual.
4.1 Pre-Installation Checks:
- Verify that the new glow plugs match the specifications and OE numbers (19850-67030, 19850-67020) for your vehicle.
- Inspect the new glow plugs for any visible damage.
- Ensure the engine is cool to the touch.
4.2 Installation Steps:
- Disconnect Battery: Disconnect the negative terminal of the vehicle's battery.
- Access Glow Plugs: Locate the glow plugs on the engine. This may require removing engine covers, intake manifolds, or other components. Refer to your vehicle's service manual for specific access procedures.
- Disconnect Wiring: Carefully disconnect the electrical connectors from each glow plug.
- Remove Old Glow Plugs: Using an appropriate glow plug wrench or socket, carefully loosen and remove the old glow plugs. Be cautious not to strip the threads or break the glow plug tip in the cylinder head. If a glow plug is seized, apply penetrating oil and allow it to soak.
- Clean Glow Plug Ports: Clean any carbon deposits or debris from the glow plug ports in the cylinder head using a suitable reamer or brush. This ensures proper seating and heat transfer for the new glow plugs.
- Install New Glow Plugs: Apply a small amount of anti-seize compound to the threads of the new ZDTOPA glow plugs. Carefully thread each new glow plug into its port by hand to avoid cross-threading.
- Torque Glow Plugs: Using a torque wrench, tighten the glow plugs to the vehicle manufacturer's specified torque setting. Overtightening can damage the glow plug or cylinder head; undertightening can lead to poor contact or leaks.
- Reconnect Wiring: Reconnect the electrical connectors to each new glow plug, ensuring a secure connection.
- Reassemble Components: Reinstall any components that were removed to access the glow plugs (e.g., intake manifold, engine covers).
- Reconnect Battery: Reconnect the negative terminal of the vehicle's battery.
- Test System: Start the engine and check for proper operation and any warning lights.
4.3 Detailed Product Views:
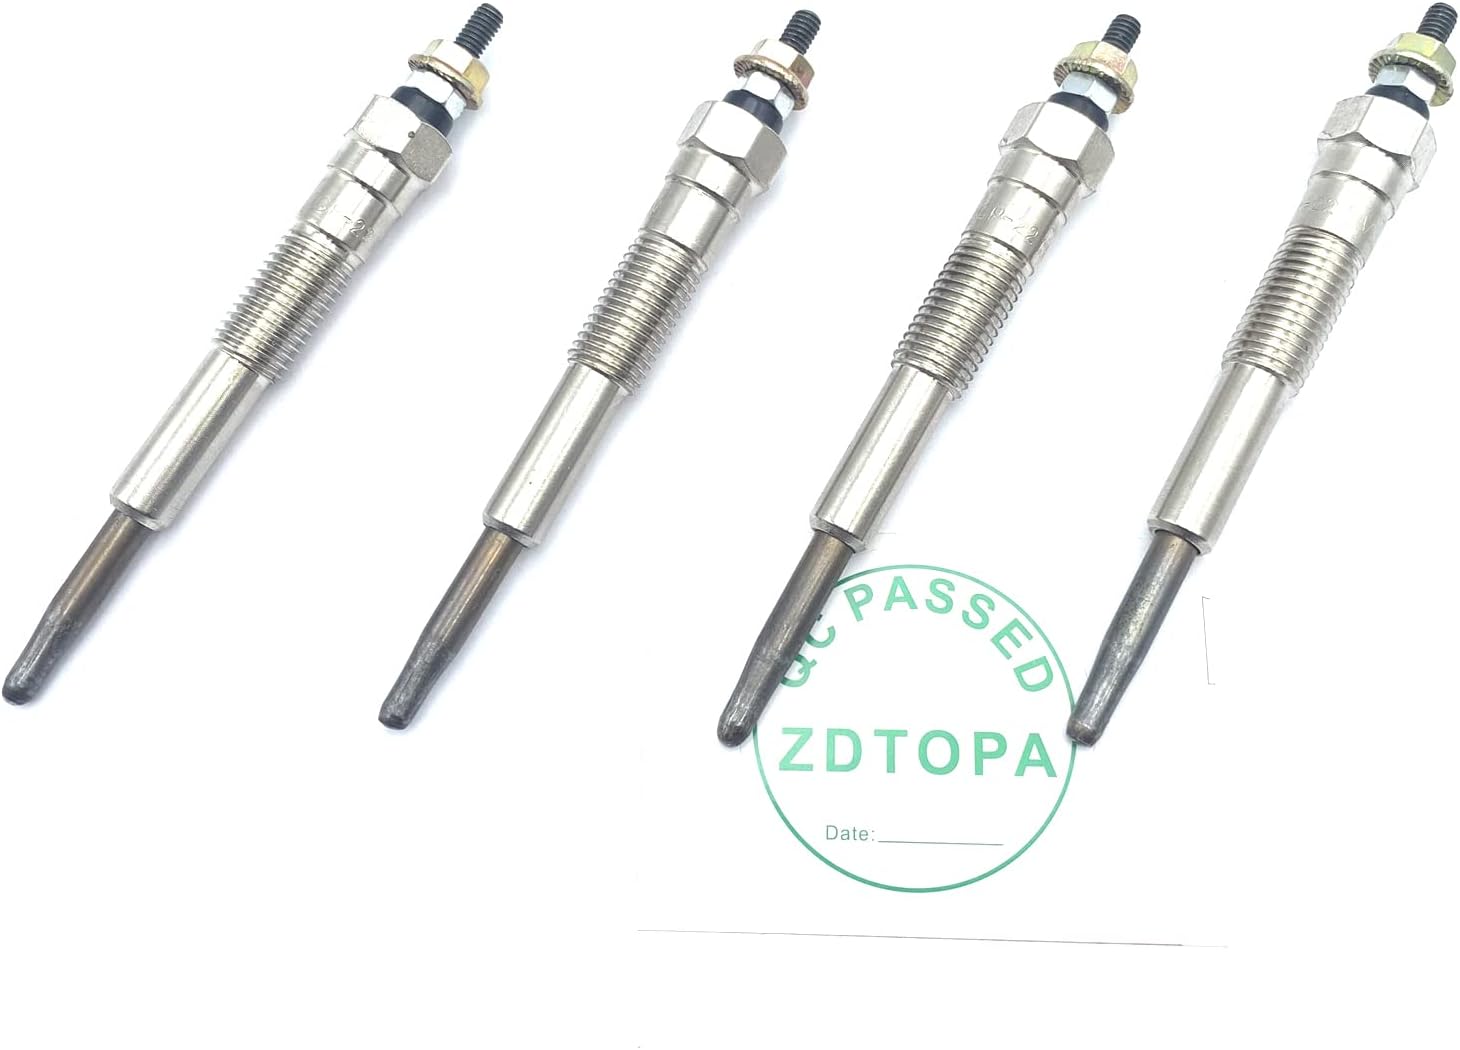
Figure 2: ZDTOPA Glow Plugs with quality control marking.

Figure 3: Close-up of a single ZDTOPA Glow Plug with others in the background.

Figure 4: Detailed view of the glow plug tip and quality control stamp.

Figure 5: Close-up of the glow plug's electrical connection point.
5. Operating Principles
Glow plugs are essential for starting diesel engines, especially in cold weather. When the ignition is turned on, an electrical current flows through the glow plug's heating element, causing its tip to rapidly heat up to a very high temperature. This intense heat is transferred to the air and fuel mixture in the combustion chamber, raising its temperature sufficiently to ignite the diesel fuel when injected. Once the engine starts and reaches operating temperature, the glow plugs typically turn off, as the heat generated by compression is then sufficient for ignition.
6. Maintenance
Glow plugs are wear items and their performance can degrade over time. Regular inspection and timely replacement are vital for maintaining reliable engine starting and efficiency.
- Inspection: During routine engine service, visually inspect glow plugs for signs of damage, carbon buildup, or corrosion.
- Testing: If starting issues arise, glow plugs can be tested for continuity and resistance using a multimeter. Consult your vehicle's service manual for specific testing procedures and resistance values.
- Replacement Interval: Follow your vehicle manufacturer's recommended replacement schedule for glow plugs. If no specific interval is provided, consider replacement every 60,000 to 100,000 miles, or sooner if starting problems occur.
- Replace as a Set: It is generally recommended to replace all glow plugs as a set to ensure balanced performance and prevent future issues from other aging plugs.
7. Troubleshooting
Common symptoms of faulty glow plugs include:
- Hard Starting: Especially noticeable in cold weather, the engine may crank for an extended period before starting.
- Rough Idling: The engine may run roughly or misfire immediately after starting, particularly when cold.
- Excessive White Smoke: White smoke from the exhaust during cold starts can indicate unburnt fuel due to insufficient combustion chamber temperature.
- Check Engine Light: Some vehicles may illuminate the check engine light or glow plug warning light if a glow plug fault is detected.
7.1 Troubleshooting Steps:
- Diagnostic Trouble Codes (DTCs): Use an OBD-II scanner to check for any stored diagnostic trouble codes related to the glow plug system.
- Visual Inspection: Check glow plug wiring and connectors for damage or corrosion.
- Electrical Testing: Test individual glow plugs for resistance and current draw. A glow plug with infinite resistance (open circuit) is faulty.
- Relay/Controller Check: Inspect the glow plug relay or control module for proper operation.
8. Specifications
| Attribute | Value |
|---|---|
| Brand | ZDTOPA |
| Model | Glow Plug Y-1013J |
| Item Weight | 2.2 pounds (for 4 plugs) |
| Item Model Number | 19850-67030 19850-67020 |
| Exterior Finish | Smooth |
| Manufacturer Part Number | ZD-22GP0093 |
| ASIN | B09SLJDTYT |
| Date First Available | February 16, 2022 |
9. Warranty and Support
For information regarding warranty coverage, technical support, or any product-related inquiries, please contact ZDTOPA directly through their official channels or the retailer from whom the product was purchased. Keep your purchase receipt as proof of purchase.