
GEOID HS500
GEOID HS500 Heart Rate Monitor User Manual
Accurate Heart Rate Tracking for Enhanced Performance
1. Product Overview
The GEOID HS500 is a high-precision heart rate monitor designed to provide accurate real-time heart rate data for various fitness activities. Its advanced sensor technology and dual ANT+/Bluetooth compatibility ensure seamless integration with a wide range of devices and applications, helping you optimize your training and monitor your physical condition effectively.

Image: The GEOID HS500 Heart Rate Monitor, featuring the main sensor unit attached to an adjustable chest strap.
Key Features:
- LED Light Reminding: A flashing LED light confirms heart rate detection and connection status. The red light indicates the monitor is ready for use.
- Advanced Design: Engineered with new hardware and algorithms to minimize interference from movement and sweat, ensuring accurate heart rate monitoring.
- Versatile Application: Suitable for various activities including cycling, fitness, football, and running. Not recommended for swimming.
- Dual Protocol Compatibility: Supports both ANT+ and Bluetooth for broad connectivity with fitness devices and applications.
- Extended Battery Life: Provides approximately 800 hours of operation on a single replaceable CR2032 battery.
- IP67 Waterproof Rating: Designed to be resistant to dust and water splashes, ensuring durability during workouts.

Image: Visual representation of the HS500 Heart Rate Monitor highlighting its key features: Live HR Tracking, IP67 Waterproof, Visible Connection, App Support, ANT+, and Bluetooth compatibility.
2. Setup and Installation
2.1 Battery Installation
The HS500 Heart Rate Monitor uses a replaceable CR2032 coin cell battery. To install or replace the battery:
- Locate the battery cover on the back of the sensor unit.
- Use a coin or a small tool to twist the battery cover counter-clockwise until it unlocks.
- Carefully remove the old battery (if applicable) and insert a new CR2032 battery with the positive (+) side facing upwards.
- Align the battery cover and twist it clockwise until it is securely closed.

Image: Illustration demonstrating the process of installing or replacing the CR2032 battery in the GEOID HS500 sensor, highlighting the battery compartment and proper battery orientation.
2.2 Wearing the Monitor
For accurate heart rate measurement, the HS500 sensor must be worn correctly on your chest.
- Moisten the electrode areas on the back of the chest strap with water or electrode gel. This improves conductivity.
- Attach the sensor unit to the two snap fasteners on the chest strap. Ensure it is securely fastened.
- Place the chest strap around your chest, just below your pectoral muscles. The sensor unit should be centered on your sternum.
- Adjust the strap length to ensure a snug but comfortable fit. It should be tight enough to stay in place during activity but not restrict breathing.
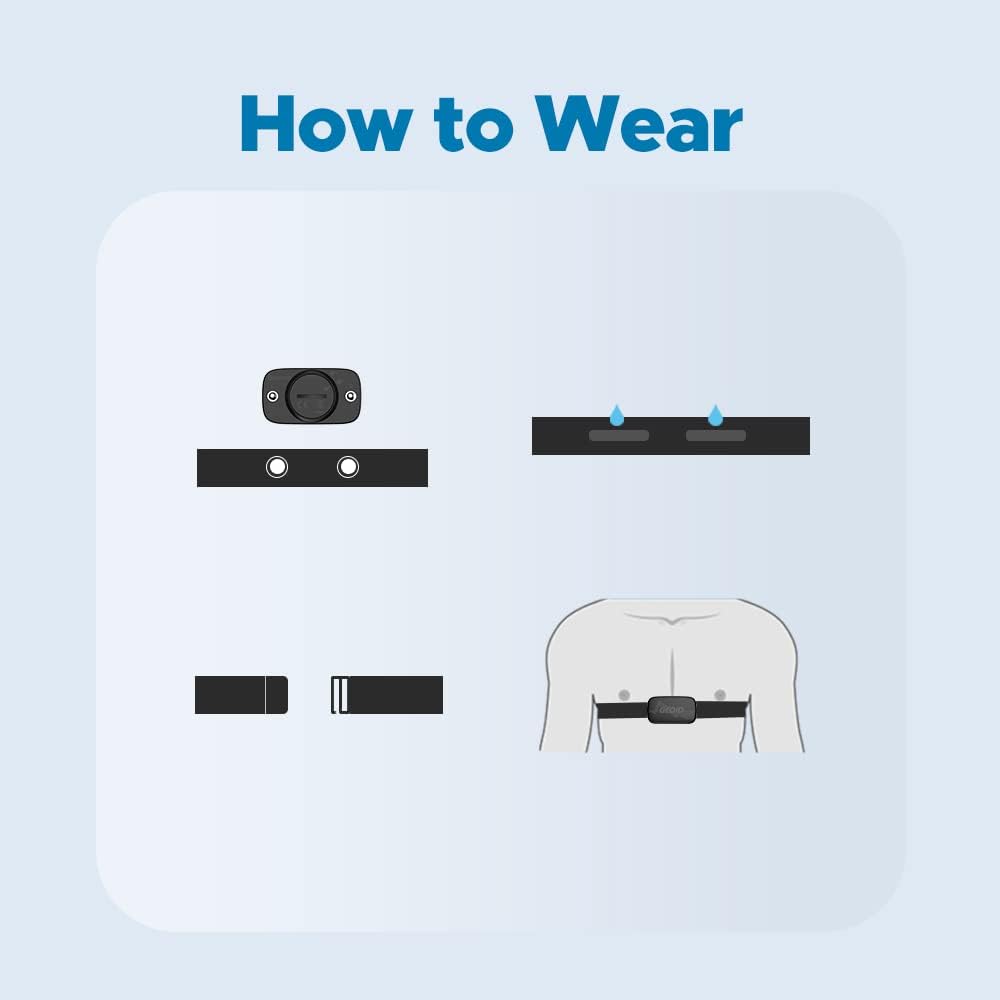
Image: Step-by-step diagram showing the assembly of the sensor to the strap and the correct placement of the heart rate monitor on the chest.

Image: A person demonstrating the proper wearing of the GEOID HS500 Heart Rate Monitor during a physical activity, showing its placement on the chest.

Image: A close-up view of the GEOID HS500 heart rate monitor strap, emphasizing its adjustable design and skin-friendly material for comfortable wear.
3. Operation
3.1 Power On/Off and LED Indicator
The HS500 automatically powers on when it detects a heart rate signal after being properly worn. The front LED will flash approximately 10 times to confirm activation and connection. The red light indicates that the monitor is ready to transmit data.

Image: The GEOID HS500 Heart Rate Monitor with its red LED indicator light illuminated, signifying its operational status.
3.2 Connectivity (ANT+ and Bluetooth)
The HS500 supports both ANT+ and Bluetooth protocols, allowing it to connect to a wide array of fitness devices and applications.
- ANT+ Compatibility: Connects with devices such as Wahoo, IGPSPORT, Bryton, Black Bird, Garmin, and other ANT+ enabled bike computers, sports watches, and fitness equipment.
- Bluetooth Compatibility: Pairs with popular fitness applications like Zwift, Onelap, Strava, Kinomap, Wahoo Fitness, TrainerRoad, Rouvy, Fulgaz, Nike Run Club, and Openrider on your smartphone or tablet.
Important Note:
When connecting via Bluetooth, always pair the HS500 through the specific fitness application you are using (e.g., Zwift, Strava). Do not attempt to connect directly from your phone's Bluetooth settings list.

Image: An illustration detailing the dual protocol compatibility of the GEOID HS500, showing its connectivity with ANT+ devices (like Wahoo, Bryton, IGPSPORT) and Bluetooth applications (like Zwift, Strava, Wahoo Fitness).
Video: An official product video demonstrating the features and usage of the GEOID HS500 Heart Rate Monitor. This video provides a visual guide to setting up and operating the device, showcasing its design and connectivity options.
4. Maintenance
4.1 Cleaning
To ensure the longevity and hygiene of your HS500 Heart Rate Monitor:
- After each use, detach the sensor unit from the chest strap.
- Rinse the chest strap under running water and hang it to dry. Do not machine wash or tumble dry.
- Wipe the sensor unit with a soft, damp cloth. Do not use abrasive cleaners or solvents.
- Ensure both the sensor and strap are completely dry before storage.

Image: The GEOID HS500 Heart Rate Monitor being splashed with water, illustrating its IP67 waterproof and dustproof capabilities, which aids in easy cleaning and durability.
4.2 Storage
Store the heart rate monitor in a cool, dry place away from direct sunlight and extreme temperatures. If not using for an extended period, it is recommended to remove the battery to prevent leakage.
5. Troubleshooting
If you encounter issues with your GEOID HS500 Heart Rate Monitor, please refer to the following common problems and solutions:
| Problem | Possible Cause | Solution |
|---|---|---|
| No heart rate reading / Device not detected | Dry electrodes, loose strap, dead battery, incorrect pairing method. | Moisten electrodes, adjust strap for snug fit, replace battery, ensure pairing via app (not phone's Bluetooth settings). |
| Inaccurate heart rate readings | Poor contact, electrical interference, sensor displacement. | Re-moisten electrodes, reposition sensor, ensure no strong electromagnetic fields nearby. |
| LED light not flashing | Battery issue, sensor not worn correctly. | Check/replace battery, ensure sensor is snapped onto strap and worn on chest. |
| Difficulty connecting to app/device | App/device compatibility, Bluetooth interference, incorrect pairing. | Verify app/device compatibility, restart app/device, ensure no other Bluetooth devices are interfering, pair only through the app. |
If the problem persists after trying these solutions, please contact GEOID customer service for further assistance.
6. Specifications
| Attribute | Specification |
|---|---|
| Model | HS500 |
| Brand | GEOID |
| Material | Polyester (Strap) |
| Color | Black |
| Item Weight (Sensor) | 71 Grams (approx. 13g for sensor unit only) |
| Heart Rate Range | 30-240 RPM |
| Sensor Dimensions | 57.6 x 33 x 11 mm |
| Strap Length | 64-86 cm (±2cm) |
| Wireless Protocol | ANT+, Bluetooth |
| Battery Type | CR2032, 3V Lithium-Ion |
| Battery Life | Approx. 800 hours |
| Waterproof Rating | IP67 |
| Compatible Devices | Smartphones, Sports Watches, Bike Computers, Treadmills, Fitness APPs |
7. Warranty and Support
GEOID stands behind the quality of its products. The HS500 Heart Rate Monitor comes with a ONE-YEAR LIMITED WARRANTY from the date of purchase.
This warranty covers manufacturing defects and ensures the product functions as intended under normal use. It does not cover damage caused by misuse, accidents, unauthorized modifications, or normal wear and tear.
Customer Service:
For any questions, concerns, or warranty claims, please contact GEOID customer service. We offer 24/7 online customer support to assist you.
- Contact Method: Please reach out via Amazon message for prompt assistance.
We are committed to ensuring your satisfaction and will always strive to provide the best possible support.
Related documentsHS500


Ask a question about this manual
Ask about setup, troubleshooting, compatibility, parts, safety, or missing instructions. Manuals+ will review the question and use this page’s manual context to help answer it.