
Introduction
This manual provides comprehensive instructions for the RemotesReplaced compatible remote control, specifically designed as a replacement for the original MINIX NEO-U1 remote. It offers identical functionality to the original, ensuring seamless operation of your device.
1. Setup
1.1 Battery Installation
The RemotesReplaced remote control requires two (2) AAA batteries for operation. Follow these steps to install the batteries:
- Locate the battery compartment cover on the back of the remote control.
- Slide the cover downwards or press the latch to open the compartment.
- Insert two AAA batteries, ensuring the positive (+) and negative (-) terminals align correctly with the markings inside the compartment.
- Close the battery compartment cover securely until it clicks into place.
No configuration codes are required. Once batteries are installed, the remote is ready for immediate use.

Image 1.1: Rear view of the remote control, highlighting the battery compartment at the bottom.
2. Operating Instructions
This replacement remote control is designed to replicate all functions of the original MINIX NEO-U1 remote. Simply point the remote towards your MINIX NEO-U1 device and press the desired button.
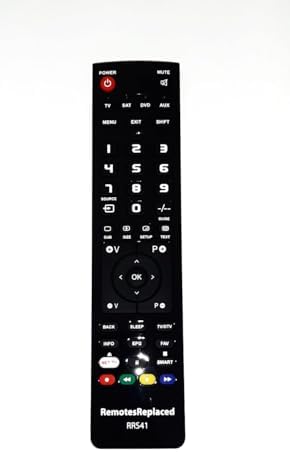
Image 2.1: Front view of the remote control, displaying all buttons and their layout.
2.1 Key Functions Overview
| Button | Function |
|---|---|
| POWER | Turns the device On/Off. |
| MUTE | Mutes or unmutes the audio. |
| TV / SAT / DVD / AUX | Input selection buttons for various devices. |
| MENU / EXIT / SHIFT | Navigation and function buttons. |
| Numeric Keypad (0-9) | Direct channel selection or data input. |
| SOURCE / GUIDE | Accesses input sources and program guide. |
| Volume (+/-) | Adjusts volume up or down. |
| Channel (P+/-) | Changes channels up or down. |
| Navigation Pad (Up, Down, Left, Right, OK) | Navigates menus and confirms selections. |
| BACK / INFO / EPG / FAV | Common function buttons for navigation and information. |
| NET TV / SMART | Quick access to network TV or smart features. |
| Color Buttons (Red, Green, Yellow, Blue) | Context-sensitive functions within menus or applications. |
3. Maintenance and Care
- Cleaning: Use a soft, dry cloth to clean the remote control. Do not use abrasive cleaners or solvents.
- Battery Replacement: Replace batteries when the remote's responsiveness decreases. Always replace both batteries at the same time with new ones.
- Storage: If the remote control will not be used for an extended period, remove the batteries to prevent leakage and damage. Store in a cool, dry place.
- Avoid Damage: Do not drop the remote control or expose it to extreme temperatures, humidity, or direct sunlight.
4. Troubleshooting
| Problem | Possible Cause | Solution |
|---|---|---|
| Remote not responding. | Dead or incorrectly inserted batteries. | Replace batteries with new ones, ensuring correct polarity (+/-). |
| Remote has limited range. | Weak batteries or obstruction between remote and device. | Replace batteries. Ensure a clear line of sight to the MINIX NEO-U1 device's IR receiver. |
| Specific buttons not working. | Dirt or debris under the button, or internal malfunction. | Clean the remote surface. If problem persists, contact customer support. |
| Device not turning on/off. | Remote is not compatible with the specific device model, or device is not powered. | Verify the remote is for MINIX NEO-U1. Ensure the MINIX NEO-U1 device is plugged in and powered on. |
5. Specifications
| Feature | Detail |
|---|---|
| Brand | RemotesReplaced |
| Model Number | NEO-U1 |
| Connectivity Technology | Infrared (IR) |
| Compatible Devices | MINIX NEO-U1 (Television/Media Player) |
| Maximum Range | 10 Meters |
| Batteries Required | 2 x AAA batteries |
| Item Weight | 120 Grams |
6. Warranty and Support
6.1 Warranty Information
This RemotesReplaced compatible remote control comes with a 1-year warranty from the date of purchase. This warranty covers manufacturing defects and ensures the remote functions as intended under normal use. Please retain your proof of purchase for warranty claims.
6.2 Customer Support
For any questions, troubleshooting assistance, or warranty claims, please contact RemotesReplaced customer support. With nearly 20 years of specialization in remote controls, our team is dedicated to providing comprehensive support.
Please visit the official RemotesReplaced website or refer to your purchase documentation for contact details.