1. Introduction
This manual provides essential information for the safe and effective use of your Yur1help replacement extractor blades. Please read these instructions carefully before installation and operation. Keep this manual for future reference.
2. Product Overview and Specifications

Image 1: Two Yur1help replacement extractor blades. Each blade features a cross-blade design within a grey base.
2.1 Key Features
- Material: Food-grade plastic and stainless steel blades. BPA-free.
- Blade Type: Cross-blade design for efficient blending and extraction.
- Seal: High-quality silicone gasket for a secure, leak-proof seal.
- Durability: Stainless steel blades designed not to require sharpening.
2.2 Dimensions

Image 2: Product dimensions. The blade assembly measures approximately 4 cm in height and 10 cm in diameter.
- Height: Approximately 4 cm
- Diameter: Approximately 10 cm
- Weight: Approximately 430 grams (for the package of two)
3. Compatibility
These replacement extractor blades are designed for specific Nutribullet blender models. Please verify your blender model before installation.
3.1 Compatible Models
- Nutribullet 600W Series: NB-101, NB-101B, NB-101S
- Nutribullet 900W Series: NB-201S
3.2 Non-Compatible Models
These blades are not compatible with the following Nutribullet or other blender models:
- Nutribullet Lean
- Nutribullet Combo
- Nutribullet RX
- Magic Bullet
- Ninja blenders
- Any other blender models not listed under compatible models.
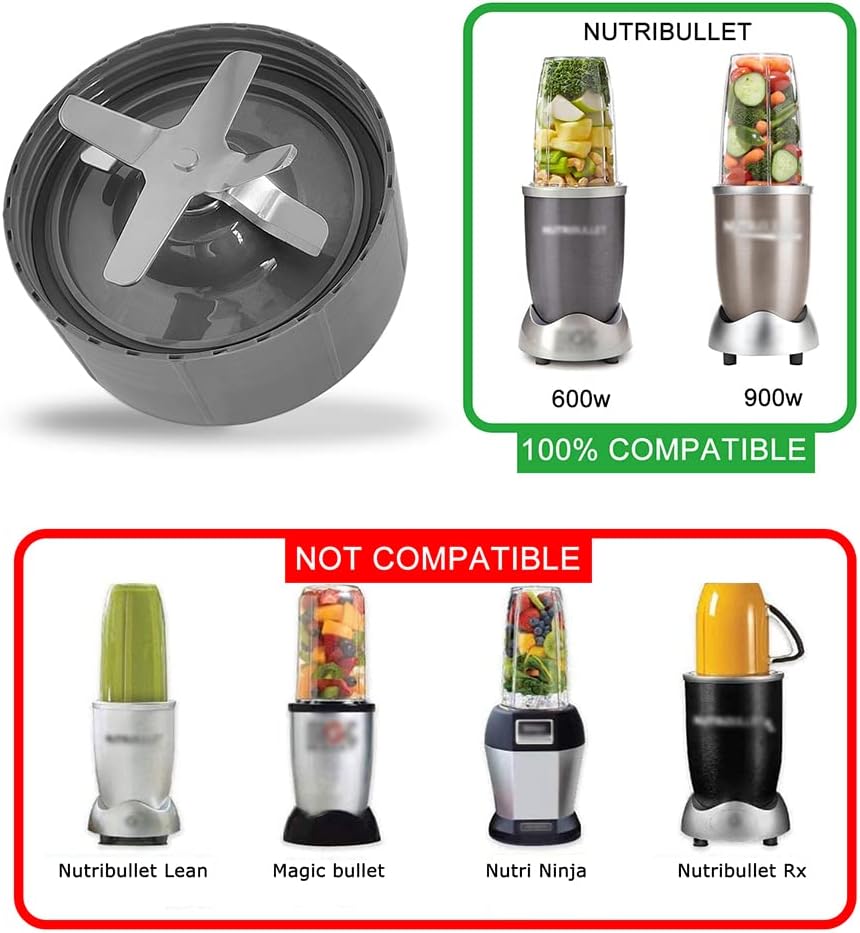
Image 3: Visual guide to compatible and non-compatible Nutribullet blender models.
4. Installation (Setup)
Follow these steps to replace your Nutribullet extractor blade:
- Unplug the Blender: Always ensure your Nutribullet base is unplugged from the power outlet before handling any parts.
- Remove Old Blade: Twist off the old blade assembly from your Nutribullet cup.
- Inspect Gasket: Before installing the new blade, check the rubber gasket (seal) on the bottom of the new blade. Ensure it is properly seated and securely inserted into the blade base to prevent leaks during operation.
- Attach New Blade: Place your ingredients into the Nutribullet cup. Align the new replacement blade assembly with the cup and twist it on securely until it is tightly sealed.
- Ready for Use: Place the assembled cup and blade onto the Nutribullet power base.

Image 4: Underside view of the blade, highlighting the rubber gear and the importance of checking the gasket.
5. Operating Instructions
Once the replacement blade is securely attached to the cup and placed on the power base, operate your Nutribullet blender as you normally would. These blades are designed for various blending tasks.
5.1 Recommended Uses
- Preparing refreshing smoothies and sorbets.
- Extracting juices from fruits and vegetables.
- Grating cheeses.
- Making jams.
- Chopping meats for various recipes.
- Creating nutritious meals and drinks.

Image 5: The replacement blade ready for use with a Nutribullet blender, illustrating its function in preparing beverages.
6. Maintenance and Cleaning
Proper cleaning ensures the longevity and hygiene of your replacement blades.
- Unplug: Always unplug the blender base before cleaning any components.
- Detach Blade: Twist the blade assembly off the Nutribullet cup.
- Rinse: Rinse the blade assembly under running water immediately after use to prevent food particles from drying on the blades and in crevices.
- Hand Wash: For thorough cleaning, hand wash the blade assembly with warm, soapy water. Use a brush if necessary to clean around the blades carefully.
- Dry: Ensure all parts are completely dry before storing or reassembling.

Image 6: Cleaning the replacement blade under running water. The design allows for easy rinsing.
Important Cleaning Notes:
- Do not immerse the entire blade assembly in water for extended periods, especially the base where the gear is located.
- Avoid using abrasive cleaners or scouring pads, as these can damage the blade or plastic components.
7. Safety Information
- Always unplug the blender before installing, removing, or cleaning the blade.
- The blades are sharp. Handle with extreme care to avoid injury.
- Ensure the blade assembly is securely tightened onto the cup before placing it on the power base to prevent leaks and potential hazards.
- Do not operate the blender with a damaged blade or gasket. Replace immediately if any damage is observed.
- Keep out of reach of children.
8. Troubleshooting
While these replacement blades are designed for reliable performance, here are some common issues and solutions:
| Problem | Possible Cause | Solution |
|---|---|---|
| Leaking during operation | Gasket not properly seated or damaged; blade not tightened sufficiently. | Ensure the rubber gasket is correctly inserted and the blade is securely twisted onto the cup. Inspect the gasket for damage and replace if necessary. |
| Blender not activating | Blade not fully engaged with the power base; blender base issue. | Ensure the cup with the blade is firmly pressed down and twisted onto the power base. If the issue persists, consult your Nutribullet blender's manual. |
| Unusual noise during blending | Loose blade assembly; worn gear on the blade or power base. | Tighten the blade assembly. Inspect the rubber gear on the bottom of the blade and the gear on the power base for wear. Replace the blade if the gear is damaged. |
9. Warranty and Support
For any questions or support regarding your Yur1help replacement blades, please contact the seller or manufacturer directly through your purchase platform. Please refer to your purchase details for specific warranty information.


