
1. Introduction
This manual provides comprehensive instructions for the installation, operation, and maintenance of your OAE 60A MPPT Solar Charge Controller. This device is designed to efficiently manage power flow from your solar panels to various battery types, including Lithium, Sealed, Gel, and Flooded batteries, ensuring optimal charging and system longevity.
2. Safety Information
Please read all safety instructions carefully before installation and operation. Failure to follow these instructions may result in electric shock, fire, or serious injury.
- Ensure all power sources are disconnected before installing or servicing the controller.
- Use appropriate personal protective equipment (PPE) such as insulated gloves and eye protection.
- Verify correct polarity for all connections (solar panel, battery, load) to prevent damage.
- Install the controller in a well-ventilated area, away from flammable materials and direct sunlight.
- Do not disassemble or attempt to repair the controller yourself. Refer to qualified personnel.
- Ensure proper grounding of the system.
3. Product Features
The OAE 60A MPPT Solar Charge Controller offers advanced features for efficient solar power management:
- Auto 12/24/36/48V Battery System: Automatically detects and adapts to your battery voltage.
- Versatile Battery Compatibility: Supports 4 charging options: Sealed, Gel, Flooded, and User-defined, compatible with lithium batteries.
- High Efficiency MPPT Technology: Creative maximum power point tracking technology significantly increases energy utilization rate (up to 97% transfer efficiency). Quickly scans the entire I-V curve to track the maximum power point within seconds.
- Informative LCD Display: Clear display of operating data and working conditions. Features real-time energy statistics, Chinese and English language options, and a multi-function LCD screen with operation menu. Displays daily power generation and current curves, and fault records for timely troubleshooting.
- Comprehensive Protection Functions: Built-in protections ensure system safety and longevity.
- RS485 Communication: Capable of Wi-Fi remote monitoring (additional purchase required) for real-time wireless monitoring via APP (Android & iOS compatible). Simple and convenient to set, with one-key factory settings restore.
4. Package Contents
Upon opening the package, verify that all items are present and undamaged:
- OAE 60A MPPT Solar Charge Controller (Blue)
- Mounting Bracket
- User Manual
- Temperature Sensor Cable
- Screws for mounting

Figure 1: OAE 60A MPPT Solar Charge Controller (Blue model).
5. Setup and Installation
Follow these steps for proper installation of your MPPT solar charge controller. For a visual guide, please refer to the installation video below.
Video 1: OAE 60A MPPT Solar Charge Controller Installation Guide. This video demonstrates the unboxing, physical setup, and wiring connections for the solar charge controller.
5.1 Physical Installation
- Unboxing and Inspection: Carefully remove the controller from its packaging. Inspect for any visible damage. The package typically includes the controller, mounting bracket, and user manual.

Figure 2: The OAE MPPT Solar Charge Controller as packaged in its box.
- Mounting the Controller: Loosen the four screws on the bottom of the MPPT controller to detach the mounting bracket. Secure the bracket to a stable, vertical surface in a well-ventilated area, then reattach the controller to the bracket using the screws.

Figure 3: Side view of the controller showing dimensions and mounting points.
5.2 Wiring Connections
Before making any connections, ensure all power sources are OFF. Connect the wires in the following order:
- Battery Connection: Connect the battery wires to the "BATTERY" terminals on the controller. Ensure correct polarity (positive to positive, negative to negative). Loosen the terminal screws, insert the wires, and tighten securely.

Figure 4: Connection diagram illustrating solar panel, battery, and DC load connections.
- Solar Panel Connection: Connect the solar panel wires to the "SOLAR PANEL" terminals. Observe correct polarity. The controller supports a maximum PV input of 150V.

Figure 5: Close-up of the controller's terminal block, showing connections for solar panel, battery, and DC load.
- DC Load Connection (Optional): If using a DC load directly from the controller, connect the load wires to the "DC LOAD" terminals, ensuring correct polarity.
- Temperature Sensor Connection: Connect the temperature sensor cable to the designated "TEMPERATURE INTERFACE" port. This ensures accurate battery temperature compensation for optimal charging.
6. Operating Instructions
Once all connections are secure, the controller will boot up automatically. The LCD display provides real-time system information and allows for configuration.
6.1 LCD Display Overview
The multi-function LCD screen displays various parameters and allows access to settings. Use the MENU, DOWN, UP, and ENTER buttons to navigate and adjust settings.
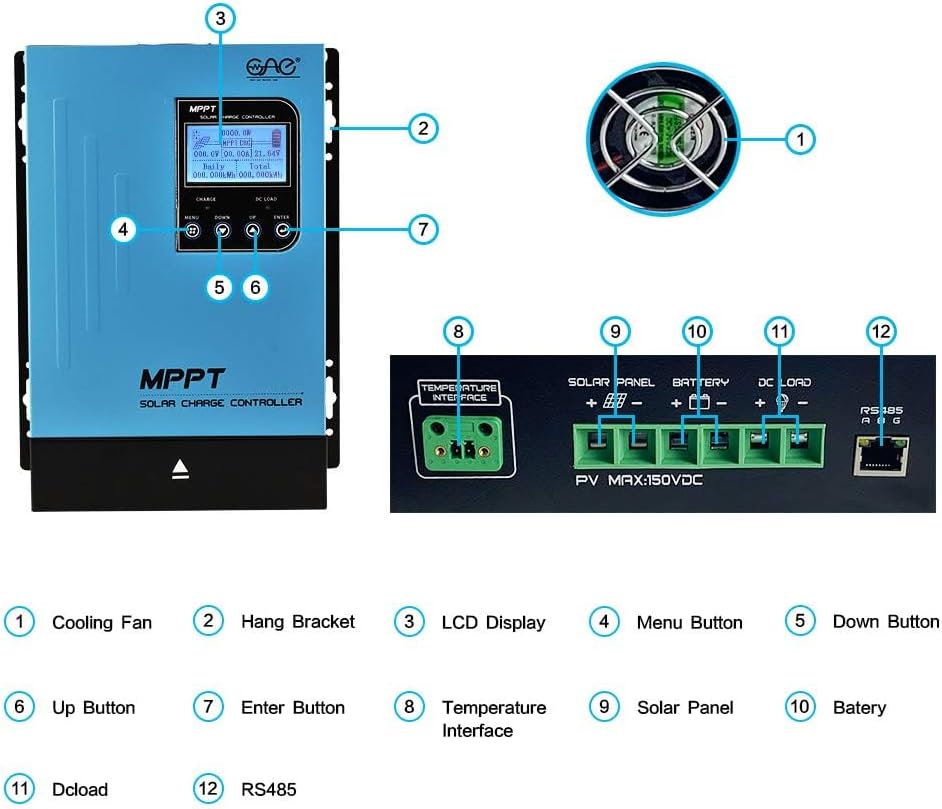
Figure 6: Detailed description of the main interface and display parameters.
6.2 Basic Operation
- Power On: After connecting the battery, the controller will automatically power on. The display will show "Boot up, please wait..."
- Monitoring: The main interface displays PV module voltage, daily power generation, charging power, charging current, battery capacity indication, battery voltage, total power generation, date, time, charging state (MPPT tracking, floating charge, stop charge), external temperature, and internal temperature.
- Navigating Menus: Use the "MENU" button to cycle through different display screens and settings options. Use "UP" and "DOWN" to change values or navigate within a menu. Press "ENTER" to confirm selections.
- DC Load Control: The DC load output can be configured for automatic operation (e.g., time control) or manual ON/OFF. This is accessed via the "DC Output Setting" menu.
7. Maintenance
Regular maintenance ensures the longevity and optimal performance of your solar charge controller:
- Cleanliness: Keep the controller clean and free from dust and debris. Use a dry cloth for cleaning.
- Ventilation: Ensure the cooling fan and ventilation holes are not obstructed. Periodically check for dust buildup in the fan.


Figure 7: Cooling fan and ventilation holes for proper airflow.
- Connections: Periodically check all wiring connections for tightness and corrosion. Loose connections can lead to overheating and poor performance.
- Battery Health: Monitor battery voltage and health regularly. Ensure the battery type setting on the controller matches your battery.
8. Troubleshooting
This section addresses common issues you might encounter with your solar charge controller.
| Problem | Possible Cause | Solution |
|---|---|---|
| Controller not powering on. | No battery connected or battery voltage too low. | Ensure battery is connected with correct polarity and has sufficient voltage (above minimum operating voltage). |
| No charging current from solar panels. | Solar panels not connected, insufficient sunlight, or incorrect panel voltage. | Check solar panel connections and polarity. Ensure adequate sunlight. Verify panel voltage is within controller's input range. |
| DC load not working. | Load output disabled, overloaded, or incorrect wiring. | Check DC output settings on the LCD. Reduce load if overloaded. Verify load wiring and polarity. |
| Unusual noise from controller (e.g., fan). | Normal operation (fan activates under load) or obstructed fan. | Ensure proper ventilation. Clean fan if obstructed. If noise is excessive or unusual, contact support. |
9. Specifications
Key technical specifications for the OAE 60A MPPT Solar Charge Controller:
- Model Number: MP-60A
- Brand: OAE
- Current Rating: 60A
- Battery System Voltage: Auto 12V/24V/36V/48V
- Max PV Input Voltage: 150V
- Display Type: LED
- Material: Metal
- Product Dimensions: 7.9 x 3.5 x 12.4 inches
- Item Weight: 7.96 pounds (3.62 Kilograms)
- Compatible Battery Types: Sealed, Gel, Flooded, Lithium, and User-defined
10. Warranty and Support
For warranty information, technical support, or to purchase additional accessories, please visit the official OAE store or contact their customer service.
Protection plans are available for extended coverage:
- 3-Year Protection Plan
- 4-Year Protection Plan
- Complete Protect (monthly plan covering eligible purchases)
For more details, visit the OAE Store on Amazon.
