
1. Introduction
This manual provides detailed instructions for the installation, operation, and maintenance of your MACHINIST H61 LGA 1155 Micro ATX Motherboard (Model H61M-S1). Please read this manual thoroughly before proceeding with installation to ensure proper setup and functionality.

Image 1.1: The MACHINIST H61 LGA 1155 Motherboard and its retail packaging.
2. Product Overview
The MACHINIST H61 LGA 1155 Motherboard is designed to support Intel 2nd and 3rd generation processors, offering essential features for a reliable computing experience.
2.1 Key Features
- Intel LGA 1155 Socket: Supports Intel Core i3/i5/i7 2nd or 3rd generation processors, as well as Xeon E3 v2, Pentium, and Celeron series processors.
- Enhanced Power Supply: Features a 3+1 phase power supply design with a 24+4pin DC power supply slot and 4-layer PCB material for stable power delivery.
- DDR3 Memory Support: Dual-channel non-ECC memory slots support up to 2x8GB DDR3 memory at 1066/1333/1600MHz frequencies.
- High-Definition Video Output: Compatible with HDMI and VGA interfaces, supporting 4K and 1080P integrated display. Includes a PCIe 2.0 X16 slot for dedicated graphics cards.
- Multiple Expansion Interfaces: Includes 1x PCIe 2.0 X16 slot, 1x PCIe X1 slot, 4x SATA 2.0 interfaces, 7x USB 2.0 interfaces (6 rear, 1 front), and 1x USB 3.0 interface (front).
- Integrated Networking and Audio: Onboard 100M LAN network interface and 5.1-channel audio interface.

Image 2.1: Overview of key features on the H61-S1 motherboard, highlighting USB 3.0, 100M LAN, heat sink, and solid capacitors.
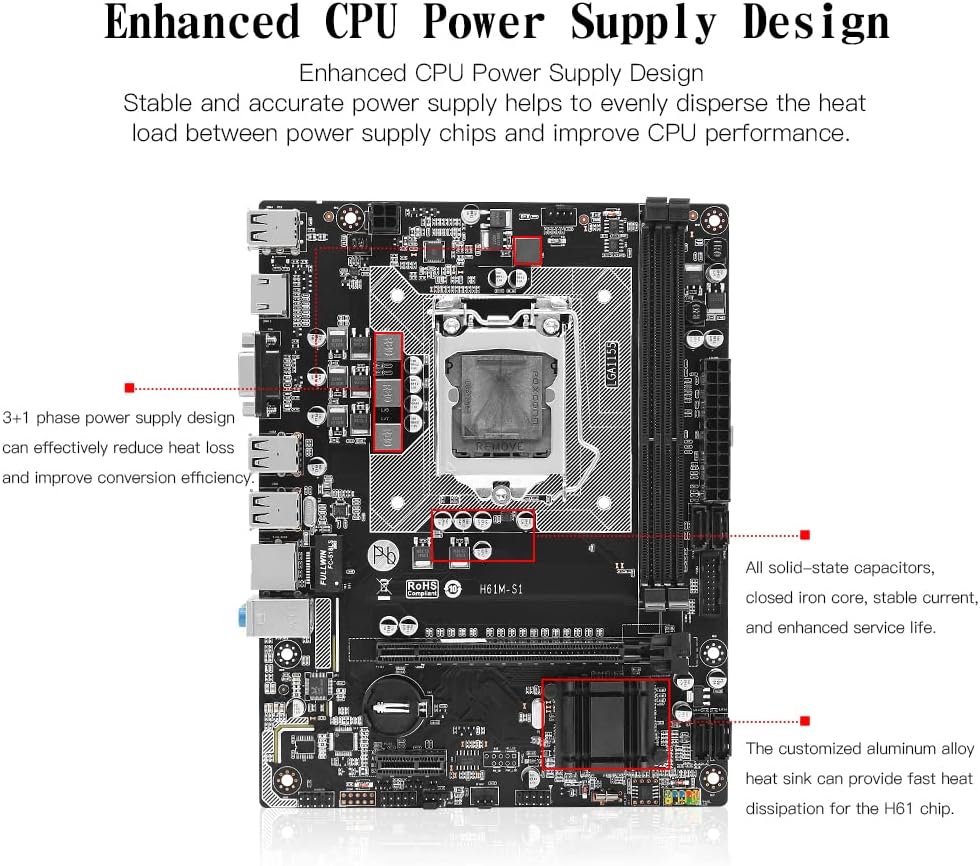
Image 2.2: Enhanced CPU power supply design with 3+1 phases and solid-state capacitors for stable power delivery.
3. Setup and Installation
Follow these steps carefully to install your motherboard and its components.
3.1 CPU Installation
Ensure the CPU socket lever is open before placing the CPU. Align the CPU correctly with the socket's notches.

Image 3.1: The LGA 1155 CPU socket, designed for Intel 2nd/3rd Gen processors.
- Press the wire buckle by hand and lift it up. Do not remove the black cover before installing the CPU.
- The motherboard base has three bayonets, and the CPU itself has three bayonets. Align them one by one, then gently place the CPU into the socket.
- Lower the wire buckle that was lifted up. The black cover will pop up automatically. Remember not to remove the black cover before installing the CPU.
- Do not open the CPU top cover. Do not touch the CPU pins to contact the core. Do not touch the motherboard interface pins.

Image 3.2: Step-by-step guide for CPU installation.
3.2 Memory Installation
The motherboard features dual-channel DDR3 memory slots. Install memory modules by aligning them with the slots and pressing down until the clips lock into place.

Image 3.3: DDR3 non-ECC memory slots, supporting up to 2x8GB.
3.3 Connecting Peripherals and Power
Connect power supply cables, storage devices, and other peripherals to the appropriate ports on the motherboard.

Image 3.4: Motherboard layout with labeled ports and connectors.
- Power Connectors: Connect the 24-pin ATX power connector and the 4-pin CPU power connector from your power supply unit.
- SATA Ports: Connect SATA 2.0 devices (HDDs, SSDs) to the available SATA ports.
- Expansion Slots: Install graphics cards in the PCIe 2.0 X16 slot and other expansion cards in the PCIe X1 slot.
- Front Panel Connectors: Connect your case's front panel USB, audio, power, and reset headers according to the motherboard manual.
- Rear I/O Ports: Connect USB devices, display cables (HDMI/VGA), Ethernet cable, and audio devices to the rear panel ports.

Image 3.5: Rear I/O panel with various connectivity options.
4. Operating Instructions
After successful hardware installation, proceed with operating system and driver installation.
4.1 Driver Installation
For optimal performance, install the necessary drivers for your motherboard components. It is recommended to use Windows 10, which often automatically installs most required drivers. If manual driver installation is needed, drivers can typically be found on the manufacturer's website or included on a driver disc (if provided).
4.2 Integrated Graphics Support
The motherboard supports integrated graphics via HDMI and VGA interfaces. Note that some Intel Xeon E3 V1 and V2 series CPUs, particularly those without a "5" suffix or with an "F" suffix (e.g., E3-1230, i7-xxxxF), do not have integrated graphics and require a dedicated graphics card.

Image 4.1: HDMI and VGA ports for high-definition video output.
5. Maintenance
To ensure the longevity and stable operation of your motherboard, consider the following maintenance tips:
- Keep the computer case clean and free of dust. Dust accumulation can lead to overheating and component failure.
- Ensure adequate airflow within the computer case by properly managing cables and using appropriate cooling solutions.
- Regularly check for and install updated drivers and BIOS versions from the manufacturer's website to improve stability and performance.
- Avoid exposing the motherboard to extreme temperatures or humidity.
6. Troubleshooting
This section provides general guidance for common issues. For specific problems, consult the manufacturer's support resources.
6.1 No Display Output
- Verify that the monitor is correctly connected to the motherboard's video output (HDMI/VGA) or to a dedicated graphics card.
- Ensure that your CPU has integrated graphics if you are not using a dedicated graphics card. Some Xeon E3 and Core iX-F series CPUs lack integrated graphics.
- Check that all power cables (24-pin ATX, 4-pin CPU, graphics card PCIe power) are securely connected.
- Reseat the RAM modules and graphics card (if installed).
6.2 USB Ports Not Functioning
- Ensure that the USB devices are properly connected to the ports.
- Check if the USB drivers are correctly installed. Windows 10 typically handles this automatically, but manual installation might be required in some cases.
- Test the USB devices on another computer to rule out device failure.
- Try connecting devices to different USB ports (both rear I/O and front panel).
6.3 System Instability or Random Restarts
- Ensure all components (CPU, RAM, graphics card) are properly seated.
- Check CPU and case temperatures to prevent overheating.
- Verify that your power supply unit (PSU) provides sufficient and stable power for all components.
- Run memory diagnostic tools to check for RAM errors.
7. Specifications
| Feature | Specification |
|---|---|
| Brand | MACHINIST |
| Model Number | H61M-S1 |
| CPU Socket | LGA 1155 |
| Compatible Processors | Intel Core i3/i5/i7 (2nd/3rd Gen), Xeon E3 V2, Pentium, Celeron |
| Chipset Type | H61 |
| RAM Memory Technology | DDR3 (Non-ECC) |
| Memory Slots | 2 (Dual-channel) |
| Max Memory Capacity | 16 GB (2x8GB) |
| Supported Memory Frequencies | 1066/1333/1600MHz |
| PCIe 2.0 X16 Slot | 1 |
| PCIe X1 Slot | 1 |
| SATA 2.0 Interfaces | 4 |
| USB 2.0 Interfaces | 7 (6 rear, 1 front header) |
| USB 3.0 Interfaces | 1 (front header) |
| Video Output | HDMI, VGA (supports 4K/1080P with compatible CPU) |
| LAN | 100M Ethernet |
| Audio | 5.1 Channel |
| Form Factor | Micro ATX |
| Product Dimensions | 8.66 x 6.69 x 1.5 inches |
| Item Weight | 1.39 pounds |
8. Package Contents
The following items are included in the product package:
- 1x MACHINIST H61 Motherboard (Model H61M-S1)
- 1x SATA Cable
- 1x I/O Baffle
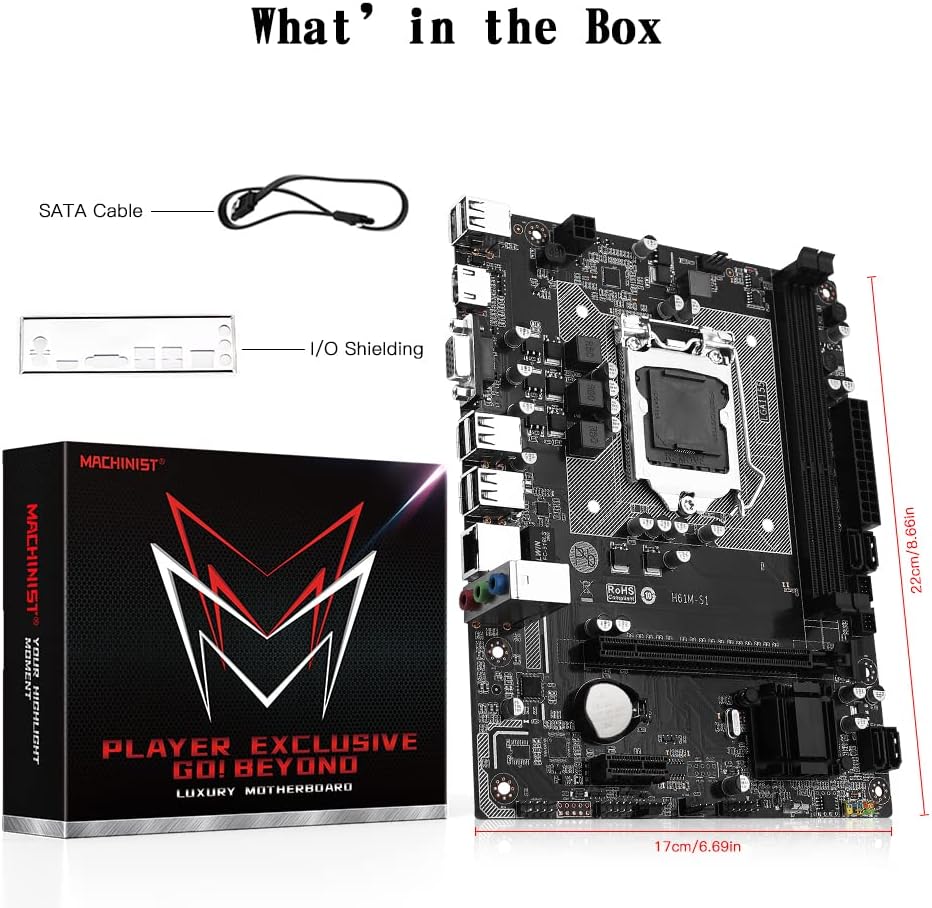
Image 8.1: Included accessories: SATA cable and I/O shielding.
9. Warranty and Support
For warranty information and technical support, please refer to the official MACHINIST website or contact your retailer. Keep your purchase receipt for warranty claims.


