Introduction
This manual provides detailed instructions for the installation, operation, and maintenance of your GeeekPi UPS HAT for Raspberry Pi Pico/Pico W. This portable power supply is designed to provide uninterruptible power to your Raspberry Pi Pico or Pico W, utilizing an 18650 lithium battery for extended operation and integrated power management capabilities.
Package Contents
- 1 x GeeekPi UPS HAT for Raspberry Pi Pico / Pico W
- 1 x Instruction Manual (this document)
- Note: Raspberry Pi Pico and 18650 Lithium Battery are NOT included.
Product Features
- Designed specifically for Raspberry Pi Pico/Pico W.
- Supports 18650 lithium battery (not included).
- Integrated battery charger and power management.
- 4 LED indicators for displaying remaining battery power.
- Charging status indicator (CHG) and standby indicator (STBY).
- All GPIO pins are led out with clear silkscreen labels for easy experimentation.
- Ability to read battery voltage and current via serial port pins (USB-to-TTL cable required).
Setup Instructions
1. Battery Installation
The GeeekPi UPS HAT requires a single 18650 lithium battery. Ensure the battery is inserted with the correct polarity as indicated on the battery holder.

Image: Correct polarity for 18650 battery installation. The positive (+) end of the battery should align with the positive terminal in the holder, and the negative (-) end with the negative terminal.
- Locate the 18650 battery holder on the underside of the UPS HAT.
- Insert a flat-top 18650 lithium battery, observing the positive (+) and negative (-) markings. Incorrect insertion can damage the device.
- Note: Button-top 18650 batteries may fit tightly or not at all. Flat-top batteries are recommended.
2. Connecting to Raspberry Pi Pico/Pico W
Align the pins of the Raspberry Pi Pico/Pico W with the corresponding female headers on the UPS HAT. Gently press the Pico onto the HAT until it is securely seated.

Image: Raspberry Pi Pico mounted on the UPS HAT, indicating the power switch and MicroUSB charging port.
- Ensure the Raspberry Pi Pico is powered off before connecting.
- Carefully align the 20-pin headers of the Pico with the female headers on the UPS HAT.
- Press down firmly but gently to ensure a secure connection.
- The UPS HAT is designed for a plug-and-play experience.
Operating Instructions
Powering On/Off
Use the integrated power switch to turn the UPS HAT and connected Pico on or off.
Charging the Battery
Connect a standard MicroUSB cable to the "USB_IN" port on the UPS HAT to charge the 18650 battery. The charging process is indicated by LEDs.

Image: Top view of the UPS HAT, highlighting the USB_IN port for charging and the battery status LEDs.
- Connect a 5V MicroUSB power source to the USB_IN port on the UPS HAT.
- The CHG (Charging) indicator LED will illuminate during charging.
- The 4 LED indicators (25%, 50%, 75%, 100%) will show the approximate charge level. The current level's LED will flash during charging.
- Once the battery is fully charged, the CHG indicator will turn off, and the STBY (Standby) indicator will light up.
- The system will automatically stop charging when the battery is full to prevent overcharging.
Monitoring Battery Status
The 4 LED indicators provide a visual representation of the remaining battery power:
- 25%: One LED illuminated.
- 50%: Two LEDs illuminated.
- 75%: Three LEDs illuminated.
- 100%: Four LEDs illuminated.
For more precise battery voltage and current information, connect a USB-to-TTL cable to the serial port pins (RXD, TXD, GND) on the UPS HAT and use appropriate software on your computer.
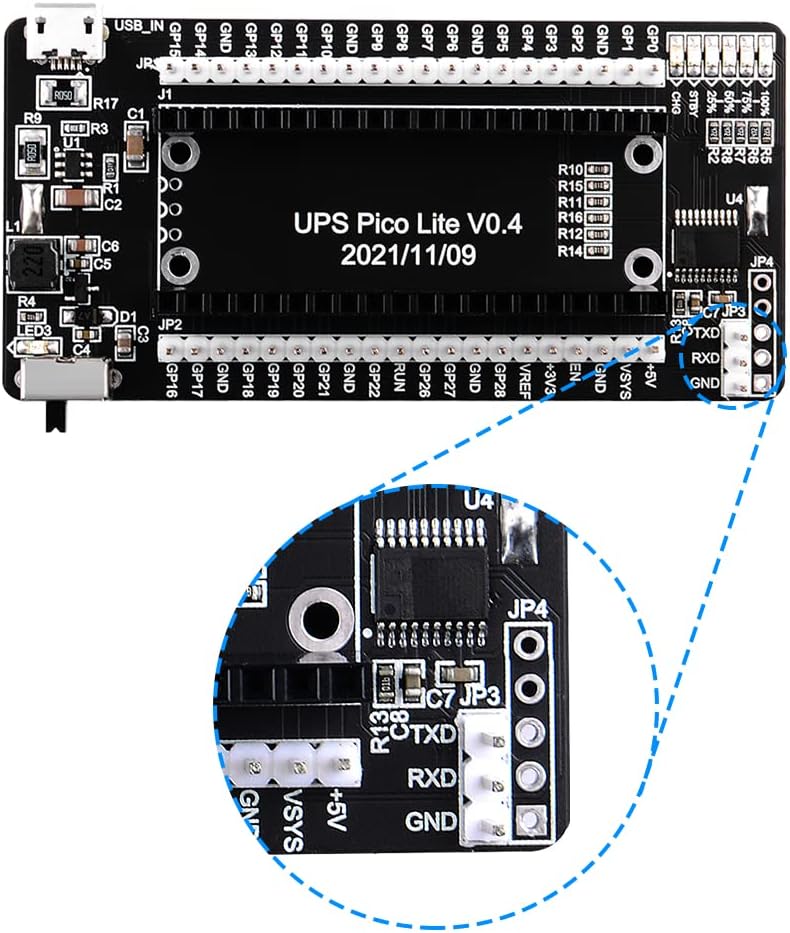
Image: Detailed view of the serial port pins (RXD, TXD, GND) for connecting a USB-to-TTL adapter to monitor battery data.
Maintenance
- Battery Care: Use only high-quality 18650 lithium batteries. Avoid fully discharging the battery frequently to prolong its lifespan.
- Cleaning: Keep the board clean and free from dust and debris. Use a soft, dry brush or compressed air for cleaning.
- Storage: If storing the UPS HAT for an extended period, remove the 18650 battery and store it separately in a cool, dry place.
- Handling: Handle the board by its edges to avoid touching components, especially when powered.
Troubleshooting
- Device Not Powering On:
- Ensure the 18650 battery is correctly inserted with the right polarity.
- Check if the battery is charged. Connect the MicroUSB charger and observe the CHG LED.
- Verify the Raspberry Pi Pico is securely connected to the UPS HAT.
- Ensure the power switch on the UPS HAT is in the "ON" position.
- Battery Not Charging:
- Confirm the MicroUSB cable and power adapter are functional.
- Check if the CHG LED illuminates when connected to power. If not, the battery might be fully charged (STBY LED should be on) or there's an issue with the power source/cable.
- Ensure the 18650 battery is not deeply discharged or damaged.
- "Puff of Smoke" / Board Damage:
- CRITICAL WARNING: Do NOT plug a USB cable directly into the Raspberry Pi Pico's USB port while it is connected to the UPS HAT, especially if the UPS battery is low. This can cause severe damage to the UPS HAT due to back-powering. Always disconnect the Pico from the UPS HAT before connecting the Pico directly to a computer via USB for programming or debugging.
- Inaccurate Battery Readings:
- The 4 LED indicators provide approximate charge levels. For precise readings, use the serial port interface with a USB-to-TTL adapter and appropriate software.
- MicroPython Code Issues:
- Refer to the official GeeekPi documentation or community forums for the latest and most compatible MicroPython code examples for battery monitoring.
Specifications
| Model Name | GeeekPi UPS HAT |
| Compatibility | Raspberry Pi Pico / Pico W |
| Battery Type Supported | 18650 Lithium Battery (flat-top recommended) |
| Charging Port | MicroUSB (5V input) |
| Battery Indicators | 4 LEDs (25%, 50%, 75%, 100%), CHG, STBY |
| Dimensions | Approximately 79mm x 39mm (3.11 x 1.53 inches) |
| Weight | Approximately 1.76 ounces (50 grams) |
| Connectivity | GPIO, I2C, SPI, UART (via Pico) |

Image: Dimensional drawing of the UPS HAT, showing its length (79mm / 3.11 inches) and width (39mm / 1.53 inches).
Warranty and Support
For warranty information and technical support, please refer to the official GeeekPi website or contact their customer service directly. Keep your purchase receipt for warranty claims.
Official GeeekPi Store: GeeekPi Amazon Store


