1. Product Overview
This manual provides instructions for the installation, operation, and maintenance of your KarParts360 Passenger Side Power Door Mirror. This mirror is designed as a direct replacement for the original equipment on Toyota RAV4 models manufactured between 2016 and 2018.
Key Features:
- Position: Passenger Side (Right)
- Functionality: Power Adjustable
- Heating: Non-Heated
- Finish: Textured Black
- Lens Curvature: Convex
- Compliance: DOT & SAE Compliant
- OEM Part Number: 87910-0R200
- Partslink Number: TO1321345
Product Image:
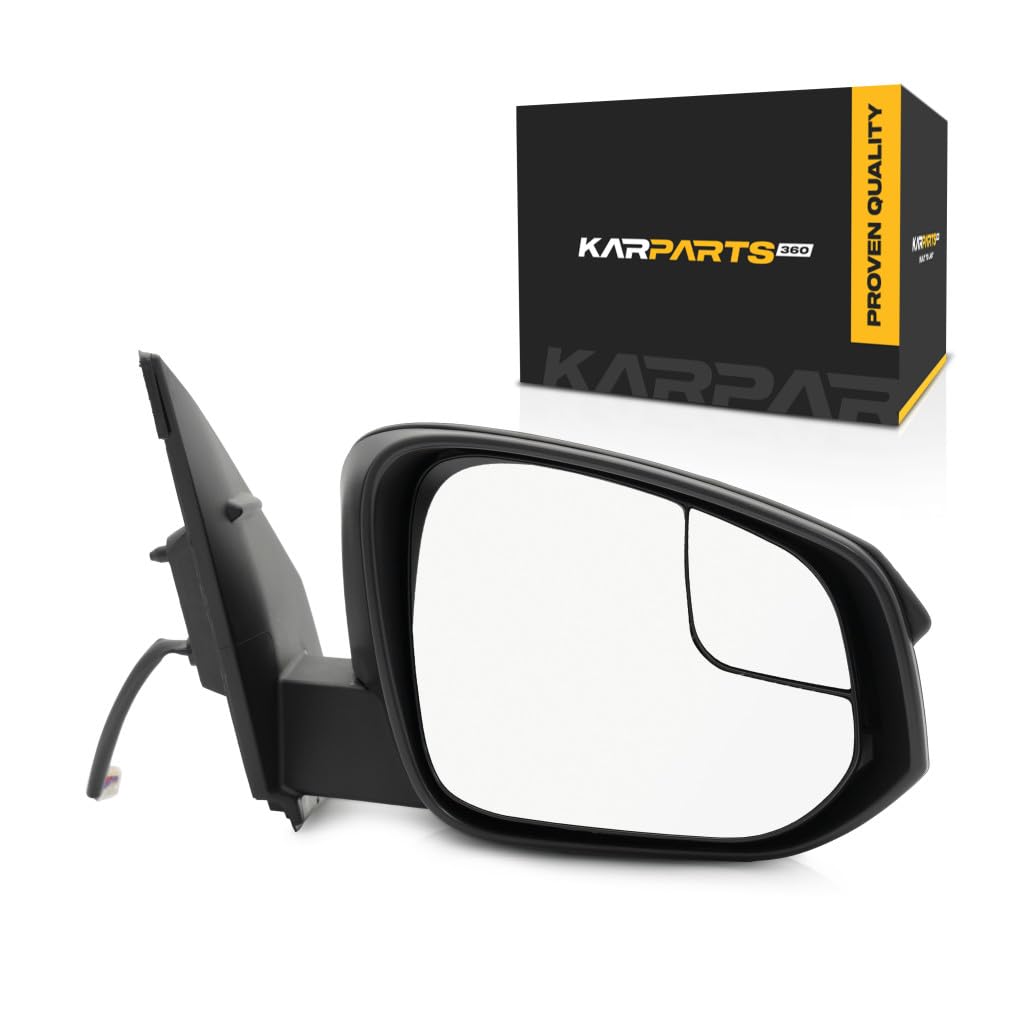
Figure 1: KarParts360 Passenger Side Power Door Mirror. This image shows the complete mirror assembly from a front-side angle, highlighting its textured black finish and overall design.
2. Safety Information
Always prioritize safety during installation and operation. Failure to follow safety guidelines may result in injury or damage to your vehicle.
- Ensure the vehicle is turned off and the ignition key is removed before beginning any installation.
- Disconnect the vehicle's battery to prevent electrical shorts or accidental activation of components.
- Wear appropriate personal protective equipment, including safety glasses and gloves.
- If you are unsure about any step of the installation process, consult a qualified automotive technician.
- Keep all tools and small parts away from children.
3. Package Contents
Verify that all components are present and undamaged before proceeding with installation.
- 1 x KarParts360 Passenger Side Power Door Mirror Assembly
- Necessary Accessories (e.g., wiring harness, mounting hardware if applicable)
4. Setup and Installation
This section outlines the general steps for replacing your vehicle's passenger side door mirror. Specific procedures may vary slightly depending on your vehicle's exact trim level. It is recommended to consult your vehicle's service manual or a reputable online resource for detailed, vehicle-specific instructions.
- Prepare the Vehicle: Park the vehicle on a level surface, engage the parking brake, and turn off the engine. Disconnect the negative terminal of the vehicle's battery.
- Remove Interior Door Panel: Carefully remove the interior door panel to access the mirror mounting bolts and electrical connector. This typically involves removing screws, clips, and disconnecting electrical connectors for window switches and other components.
- Disconnect Old Mirror: Locate the electrical connector for the old mirror and carefully disconnect it. Then, unbolt the old mirror from the door frame.
- Install New Mirror: Position the new KarParts360 mirror assembly onto the door frame, aligning the mounting holes. Secure it with the appropriate bolts.
- Connect Electrical Harness: Connect the electrical harness of the new mirror to the vehicle's wiring. Ensure a secure connection.

Figure 2: Electrical Connector. This image provides a close-up view of the multi-pin electrical connector on the mirror's wiring harness, which connects to the vehicle's electrical system.

Figure 3: Rear View with Wiring. This image shows the back of the mirror assembly, illustrating the mounting points and the integrated wiring harness extending from the base.
- Test Functionality: Before reassembling the door panel, reconnect the vehicle's battery. Turn on the ignition and test the power adjustment function of the new mirror to ensure it operates correctly.
- Reassemble Door Panel: Once functionality is confirmed, carefully reattach the interior door panel, ensuring all clips and screws are secured and electrical connectors are properly reconnected.
Installation Video:
Video 1: KarParts360 Toyota RAV4 2016-2018 Door Mirror Passenger Side. This video provides a visual overview of the KarParts360 passenger side door mirror, highlighting its compatibility and key features for Toyota RAV4 models from 2016 to 2018.
5. Operating Instructions
The KarParts360 Passenger Side Power Door Mirror operates identically to your vehicle's original mirror.
- Power Adjustment: Use the vehicle's interior mirror control switch to adjust the mirror glass position. Refer to your vehicle's owner's manual for the exact location and operation of this switch.
- Manual Folding: This mirror is designed to be manually folded against the vehicle body if necessary (e.g., for tight parking spaces). Gently push the mirror housing towards the vehicle until it folds. To return it to the driving position, gently pull it back until it clicks into place.
6. Maintenance
Proper maintenance ensures the longevity and optimal performance of your door mirror.
- Cleaning: Clean the mirror glass regularly with a soft cloth and standard automotive glass cleaner. Avoid abrasive cleaners or materials that could scratch the glass or housing.
- Inspection: Periodically inspect the mirror housing for any cracks or damage. Check the electrical connection for corrosion or loose wires.
- Lubrication: The internal mechanisms are generally maintenance-free. Avoid applying lubricants unless specifically instructed by a professional, as this could attract dirt.
7. Troubleshooting
If you encounter issues with your door mirror, try the following troubleshooting steps:
| Problem | Possible Cause | Solution |
|---|---|---|
| Mirror glass does not adjust. | Loose electrical connection, blown fuse, faulty control switch, motor failure. | Check electrical connection. Inspect vehicle's fuse box for a blown fuse related to mirrors. Test the control switch. If these do not resolve the issue, professional diagnosis may be required. |
| Mirror is loose or vibrates. | Loose mounting bolts, damaged internal components. | Check and tighten mounting bolts. If the issue persists, the mirror may be damaged and require replacement. |
| Unusual noise during adjustment. | Debris in mechanism, motor issue. | Inspect for visible obstructions. If none, the motor may be failing. |
For issues not listed or if troubleshooting steps do not resolve the problem, contact KarParts360 customer support or a certified mechanic.
8. Specifications
| Attribute | Detail |
|---|---|
| Brand | KarParts360 |
| Model Number | CLX-M0-3121-0461-4200-CL360A50 |
| OEM Part Number | 87910-0R200 |
| Partslink Number | TO1321345 |
| Auto Part Position | Right (Passenger Side) |
| Mirror Adjustment | Power |
| Heated | No |
| Finish | Textured Black (Unfinished Exterior) |
| Material | Glass (for mirror surface) |
| Lens Curvature | Convex |
| Mounting Type | Door Mount |
| Special Feature | Lighted (as per specifications, though not explicitly mentioned in features) |
| Safety Rating | DOT Certified |
| Product Dimensions (L x W x H) | 16.69 x 6.65 x 11.61 inches |
| Item Weight | 4.11 pounds |
| Vehicle Service Type | Car |
| Fit Type | Vehicle Specific Fit |
9. Warranty Information
KarParts360 products are backed by a manufacturer's warranty. For specific details regarding the warranty period, coverage, and claims process, please refer to the warranty documentation included with your purchase or visit the official KarParts360 website. Keep your proof of purchase for warranty claims.
10. Support Information
If you have any questions, require technical assistance, or need to report an issue with your KarParts360 product, please contact our customer support team.
- Online Support: Visit the KarParts360 Store on Amazon for FAQs and product information.
- Contact Manufacturer: Refer to the packaging or the KarParts360 website for direct contact methods such as phone numbers or email addresses.


