1. Product Overview
The Wittime 2079 is a wireless indoor/outdoor thermometer and humidity monitor designed to provide accurate environmental data. It features a 5-inch full-color LCD screen for clear display of indoor and outdoor temperature and humidity, trend arrows, daily high/low readings, time, and calendar. The system includes a main display unit and one WT-2022A remote sensor.

Figure 1: Wittime 2079 Main Display Unit. This image shows the front view of the main display unit, featuring a large, colorful LCD screen that displays various environmental data and time.
2. Package Contents
- 1 x Wittime 2079 Main Display Unit
- 1 x WT-2022A Wireless Outdoor Sensor
- 1 x 5.0V AC Power Adapter
- 3 x AAA Batteries (for main unit backup)
- 2 x AA Batteries (for outdoor sensor)
- 1 x Instruction Manual
3. Product Components
Familiarize yourself with the main display unit and the wireless outdoor sensor.

Figure 2: Wittime 2079 Display and Sensor with Callouts. This image highlights key features of the main unit and the outdoor sensor, including outdoor temperature, low voltage icon, weather forecast, time/alarm clock, touch controls, indoor temperature and humidity, and the sensor's LED indicator.
Main Display Unit Features:
- Full-Color LCD Screen: Displays indoor/outdoor temperature and humidity, time, date, and weather forecast icons.
- Control Buttons: MODE, UP (▲), DOWN (▼), CHANNEL buttons for settings and adjustments.
- Power Options: Primarily powered by a 5.0V AC adapter for full functionality and constant backlight. Battery backup (3 x AAA) maintains settings during power outages.
Wireless Outdoor Sensor (WT-2022A) Features:
- Temperature and Humidity Sensing: Measures outdoor temperature and humidity.
- Transmission Range: Up to 328 feet (100 meters) in an open area.
- Power Source: 2 x AA batteries.
- IP44 Water-Resistant: Designed for outdoor use, protected against splashing water.
4. Setup Instructions
Follow these steps for initial setup to ensure proper operation.
- Install Batteries in Outdoor Sensor: Open the battery compartment on the WT-2022A outdoor sensor. Insert 2 x AA batteries, observing the correct polarity (+/-). Close the compartment securely.
- Install Batteries in Main Display Unit: Open the battery compartment on the back of the main unit. Insert 3 x AAA batteries, observing the correct polarity (+/-). These batteries serve as a backup.
- Connect AC Power Adapter: Plug the 5.0V AC power adapter into the main display unit and then into a standard electrical outlet. The display will light up and begin searching for the outdoor sensor.
- Sensor Pairing: The main unit will automatically attempt to connect with the outdoor sensor. This process may take a few minutes. Once connected, the outdoor temperature and humidity will appear on the display. If connection fails, press and hold the 'CHANNEL' button on the main unit for 3 seconds to initiate a manual search.
- Placement of Outdoor Sensor: Place the outdoor sensor in a shaded, dry location, protected from direct sunlight and precipitation, to ensure accurate readings. Ensure it is within the 328-foot transmission range of the main unit.

Figure 3: Wittime 2079 Power Options. This image illustrates that the main unit requires a 5.0V AC power adapter for full functionality, including constant backlight and adjustable settings, with 3 AAA alkaline batteries serving as backup power.
5. Operating Instructions
Display Information:
- Outdoor Temperature/Humidity: Located at the top of the display.
- Indoor Temperature/Humidity: Located in the middle of the display.
- Trend Arrows: Indicate rising, stable, or falling temperature/humidity.
- Weather Forecast: Icons predict upcoming weather conditions.
- Time/Date: Located at the bottom of the display.
Button Functions:
- MODE: Press to cycle through display modes (e.g., time, alarm settings). Hold to enter setting mode.
- UP (▲): Adjusts values upwards in setting mode.
- DOWN (▼): Adjusts values downwards in setting mode.
- CHANNEL: Cycles through multiple outdoor sensors (if more than one is connected). Hold to manually search for sensors.
Setting Time, Date, and Alarm:
- Press and hold the 'MODE' button for 3 seconds to enter time setting mode. The hour digit will flash.
- Use the 'UP' or 'DOWN' buttons to adjust the hour. Press 'MODE' to confirm and move to the next setting (minutes, year, month, day, 12/24-hour format, temperature unit °F/°C).
- Repeat step 2 for each setting. Press 'MODE' to exit setting mode.
- To set the alarm, press 'MODE' repeatedly until the alarm time is displayed. Hold 'MODE' to enter alarm setting mode and adjust using 'UP'/'DOWN' buttons.
Adding Additional Sensors:
The main unit supports up to three WT-2022A outdoor sensors. To add an additional sensor:
- Ensure the new sensor has batteries installed.
- On the main unit, press the 'CHANNEL' button to select an unused channel (e.g., CH2 or CH3).
- Hold the 'CHANNEL' button for 3 seconds to initiate a search for the new sensor.
- Once connected, the new sensor's data will display on the selected channel.
6. Maintenance
- Cleaning: Wipe the display unit and sensor with a soft, damp cloth. Do not use abrasive cleaners or solvents.
- Battery Replacement: Replace batteries in the outdoor sensor (2 x AA) and the main unit (3 x AAA backup) when the low battery indicator appears on the display. Ensure correct polarity.
- Sensor Placement: Periodically check the outdoor sensor's placement to ensure it remains protected from direct elements and maintains optimal signal strength.
7. Troubleshooting
| Problem | Possible Cause | Solution |
|---|---|---|
| No outdoor temperature/humidity reading. | Sensor not paired, out of range, or low batteries. | Ensure sensor batteries are fresh and correctly installed. Move sensor closer to the main unit. Hold 'CHANNEL' button on main unit to re-pair. |
| Inaccurate readings. | Sensor exposed to direct sunlight or heat sources. | Relocate the outdoor sensor to a shaded, well-ventilated area away from direct heat or cold sources. |
| Display is dim or off (when not plugged in). | Main unit batteries are low or depleted. | Replace the 3 x AAA backup batteries. For constant backlight and full functionality, ensure the AC adapter is connected. |
| Time/Date settings are lost. | Power outage and backup batteries are depleted. | Replace backup batteries and reset time/date as per operating instructions. |
8. Specifications
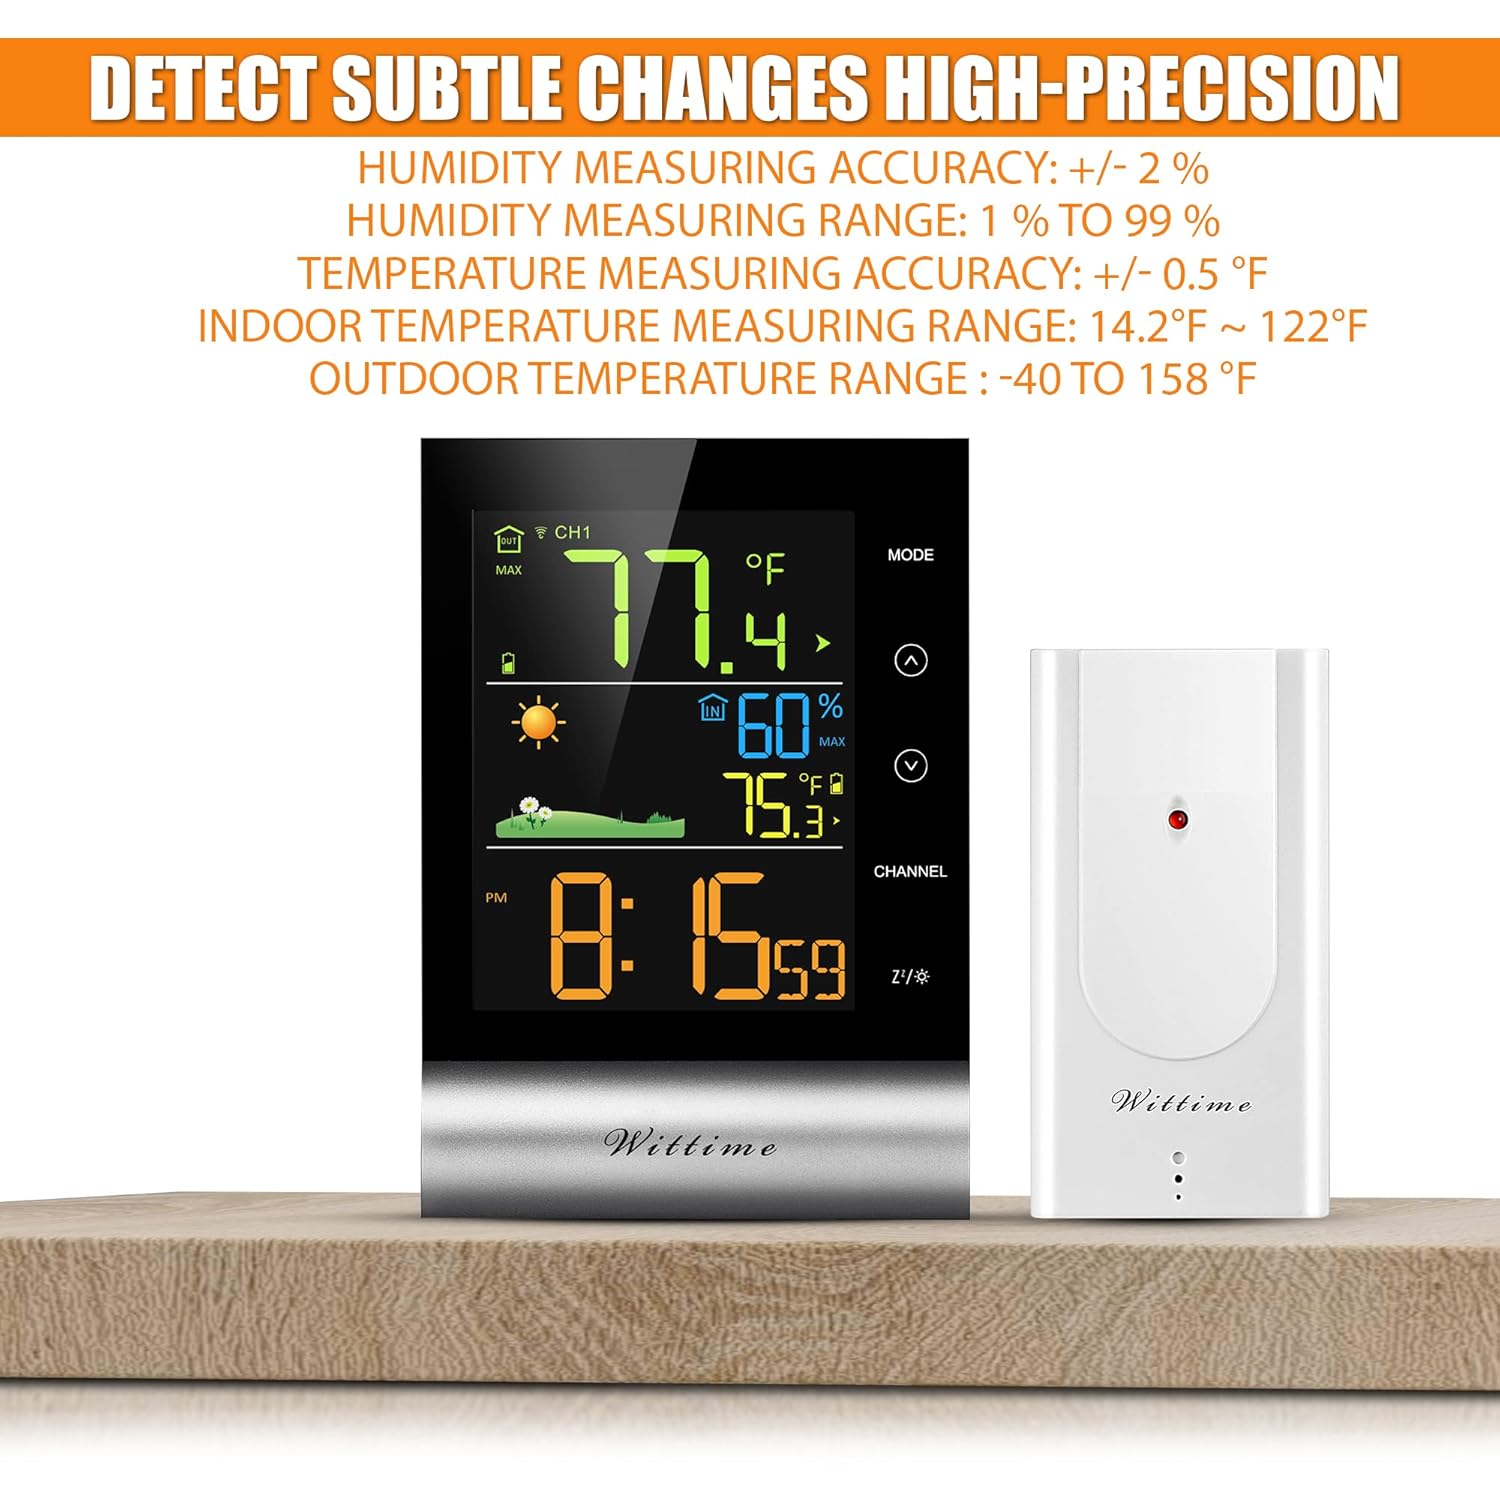
Figure 4: Wittime 2079 High-Precision Accuracy. This image details the humidity and temperature measuring accuracy and ranges for both indoor and outdoor environments.
| Feature | Detail |
|---|---|
| Model | Wittime 2079 |
| Display Type | 5-inch Full-Color LCD |
| Indoor Temperature Range | 14.2°F to 122°F (-9.9°C to 50°C) |
| Outdoor Temperature Range | -40°F to 158°F (-40°C to 70°C) |
| Temperature Accuracy | ±0.5°F (±0.3°C) |
| Humidity Range | 1% to 99% RH |
| Humidity Accuracy | ±2% RH |
| Wireless Transmission Range | Up to 328 feet (100 meters) in open area |
| Outdoor Sensor Water Resistance | IP44 |
| Main Unit Power | 5.0V AC Adapter (primary), 3 x AAA Batteries (backup) |
| Outdoor Sensor Power | 2 x AA Batteries |
| Dimensions (Main Unit) | Approximately 9.06 x 6.5 x 2.28 inches |
9. Warranty and Support
Wittime provides a 12-month manufacturer warranty for this product. If you encounter any questions or require technical support, please contact us directly via Amazon message. Our support team aims to reply within 12 hours to assist you.
10. Important Safety Information
- Do not expose the main unit to extreme temperatures, direct sunlight, or moisture.
- Ensure batteries are inserted with correct polarity. Do not mix old and new batteries or different types of batteries.
- Dispose of used batteries according to local regulations.
- Do not attempt to disassemble or repair the device yourself. Contact support for assistance.
- Keep out of reach of children.


