
Introduction
This manual provides detailed instructions for the installation, operation, and maintenance of your new SCREENARAMA FHD 1920x1080 IPS Matte LCD LED Display replacement for the Gateway GWTN156-7BL laptop. Please read these instructions carefully before proceeding with the installation to ensure a successful replacement and optimal performance.
Setup and Installation
Before beginning the installation, ensure your laptop is powered off and disconnected from any power source. It is recommended to discharge any static electricity from your body before handling electronic components.
1. Verify Screen Compatibility
It is crucial to confirm that the replacement screen matches the specifications of your original screen. Pay close attention to the video connector type, resolution, touchscreen capability, and refresh rate.
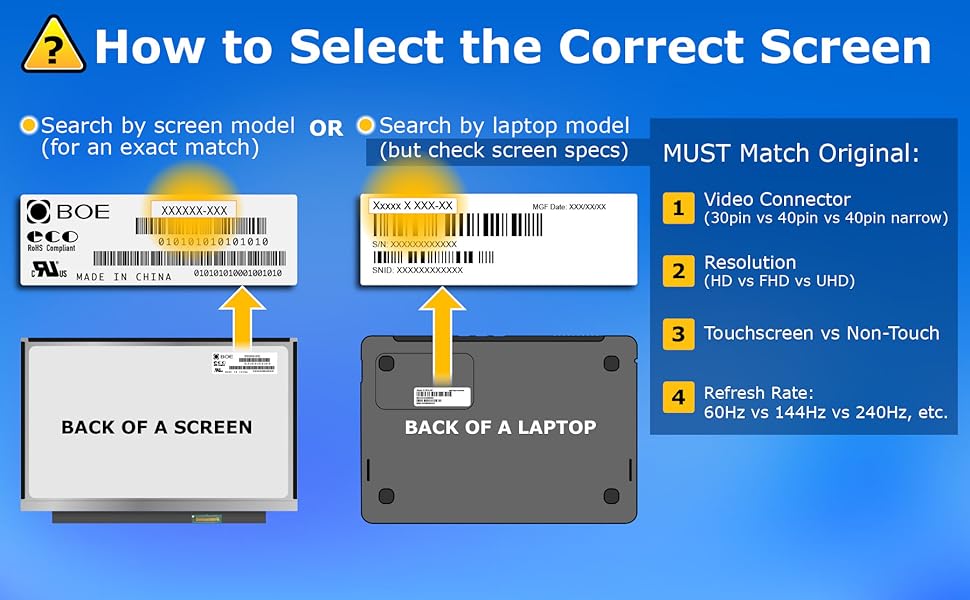
Image: Guide on how to select the correct screen by verifying specifications such as video connector type (30-pin vs 40-pin), resolution (HD, FHD, UHD), touchscreen vs non-touch, and refresh rate (60Hz, 144Hz, 240Hz). This involves checking labels on the back of the original screen or laptop.
- Video Connector: This replacement screen features a 30-pin connector. Ensure your original screen also uses a 30-pin connector.
- Resolution: This screen supports FHD 1920x1080 resolution.
- Touchscreen: This is a non-touchscreen display.

Image: The back of a 15.6-inch Full HD screen, highlighting the 30-pin video connector located at the bottom center.

Image: A visual comparison between a 30-pin video connector and a 40-pin video connector. The 40-pin connector is marked as incorrect for this product.
2. Prepare for Installation
The replacement screen comes with a set of tools designed for DIY installation. These tools typically include screwdrivers, prying tools, and tweezers to assist in safely disassembling your laptop and installing the new screen.

Image: A set of tools provided for screen replacement, including a screwdriver, prying tools, and precision tweezers.
3. Installation Steps (General Guidance)
While specific steps may vary by laptop model, the general process involves:
- Carefully remove the bezel surrounding the screen.
- Unscrew the old screen from its mounting brackets.
- Gently disconnect the video cable from the back of the old screen.
- Connect the video cable to the new SCREENARAMA replacement screen, ensuring a secure fit.
- Mount the new screen into the laptop frame.
- Reattach the bezel and reassemble the laptop.
For a visual guide on screen specifications, please refer to the video below:
Video: This video provides an overview of the SCREENARAMA 15.6" FHD 30-pin Matte 60Hz non-touchscreen display, highlighting its key features and specifications relevant for replacement.
Operating Characteristics
Your SCREENARAMA replacement screen is designed to provide a high-quality visual experience with specific features:
- Full HD Resolution: The display operates at a native resolution of 1920x1080 pixels, offering clear and sharp images.
- IPS Technology: In-Plane Switching (IPS) technology provides wide viewing angles and consistent color reproduction, ensuring the display looks good from various perspectives.
- Matte Finish: The matte surface reduces glare and reflections from ambient light, improving visibility in brightly lit environments.
- Non-Touchscreen: This is a standard LCD display and does not support touch input.

Image: A visual representation indicating that the screen is compatible only with 1920x1080 resolution, explicitly showing other resolutions as unsupported.
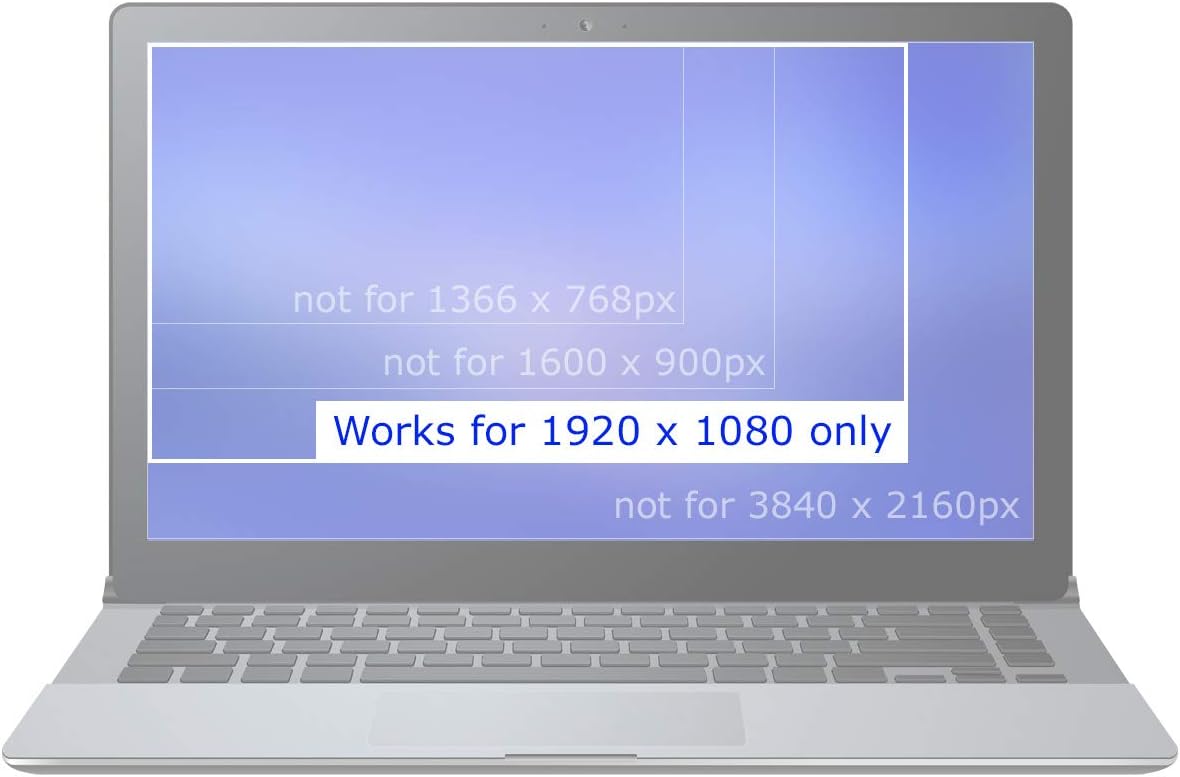
Image: This image clarifies that the product is an LCD screen only and does not feature touchscreen functionality, with a visual cue of a crossed-out touchscreen.

Image: A comparison illustrating the benefits of an IPS screen (better viewing angles, vivid colors) versus a TN screen (narrow viewing angles, washed-out colors).
Maintenance
To ensure the longevity and optimal performance of your SCREENARAMA display, follow these maintenance guidelines:
- Cleaning: Use a soft, lint-free cloth specifically designed for electronics to gently wipe the screen. For stubborn smudges, lightly dampen the cloth with water or a screen-cleaning solution. Avoid harsh chemicals, abrasive materials, or excessive moisture.
- Protection: When transporting your laptop, ensure the lid is closed to protect the screen from scratches and impacts.
- Handling: Avoid applying direct pressure to the screen surface, as this can cause damage to the LCD panel.
Troubleshooting
If you encounter issues after installing your new screen, consider the following troubleshooting steps:

Image: A visual guide outlining common troubleshooting steps for display issues after screen replacement.
- No Display/Blank Screen:
- Connect an external monitor to your laptop to verify if the laptop itself is still operational. If the external monitor works, the issue is likely with the internal display or its connection.
- Ensure the video cable from the laptop's motherboard is securely connected to the new screen's 30-pin connector. Disconnect and reconnect it firmly.
- Verify that the number of pins on your original LCD and the new replacement screen are identical (both 30-pin for this model).
- Dim Image/No Backlight:
- If the image is very dim or there is no backlight, try connecting your old screen (if it still powers on) to see if its backlight functions.
- If both screens exhibit the same dimness or lack of backlight, the problem might be with the backlight fuse on the laptop's motherboard, usually located near the video connector.
- Image Artifacts/Incorrect Colors:
- Ensure the video cable is not damaged and is properly seated.
- If the issue persists, it might indicate a problem with the video cable itself or the laptop's graphics hardware.
- If the issue is the same as with the old LCD: The problem is likely in another part of the laptop (e.g., motherboard, video card, video cable) rather than the new screen.
Specifications
| Feature | Detail |
|---|---|
| Model Compatibility | Gateway GWTN156-7BL |
| Screen Size | 15.6 inches |
| Resolution | FHD (Full High Definition) 1920x1080 |
| Panel Type | IPS (In-Plane Switching) |
| Surface Finish | Matte (Anti-Glare) |
| Backlight Type | LCD LED |
| Video Connector | 30-pin |
| Touchscreen | No |
| Included Tools | Yes, for DIY installation |
| Item Weight | 1.1 pounds (approx.) |
| Package Dimensions | 17.72 x 10.63 x 1.18 inches (approx.) |
Warranty Information
This SCREENARAMA replacement screen is covered by a 2-Year warranty from the date of purchase. This warranty covers manufacturing defects and ensures the product meets its specified performance standards. Please retain your proof of purchase for warranty claims.
Customer Support
For further assistance, technical support, or warranty inquiries, please contact SCREENARAMA customer service. Refer to the product packaging or the official SCREENARAMA website for the most current contact information.
When contacting support, please have your product model (Gateway GWTN156-7BL) and purchase details ready.