1. Introduction and Safety Information
This manual provides essential instructions for the safe operation, maintenance, and care of your Nilox X-Drive M1 Electric Scooter. Please read this manual thoroughly before first use to ensure proper handling and to prevent accidents.
1.1 General Safety Guidelines
- Always wear a helmet and appropriate protective gear (knee pads, elbow pads) when riding.
- Ensure all components are securely fastened and in good working order before each ride.
- Do not ride in adverse weather conditions, such as heavy rain, snow, or icy conditions.
- Avoid riding on uneven surfaces, potholes, or obstacles that could cause loss of control.
- Adhere to local traffic laws and regulations regarding electric scooter usage. In Italy, speed limits are 6 km/h in pedestrian areas and 20 km/h in other cases.
- Do not allow children under the recommended age (Adults) to operate the scooter.
- Do not exceed the maximum weight limit of 100 kg.
- Be aware of your surroundings and other road users.
1.2 Safety Features
The Nilox X-Drive M1 is designed with several safety features:
- Antibacterial and Fluorescent Grips: For enhanced hygiene and visibility.
- Reflective Stickers: Improve visibility in low-light conditions.
- High-Visibility Lights: Equipped with white or yellow front lights and red rear lights for improved visibility.
- Integrated Turn Signals: Turn signals are incorporated into the rear LED light for clear indication of direction changes.
- Dual Braking System: Features a rear disc brake and a front electric brake for effective stopping power.
- Horn: A built-in horn is included for alerting others.
2. Product Overview
The Nilox X-Drive M1 is a lightweight, foldable electric scooter designed for urban mobility. It features a 350W motor, a 25 km range, cruise control, and a smart display.
2.1 Components and Features

Image: The Nilox X-Drive M1 electric scooter shown alongside its detachable shoulder strap, highlighting its portability.

Image: A complete view of the Nilox X-Drive M1 electric scooter, showcasing its black frame with lime green accents and overall design.

Image: A detailed view of the scooter's smart display, showing digital readouts for speed, battery level, and other indicators.
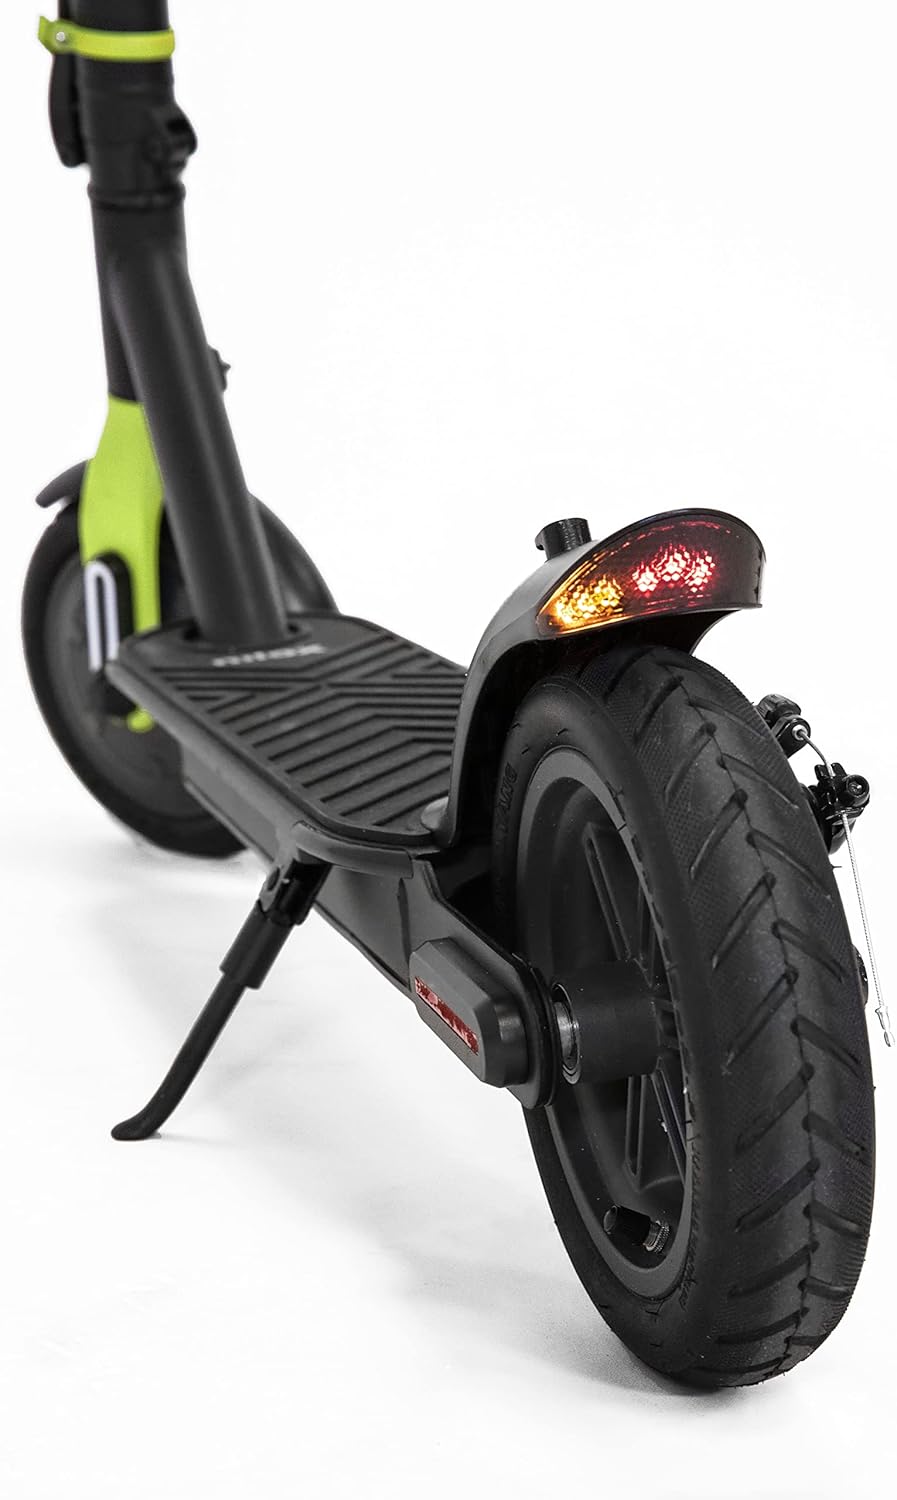
Image: A close-up of the rear wheel, showcasing the disc brake mechanism and the integrated rear LED light with turn signals.
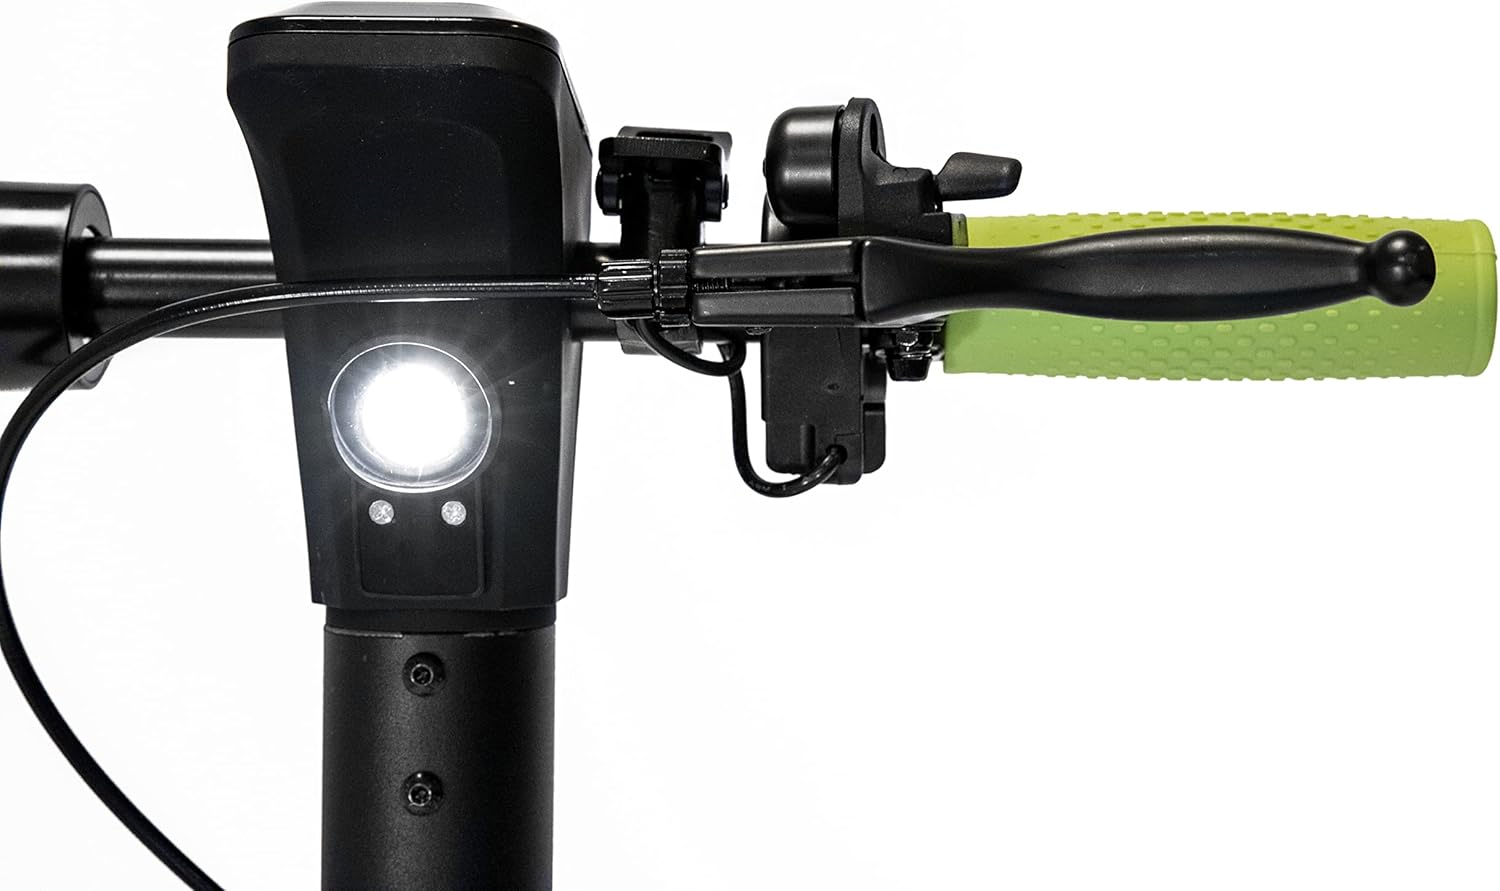
Image: A view of the scooter's handlebar area, showing the front light and the brake lever on the left side.
2.2 Key Features Diagram

Diagram: This image illustrates the smart display, cruise control activation (double accelerator press), visual alarm signals, and the ON/OFF button on the handlebar.

Diagram: This image shows the turn signal control on the handlebar and the brake lights and turn signals located on the rear fender.

Diagram: This image highlights the rear disc brake, front electric brake, certified antibacterial grips, and reflective paint on the scooter's frame.
3. Setup
3.1 Unboxing and Initial Inspection
- Carefully remove the scooter and all accessories from the packaging.
- Verify that all components listed in the "What's in the Box" section (e.g., Battery Pack) are present.
- Inspect the scooter for any visible damage from shipping. If damage is found, do not use the scooter and contact customer support.
3.2 Folding and Unfolding
The X-Drive M1 is designed to be foldable for easy transport and storage.
- Unfolding: Locate the folding mechanism latch near the base of the handlebar stem. Release the latch and carefully raise the handlebar stem until it locks securely into the upright position. Ensure it is fully locked before use.
- Folding: To fold, disengage the locking mechanism and gently lower the handlebar stem towards the deck until it clicks into the folded position.
3.3 Battery Charging
- Before first use, fully charge the scooter's battery.
- Connect the charger to the charging port on the scooter and then plug it into a standard power outlet.
- The charging indicator on the charger will typically change color (e.g., red to green) when charging is complete.
- Do not overcharge the battery. Unplug the charger once charging is complete.
4. Operating Instructions
4.1 Powering On/Off
- To power on the scooter, press and hold the ON/OFF button located near the smart display.
- To power off, press and hold the ON/OFF button again until the display turns off.
4.2 Riding the Scooter
- Place one foot on the deck and push off with the other foot to gain initial momentum.
- Once moving, gently press the accelerator to engage the motor.
- The scooter offers 3 speed modes: 6 km/h, 20 km/h, and 25 km/h. Select the appropriate speed mode via the smart display controls.
4.3 Cruise Control
- To activate cruise control, maintain a consistent speed and double-press the accelerator. The scooter will maintain its current speed.
- To deactivate cruise control, lightly press the brake lever or the accelerator.
4.4 Braking
- To slow down or stop, gently press the brake lever on the handlebar. This activates both the rear disc brake and the front electric brake.
- Apply brakes smoothly to avoid sudden stops and maintain control.
4.5 Turn Signals and Lights
- Activate the turn signals using the dedicated control on the handlebar to indicate your intended direction.
- Ensure the front and rear lights are on when riding in low-light conditions or at night.
4.6 NFC Key
- The scooter features an NFC key for enhanced security.
- The NFC key can be replicated on your smartphone for convenient unlocking and locking. Refer to the scooter's companion app or specific instructions for NFC key setup.
5. Maintenance
5.1 Battery Care
- Charge the battery regularly, even if the scooter is not in use for extended periods, to maintain battery health.
- Avoid completely draining the battery before recharging.
- Store the scooter and battery in a cool, dry place away from direct sunlight and extreme temperatures.
5.2 Tire Maintenance
- Regularly check tire pressure to ensure optimal performance and range. Refer to the tire sidewall for recommended pressure.
- Inspect tires for wear, punctures, or damage before each ride.
5.3 Brake System Check
- Periodically check the brake levers for proper tension and responsiveness.
- Ensure the disc brake is clean and free of debris.
- If braking performance degrades, have the brakes inspected by a qualified technician.
5.4 Cleaning and Storage
- Clean the scooter with a damp cloth. Do not use high-pressure water jets or immerse the scooter in water.
- Avoid using abrasive cleaners or solvents that could damage the finish.
- Store the scooter in a dry, sheltered location when not in use.
6. Troubleshooting
If you encounter issues with your Nilox X-Drive M1, the smart display can provide alarm signals to help diagnose problems. Consult the display for specific error codes or indicators.
| Problem | Possible Cause | Solution |
|---|---|---|
| Scooter does not power on. | Low battery; loose connections. | Charge the battery fully. Check all cable connections. |
| Reduced range or power. | Low tire pressure; battery degradation; riding uphill frequently. | Check and inflate tires to recommended pressure. Ensure battery is fully charged. |
| Brakes feel loose or ineffective. | Brake cable tension too low; worn brake pads. | Adjust brake cable tension. Inspect brake pads for wear and replace if necessary. |
| Unusual noises during operation. | Loose components; debris in wheels/motor. | Inspect all parts for looseness and tighten. Clean wheels and motor area. |
For persistent issues or complex repairs, it is recommended to contact Nilox customer support or a certified service center.
7. Specifications
| Feature | Specification |
|---|---|
| Model Name | X-Drive M1 (M1 with Turn Signals, Lime Green) |
| Motor Power | 350 W |
| Max Range | 25 km |
| Max Speed | 25 km/h (adjustable to 6 km/h, 20 km/h) |
| Weight | 13.8 kg |
| Max Load Capacity | 100 kg |
| Wheel Size | 8.5 Inches |
| Brake Type | Rear Disc Brake, Front Electric Brake |
| Material | Aluminum, Metal Frame |
| Color | Black - Lime |
| Special Features | Lightweight, Foldable, Cruise Control, Smart Display, NFC Key, Turn Signals |
| Recommended Age | Adults |
| Battery Type | Lithium Ion (1 required, included) |
8. Warranty and Support
8.1 Warranty Information
Specific warranty terms and conditions for the Nilox X-Drive M1 Electric Scooter may vary by region and retailer. Please refer to the warranty card included with your product or consult the point of purchase for detailed warranty information. Keep your proof of purchase for warranty claims.
8.2 Customer Support
For technical assistance, spare parts, or any other inquiries regarding your Nilox X-Drive M1, please contact Nilox customer support. Visit the official Nilox website for contact details and further resources.
You can also visit the Nilox Store on Amazon for more information.