P60 MPPT Charge Controller User Manual
Model: P60
1. Introduction
The Shanrya P60 MPPT Charge Controller is designed for efficient solar power management in 12V/24V systems. It features an ultra-low power consumption chip, excellent heat dissipation, and a full-screen display for real-time data monitoring. This manual provides essential information for the safe and effective installation, operation, and maintenance of your P60 MPPT Charge Controller.
2. Safety Information
Please read and understand all safety instructions before installation and operation. Failure to follow these instructions may result in electric shock, fire, or serious injury.
- Critical Connection Order: Always connect the battery to the controller before connecting the solar panel. Disconnect in reverse order.
- Avoid Inverter/Inductive Loads: Do not connect an inverter or any inductive load directly to the controller's load output ports.
- Ensure proper ventilation around the controller to facilitate heat dissipation.
- Keep the controller away from water, flammable gases, and corrosive substances.
- Only qualified personnel should perform installation and maintenance.
3. Package Contents
Verify that all items listed below are included in your package:
- 1 x Shanrya P60 Solar Controller
- 1 x User Manual (this document)
- 1 x Connector (DC power plug)
- 5 x Green Accessories (wall anchors)
- 15 x Screw Nuts (various sizes for mounting and terminals)

Image 3.1: Shanrya P60 MPPT Charge Controller with all included accessories, including the main unit, a DC power connector, green wall anchors, and various screws and nuts.
4. Product Overview
The P60 MPPT Charge Controller features a robust design with an integrated display and multiple connection points for solar panels, batteries, and loads.
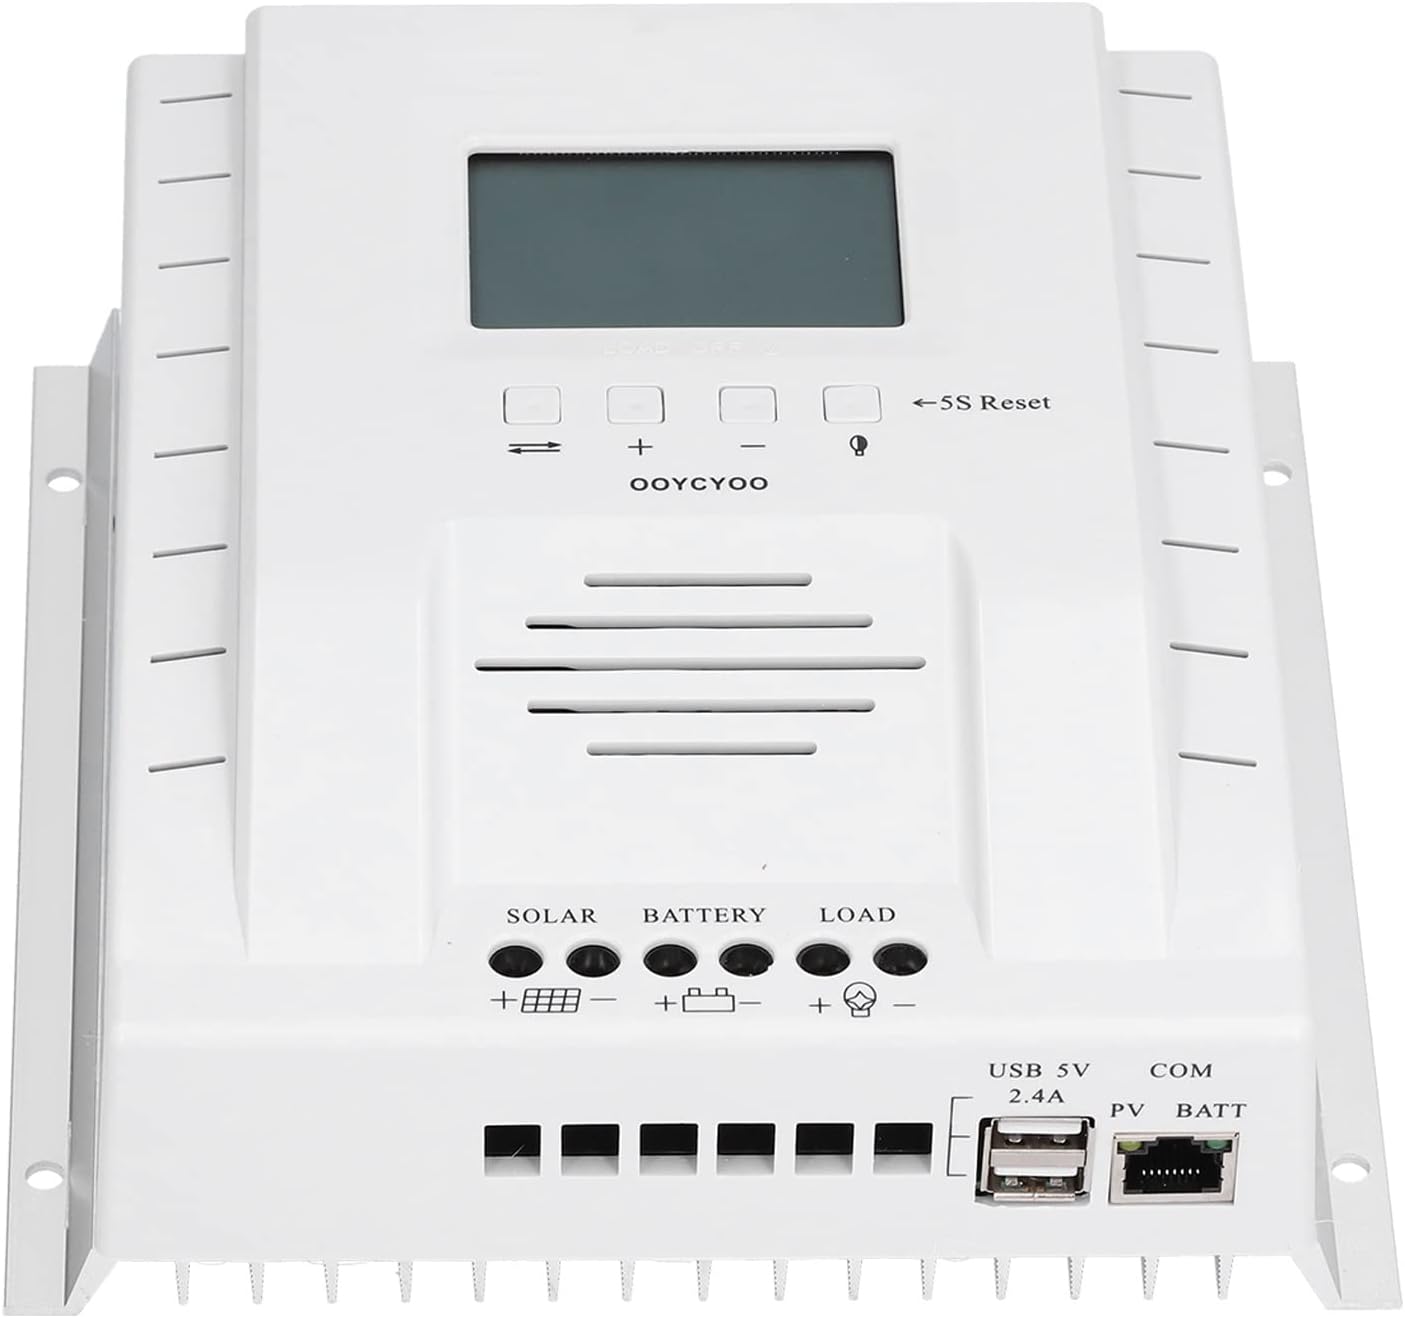
Image 4.1: Front view of the P60 MPPT Charge Controller, showing the LCD screen, control buttons, and terminal connections for solar, battery, and load, along with USB and COM ports.
Key Features:
- Full-screen display for real-time data monitoring.
- Supports solar panel input voltage up to 100V.
- Ultra-low power consumption chip for reduced standby power.
- USB 5V 2.4A output for charging mobile phones or powering small devices.
- Dual-period control mode for efficient operation and good heat dissipation.
Component Identification:
- LCD Display: Shows various system parameters.
- Control Buttons: Used for navigation and settings adjustment. Includes '5S Reset' button.
- Solar Input Terminals (+/-): For connecting solar panels.
- Battery Terminals (+/-): For connecting the battery bank.
- Load Output Terminals (+/-): For connecting DC loads.
- USB 5V 2.4A Port: For charging USB-powered devices.
- COM Port: For communication (e.g., with monitoring software, if supported).

Image 4.2: Close-up view of the LCD display and control buttons on the P60 MPPT Charge Controller, showing the '5S Reset' button and navigation controls.
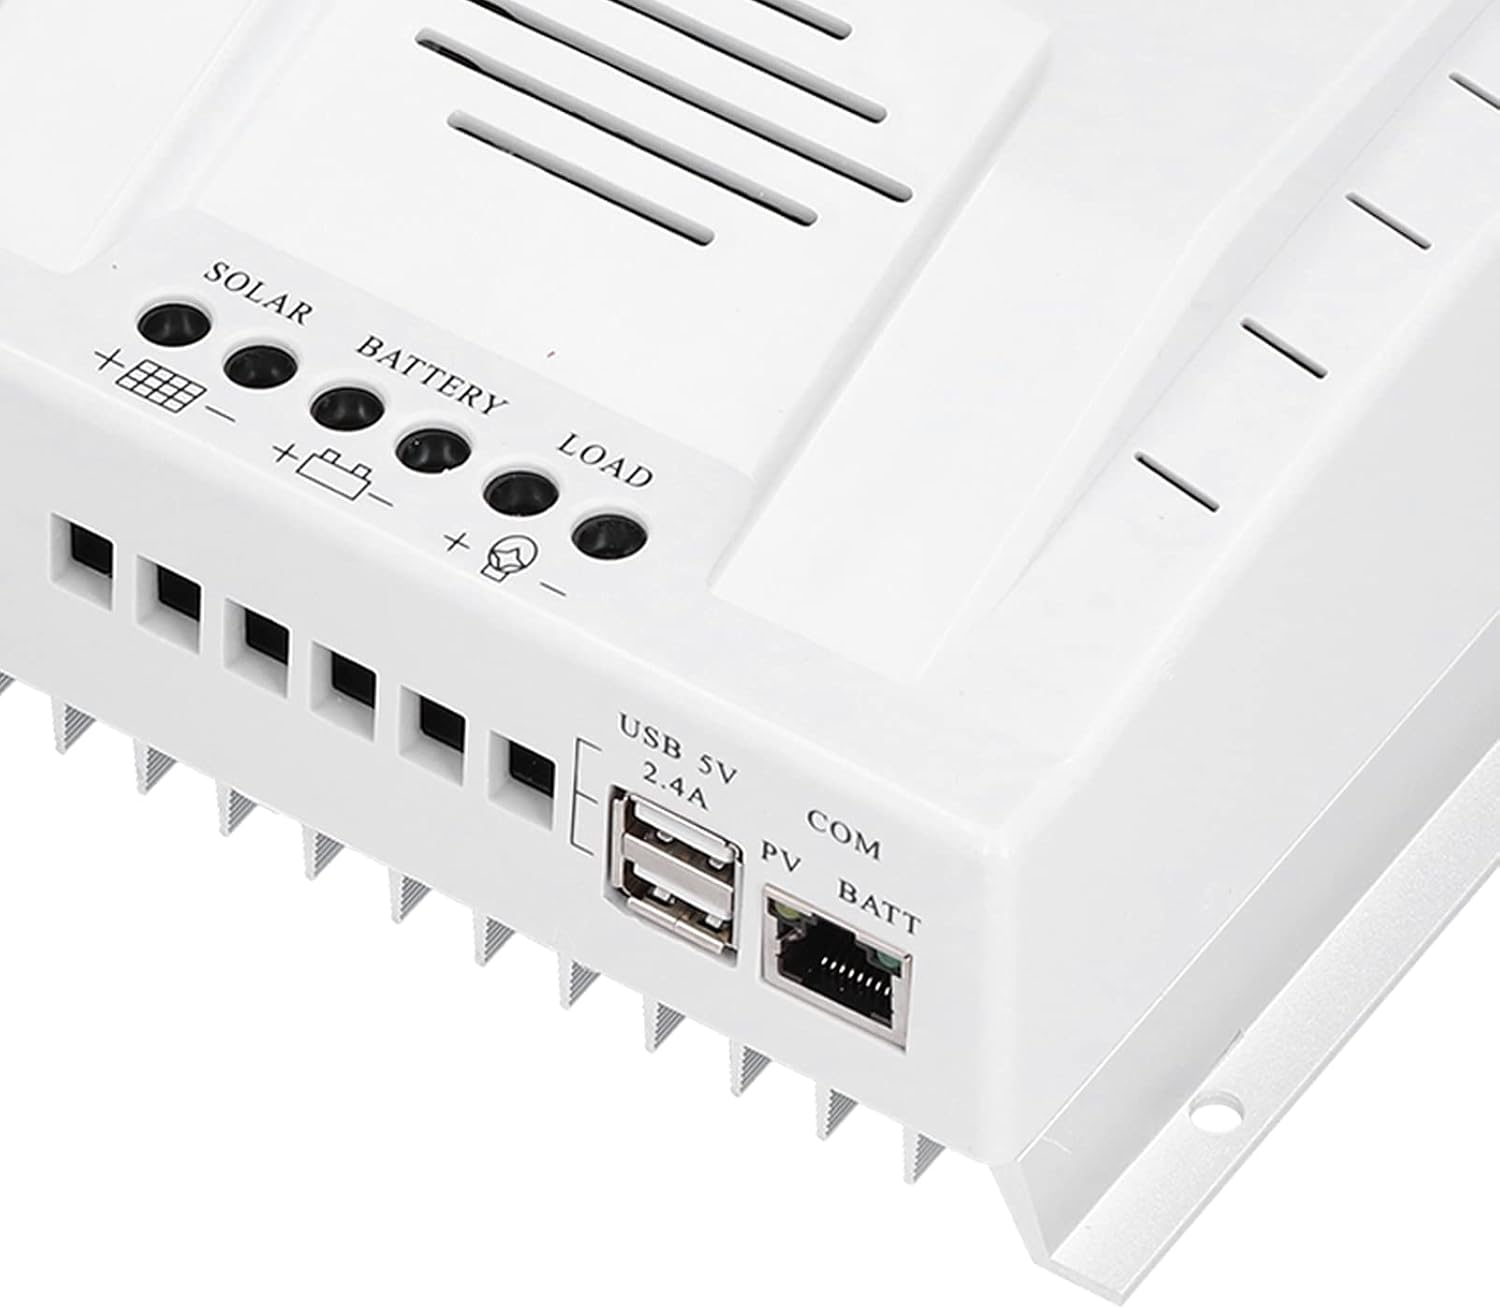
Image 4.3: Close-up view of the USB 5V 2.4A output port and the COM port located on the lower right side of the P60 MPPT Charge Controller.
5. Specifications
| Parameter | Value |
|---|---|
| Model | P60 |
| Current | 60A |
| Output Voltage | 12V/24V (Auto-sensing) |
| Material | ABS |
| Manufacturer | Shanrya |
| Part Number | Shanrya3r72kf8bad1774 |
| Item Weight | 2.85 pounds |
| Package Dimensions | 8.27 x 8.27 x 3.54 inches |
| Power Source | Solar Powered |
| Item Package Quantity | 1 |
6. Setup and Installation
Follow these steps carefully to install your P60 MPPT Charge Controller. Adhering to the correct connection order is crucial for safety and proper operation.
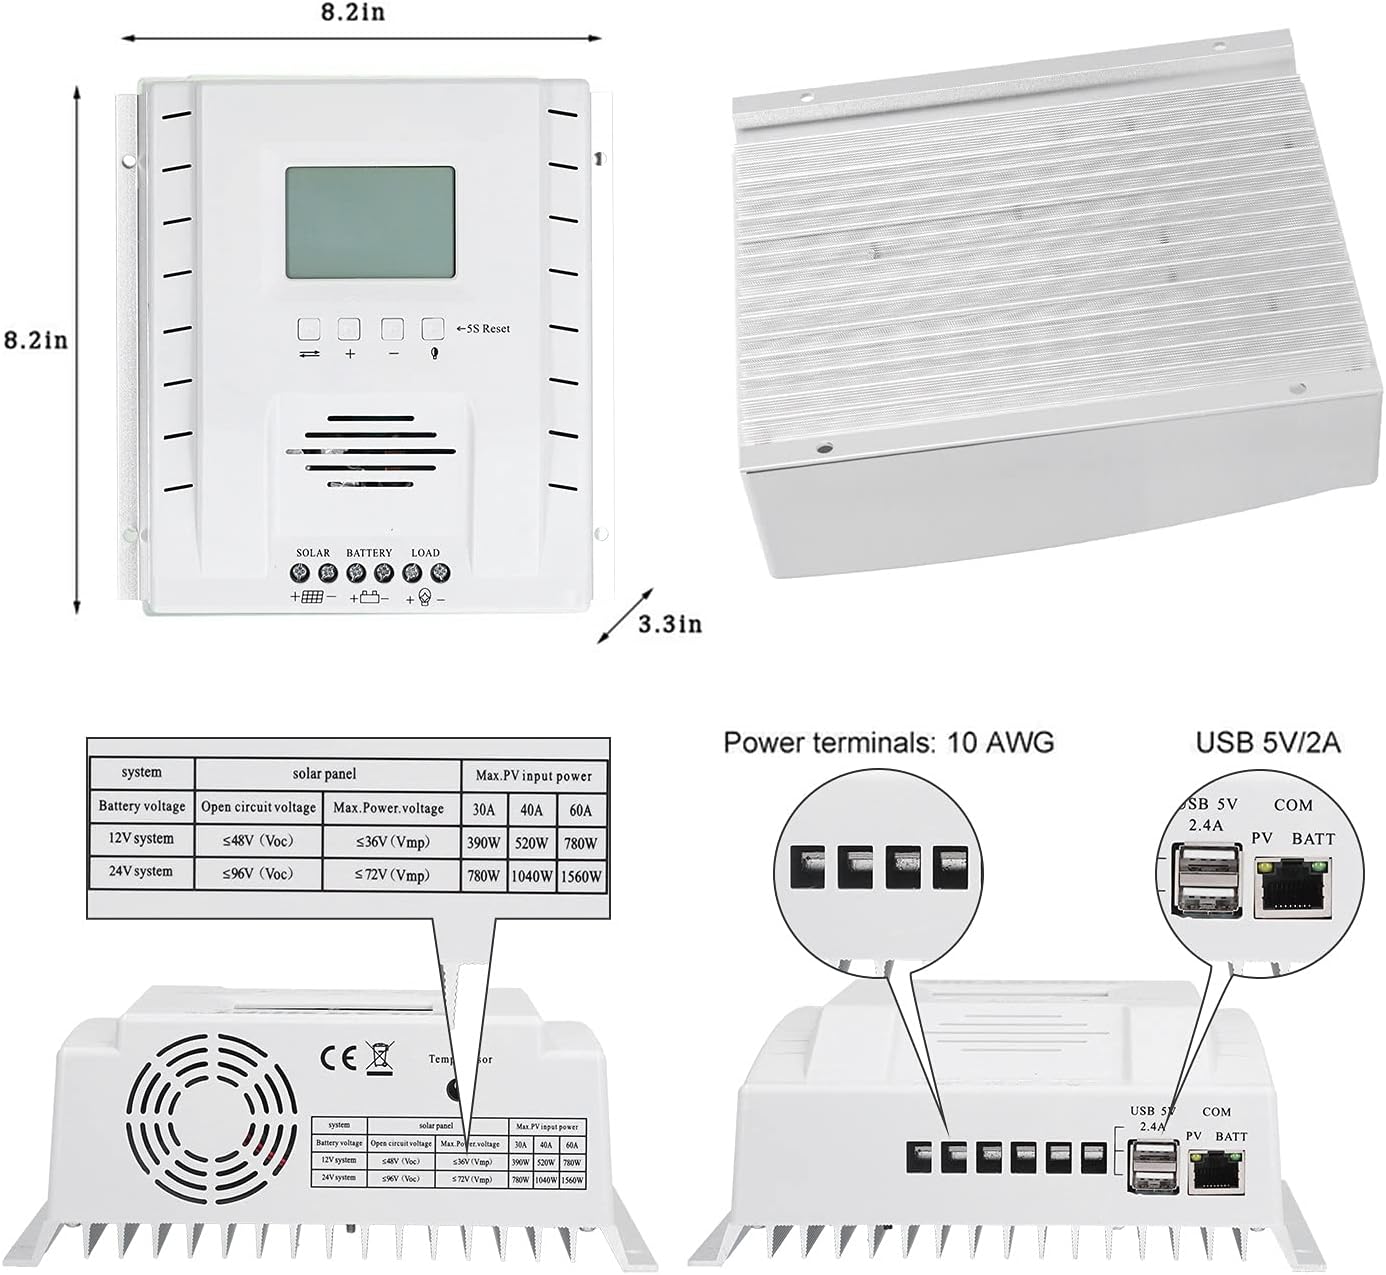
Image 6.1: Detailed diagram illustrating the dimensions of the P60 MPPT Charge Controller and the layout of its power terminals (Solar, Battery, Load) and data ports (USB, COM).
Installation Steps:
- Choose a Mounting Location: Select a dry, well-ventilated area, away from direct sunlight, high temperatures, and moisture. Ensure there is sufficient space around the controller for air circulation and heat dissipation.
- Mount the Controller: Securely mount the controller to a wall or stable surface using appropriate screws and anchors (provided).
- Connect the Battery:
- Connect the positive (+) terminal of the battery to the battery positive (+) terminal on the controller.
- Connect the negative (-) terminal of the battery to the battery negative (-) terminal on the controller.
IMPORTANT: The controller display should light up once the battery is connected. This confirms the controller is powered. Do NOT connect the solar panel before the battery.
- Connect the Solar Panel:
- Connect the positive (+) terminal of the solar panel to the solar positive (+) terminal on the controller.
- Connect the negative (-) terminal of the solar panel to the solar negative (-) terminal on the controller.
Ensure the solar panel's open circuit voltage (Voc) does not exceed the controller's maximum input voltage (100V).
- Connect the DC Load (Optional):
- Connect the positive (+) terminal of your DC load to the load positive (+) terminal on the controller.
- Connect the negative (-) terminal of your DC load to the load negative (-) terminal on the controller.
WARNING: Do not connect an inverter or any inductive load to these ports. Only connect DC loads that are compatible with the controller's output specifications.
- Connect USB Devices (Optional): The USB 5V 2.4A port can be used to charge compatible devices like mobile phones or power small USB fans.
7. Operating Instructions
Once properly installed, the P60 MPPT Charge Controller will automatically begin charging the battery from the solar panels. The LCD display provides real-time system information.
Display and Navigation:
- The full-screen display cycles through various parameters such as battery voltage, charging current, solar panel voltage, and load status.
- Use the navigation buttons (usually 'up' and 'down' arrows) to manually cycle through the display screens or access settings menus.
- The '5S Reset' button can be used to reset certain parameters or restart the controller if needed. Refer to the on-screen prompts for specific functions.
Charging Modes:
The controller utilizes MPPT (Maximum Power Point Tracking) technology to optimize power extraction from your solar panels, ensuring efficient charging of your battery bank.
Load Control:
The controller manages the DC load output. Depending on the model's capabilities, you may be able to set timers or control the load output manually through the display interface.
8. Maintenance
Regular maintenance ensures the longevity and optimal performance of your charge controller.
- Cleanliness: Keep the controller clean and free from dust and debris. Use a dry, soft cloth for cleaning. Do not use liquid cleaners.
- Connections: Periodically check all wire connections to ensure they are tight and secure. Loose connections can cause overheating and damage.
- Ventilation: Ensure that the ventilation openings are not blocked to allow for proper heat dissipation.
- Environmental Check: Verify that the operating environment remains within the specified temperature and humidity ranges.
9. Troubleshooting
If you encounter issues with your P60 MPPT Charge Controller, refer to the following common problems and solutions:
| Problem | Possible Cause | Solution |
|---|---|---|
| Controller display is off | No battery connected or battery voltage too low. | Ensure battery is properly connected and has sufficient charge. |
| No charging from solar panel | Solar panel not connected, insufficient sunlight, or panel voltage too low/high. | Check solar panel connections. Ensure adequate sunlight. Verify panel voltage is within controller's range. |
| Load output not working | Load not connected, battery voltage too low, or load protection activated. | Check load connections. Ensure battery is charged. Check controller settings for load control. |
| Overheating | Poor ventilation or excessive load. | Ensure adequate airflow around the controller. Reduce load if necessary. |
If the problem persists after attempting these solutions, please contact customer support.


