1. Introduction
This manual provides instructions for the YAOHUIMI Replacement Remote Control, designed for use with various Fujitsu AC Air Conditioner models. This remote control offers essential functions for managing your air conditioning unit.
Important Note:
This is a replacement remote control and is not a universal remote. Please verify compatibility with your specific Fujitsu air conditioner model or original remote control model before use. Refer to the compatibility list below.
1.1 Compatibility
This remote control is compatible with a wide range of Fujitsu AC Air Conditioner models and remote control models, including but not limited to:
- Fujitsu AC Models: ASYG07KETA, ASYG07KETA-B, ASYG09KETA, ASYG09KETA-B, ASYG12KETA, ASYG12KETA-B, ASYG14KETA, ASYG14KETA-B, ASHG14KGTA, ASYG12KMTA, and many others listed in the product description.
- Original Remote Control Models: AR-RED1U, AR-REF1U, AR-REG1U, AR-REM1U, AR-REY1U, AR-REA1E, AR-REA2E, AR-REB1E, AR-REB2E, AR-REF1E, AR-REF2E, AR-REF3E, AR-REF4E, AR-REJ1E, AR-REM1E, AR-REM2E, AR-REM3E, AR-REM4E, AR-REM5E, AR-REM6E, AR-REM7E, AR-REW1E, AR-REW2E, AR-REW3E, AR-REW4E.
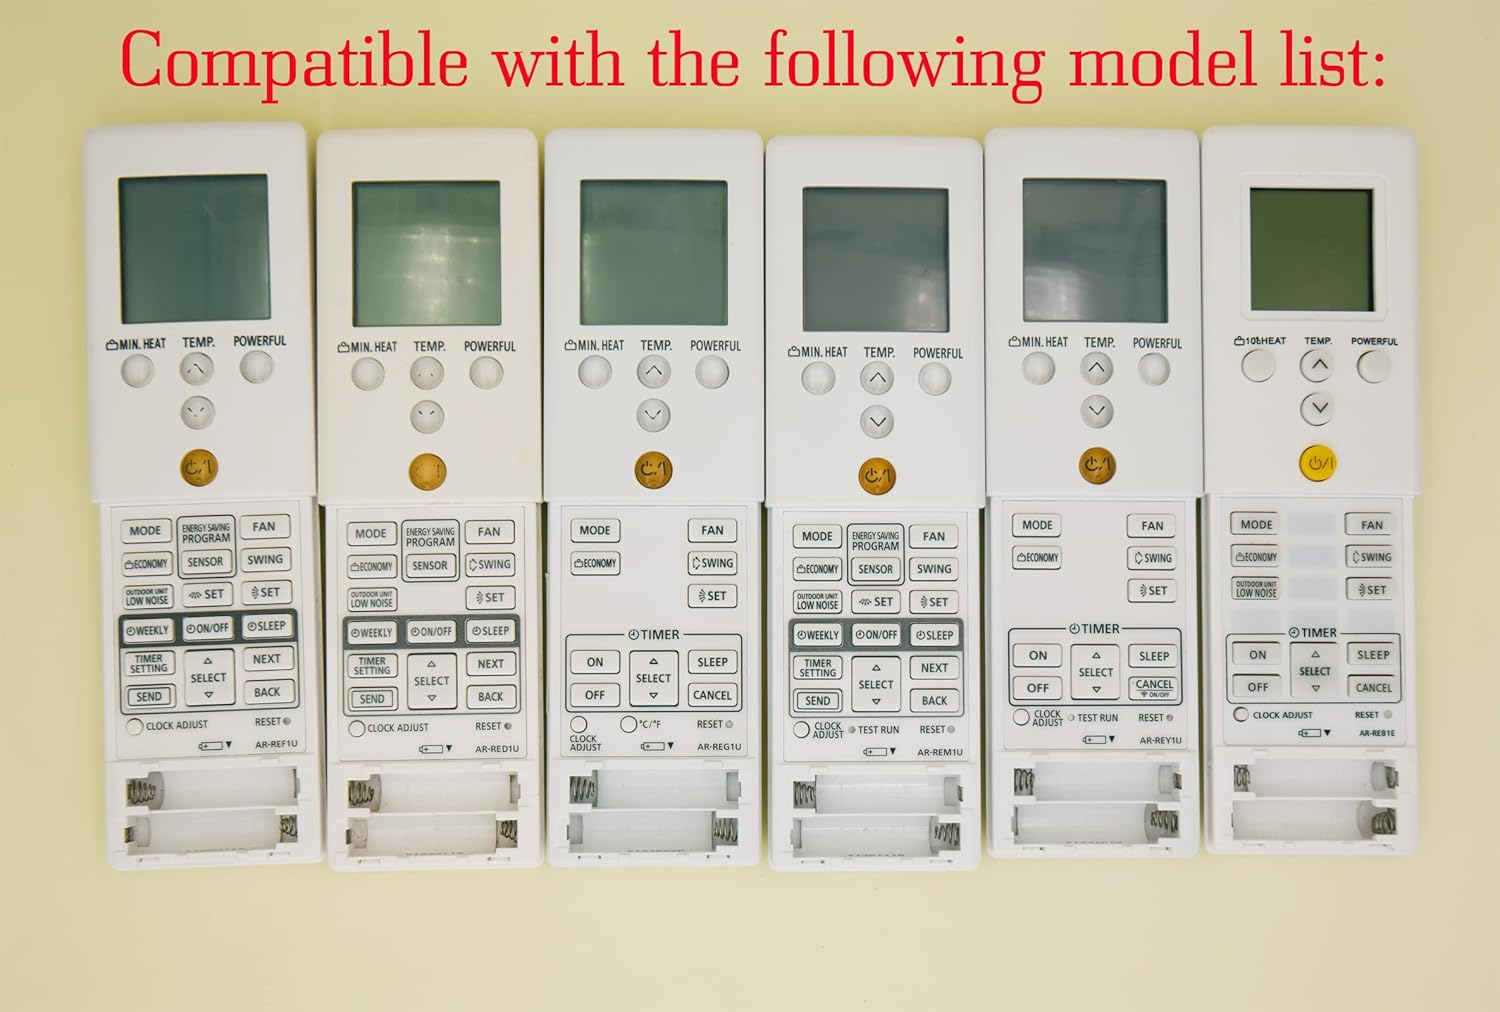
Image 1.1: Various compatible remote control models.
2. Setup
2.1 Battery Installation
To begin using your remote control, you must install batteries. The remote requires two AAA batteries (not included).
- Locate the battery compartment cover on the back of the remote control.
- Slide the cover downwards or press the latch (if present) to open the compartment.
- Insert two AAA batteries, ensuring the positive (+) and negative (-) terminals align correctly with the markings inside the compartment.
- Slide the battery compartment cover back into place until it clicks securely.
Caution:
- Do not mix old and new batteries.
- Do not mix alkaline, standard (carbon-zinc), or rechargeable (nickel-cadmium) batteries.
- Remove batteries if the remote control will not be used for an extended period to prevent leakage.

Image 2.1: Rear view of the remote control with battery compartment.
3. Operating Instructions
This section details the functions of the buttons on your replacement remote control.

Image 3.1: Overview of the remote control buttons.
3.1 Basic Functions
- Power Button (⑁/⑀): Press to turn the air conditioner ON or OFF. This button is typically yellow and located centrally.
- MODE Button: Cycles through operating modes such as AUTO, COOL, DRY, FAN, and HEAT.
- TEMP. Buttons (▲/▼): Adjusts the desired temperature setting. Press ▲ to increase and ▼ to decrease the temperature.
- FAN Button: Adjusts the fan speed (e.g., Auto, Low, Medium, High).
- SWING Button: Activates or deactivates the air swing function, which moves the air outlet louvers.

Image 3.2: Detailed view of remote control buttons.
3.2 Advanced Functions
- MIN. HEAT Button: Activates a minimum heat setting, often used to prevent freezing in unoccupied rooms.
- POWERFUL Button: Engages a powerful operation mode for rapid cooling or heating.
- ENERGY SAVING PROGRAM Button: Activates a pre-set energy-saving mode.
- SENSOR Button: May activate a temperature sensor function within the remote itself.
- ECONOMY Button: Engages an economic operation mode to reduce power consumption.
- OUTDOOR UNIT LOW NOISE Button: Reduces the noise level of the outdoor unit.
- WEEKLY Button: Accesses weekly timer settings.
- ON/OFF Button (Timer): Sets the ON/OFF timer for scheduled operation.
- SLEEP Button: Activates sleep mode, which adjusts temperature gradually for comfortable sleep.
- TIMER SETTING Button: Used to configure various timer functions.
- SELECT (▲/▼) Button: Used for navigating and selecting options within timer or program settings.
- SEND Button: Confirms and sends timer or program settings to the AC unit.
- BACK Button: Returns to the previous menu or cancels a setting.
- CLOCK ADJUST Button: Used to set the current time on the remote's display.
- RESET Button: Resets the remote control to its factory default settings.
3.3 Display Features
- Green Backlight: The remote control features a green backlight for easy visibility and operation in low-light conditions or at night.
- Fahrenheit and Celsius Display: The remote can display temperature in both Fahrenheit (℉) and Celsius (℃). Use the ℃/℉ button to toggle between the two units.

Image 3.3: Green backlight and Fahrenheit/Celsius display toggle.
4. Maintenance
4.1 Cleaning the Remote Control
To maintain the remote control's appearance and functionality:
- Wipe the surface with a soft, dry cloth.
- For stubborn dirt, lightly dampen the cloth with water and a mild detergent, then wipe dry immediately.
- Do not use abrasive cleaners, alcohol, or chemical solvents, as these can damage the remote's finish or internal components.
4.2 Battery Replacement
Replace the batteries when the remote's display becomes dim or if the remote becomes unresponsive. Typically, batteries should be replaced every 6-12 months, depending on usage. Follow the battery installation steps in Section 2.1.
5. Troubleshooting
- Remote not responding:
- Check if the batteries are correctly installed and have sufficient charge. Replace if necessary.
- Ensure there are no obstructions between the remote control and the air conditioner's receiver.
- Make sure you are within the effective operating range of the air conditioner.
- Incorrect temperature display (Fahrenheit/Celsius):
- Press the ℃/℉ button on the remote control to toggle between Fahrenheit and Celsius display modes.
- Remote functions are erratic:
- Try resetting the remote control by removing the batteries for a few minutes, then reinserting them.
- If the issue persists, replace the batteries with new ones.
6. Specifications
| Feature | Description |
|---|---|
| Brand | YAOHUIMI |
| Model Number | A420220127-8IN1-18 |
| Connectivity Technology | Infrared |
| Special Feature | Replacement Remote (Not Universal) |
| Compatible Devices | Fujitsu AC Air Conditioners (various models, see Section 1.1) |
| Power Source | 2 x AAA Batteries (not included) |
7. Warranty and Support
For warranty information or technical support, please refer to the documentation provided with your purchase or contact the seller directly. Keep your purchase receipt as proof of purchase.


