
1. Introduction
This manual provides essential instructions for the installation, operation, maintenance, and troubleshooting of your NETGEAR M4250-26G4XF-PoE+ AV Line Managed Switch. Please read this manual thoroughly before using the device to ensure proper setup and optimal performance. Keep this manual for future reference.
2. Product Overview
The NETGEAR M4250-26G4XF-PoE+ is a high-performance AV Line Managed Switch designed for professional audio/video installations. It features extensive Power over Ethernet Plus (PoE+) capabilities and advanced management options to support demanding AV-over-IP applications.
Key Features:
- 24 x Gigabit Ethernet PoE+ ports for powering compatible devices.
- 2 x Gigabit Ethernet Network uplink ports for high-speed connectivity.
- Modular design for flexible expansion.
- Managed switch capabilities for advanced network control and optimization.
Physical Components:

Figure 2.1: Angled front view of the NETGEAR M4250-26G4XF-PoE+ AV Line Managed Switch. This image displays the overall chassis design, front panel ports, and LED indicators.

Figure 2.2: Front panel of the NETGEAR M4250-26G4XF-PoE+ AV Line Managed Switch. This view highlights the 24 Gigabit Ethernet PoE+ ports, 2 Gigabit Ethernet uplink ports, and various status LEDs for power, link activity, and PoE status.
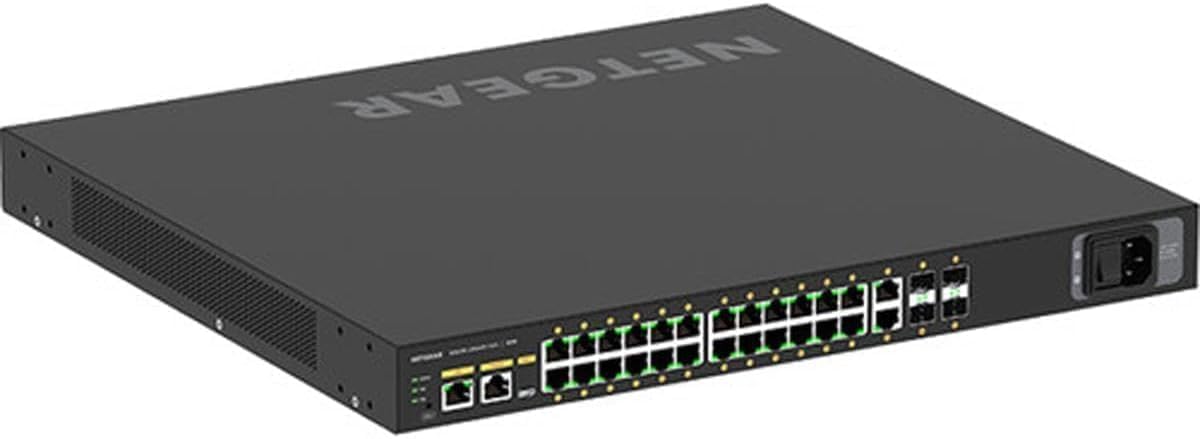
Figure 2.3: Rear panel of the NETGEAR M4250-26G4XF-PoE+ AV Line Managed Switch. This image shows the AC power input connector and ventilation openings.
3. Setup
3.1 Unpacking
Carefully unpack the switch and all accessories from the box. Verify that all components are present and undamaged. If any items are missing or damaged, contact your vendor or NETGEAR support immediately.
3.2 Physical Placement
- Environment: Place the switch in a cool, dry environment, away from direct sunlight, heat sources, and excessive dust.
- Ventilation: Ensure adequate airflow around the switch. Do not block ventilation openings.
- Mounting: The switch can be placed on a flat surface or rack-mounted using the provided rack-mount kit (if included).
3.3 Connecting Power
- Connect one end of the provided AC power cord to the power input on the rear panel of the switch.
- Connect the other end of the AC power cord to a grounded electrical outlet.
- The switch will power on automatically. Observe the power LED on the front panel to confirm it is illuminated.
3.4 Network Connections
- Uplink Ports: Connect your network router or core switch to the Gigabit Ethernet uplink ports using standard Ethernet cables.
- Device Connections: Connect your AV-over-IP devices, IP cameras, wireless access points, or other network devices to the 24 Gigabit Ethernet PoE+ ports. The switch will automatically provide power to PoE-compatible devices.
- Verify link and activity LEDs for each connected port to ensure proper connection.
4. Operating Instructions
The NETGEAR M4250-26G4XF-PoE+ is a managed switch, offering extensive configuration and monitoring capabilities through its management interface.
4.1 Initial Access to Management Interface
- Default IP Address: The switch typically obtains an IP address via DHCP. If no DHCP server is available, it will use a default static IP address (refer to the product documentation or NETGEAR support website for the specific default IP).
- Connect a PC: Connect a computer to any of the switch's data ports. Ensure the computer's IP address is in the same subnet as the switch's management IP.
- Web Browser Access: Open a web browser and enter the switch's IP address in the address bar.
- Login: Enter the default username and password (refer to the product documentation for default credentials). You will be prompted to change the password upon first login for security.
4.2 Basic Configuration
Once logged into the web management interface, you can configure various network settings:
- IP Configuration: Set a static IP address if DHCP is not desired.
- VLANs: Create and configure Virtual Local Area Networks to segment network traffic.
- QoS (Quality of Service): Prioritize AV traffic to ensure smooth, uninterrupted media streams.
- PoE Management: Monitor PoE power consumption, set power priorities, and enable/disable PoE on individual ports.
- Port Configuration: Configure port speed, duplex settings, and enable/disable ports.
For detailed configuration instructions, refer to the comprehensive user manual available on the NETGEAR support website.
5. Maintenance
5.1 Firmware Updates
Periodically check the NETGEAR support website for firmware updates. Firmware updates can provide new features, performance improvements, and security enhancements. Follow the instructions provided with the firmware update package carefully.
5.2 Cleaning
To clean the switch, use a soft, dry cloth. Do not use liquid or aerosol cleaners, as they may damage the device. Ensure the switch is powered off and disconnected from the power source before cleaning.
5.3 Environmental Considerations
Maintain the operating environment within the specified temperature and humidity ranges to ensure the longevity and reliability of the switch.
6. Troubleshooting
6.1 No Power
- Ensure the power cord is securely connected to both the switch and a working electrical outlet.
- Verify the power outlet is functional by plugging in another device.
- Check the power LED on the front panel. If it is off, contact support.
6.2 No Network Connectivity
- Check the Ethernet cables for secure connections at both ends.
- Verify the link/activity LEDs for the connected ports. A solid green or amber light indicates a valid link. A blinking light indicates activity.
- Ensure the connected device is powered on and functioning correctly.
- Check the switch's configuration via the management interface to ensure ports are enabled and correctly configured.
6.3 Cannot Access Management Interface
- Verify your computer's IP address is in the same subnet as the switch's management IP.
- Ensure there are no IP address conflicts on the network.
- Try pinging the switch's IP address from your computer.
- If you have forgotten the password, you may need to perform a factory reset (refer to the full product manual for instructions, as this will erase all configurations).
7. Specifications
| Feature | Specification |
|---|---|
| Model Number | M4250-26G4XF-PoE+ (GSM4230PX-100NAS) |
| Brand | NETGEAR |
| Total Number of Network Ports | 24 (PoE+) + 2 (Uplink) |
| Interface Type | PoE+ |
| Data Transfer Rate | 1.18 Gigabits Per Second |
| Product Dimensions | 2 x 17 x 16 inches |
| Item Weight | 6 pounds |
| Color | Black |
| UPC | 606449151626 |
| First Available | January 11, 2022 |
8. Warranty and Support
NETGEAR products are backed by a limited hardware warranty. The specific terms and duration of your warranty may vary by region and product. Please retain your proof of purchase for warranty claims.
For detailed warranty information, technical support, firmware downloads, and additional resources, please visit the official NETGEAR support website:
You can also find frequently asked questions (FAQs) and community forums on the support website to assist with common issues and best practices.