1. Introduction
This manual provides detailed instructions for the operation and maintenance of your AllAboutAdapters All-in-1 Retro Cassette Player. This versatile device combines a cassette player, AM/FM radio tuner, digital clock, and audio recorder, offering a blend of classic audio enjoyment with modern convenience. Please read this manual thoroughly before use to ensure proper functionality and longevity of your device.
2. Key Features
- All-in-1 functionality: Cassette player, AM/FM radio, digital LED clock, and audio recorder.
- Accurate digital tuning for AM/FM radio stations with digital LED screen display of radio channel frequency.
- Playback classic music cassette tapes through the internal loud speaker or privately via earphones.
- Record favorite FM or AM stations (classical music, live sports, news, podcasts) directly onto cassette tapes for later playback.
- Voice recording function via the internal microphone.
- Easy timer for scheduling automatic turn-on of pre-set FM/AM radio stations at a specified time.
- Built-in loud speakers and microphone.
- Long telescopic antenna for enhanced AM/FM radio signal reception.
- Standard cassette player functions: Forward, Rewind, Stop, Auto Reverse, Loop Play. Auto reverse allows continuous playback.
- LED screen displays time, clock settings, digital tuning, or scheduled radio broadcasts.
- Belt clip for portable use.
- Flexible power supply: DC 5V via USB power cord (included) or 2 AA batteries (not included) for mobile use.
3. What's in the Box
- All-in-1 Retro Cassette Player (Model: Allaboutadapters-X)
- DC 5V to USB Power Cord
- Earphone
- User Manual (this document)
4. Setup
4.1 Powering the Device
Your cassette player offers two power options:
- DC 5V USB Power: Connect the included DC 5V to USB power cord to the DC 5V port on the device and plug the USB end into a compatible USB wall charger (not included) or a powered USB port.
- Battery Power: For mobile use, open the battery compartment (located on the back of the unit) and insert 2 AA batteries (not included), ensuring correct polarity.

Image Description: This image displays the cassette player alongside its DC 5V to USB power cord. A diagram shows how to connect the USB cord to a wall charger and how to install 2 AA batteries into the battery compartment on the back of the unit. The image highlights the dual power supply options.
4.2 Antenna Setup
For optimal radio reception, extend the telescopic antenna fully. Adjust its position for the best signal clarity.

Image Description: A side view of the cassette player is shown with its telescopic antenna fully extended. Labels indicate the earphone port, volume control, cassette tape/radio mode switch, radio tuning dial, and speaker.
5. Operating Instructions
5.1 General Controls Overview

Image Description: This image provides a comprehensive diagram of the cassette player's front, top, and side controls. Each control is numbered, and a legend below the diagram identifies each function, including DC power plug, radio tuning dial, T(tape)/R(radio) switch, volume dial, earphone plug, cassette tape door, speakers, AM/FM mode switch, antenna, auto reverse, reverse/loop switch, fast forward, rewind, play, record, stop, built-in microphone, radio timer on/off button, LED clock/FM/AM display, and hour/minute buttons.
5.2 Cassette Playback
- Open the cassette tape door.
- Insert a cassette tape, ensuring the exposed tape is facing upwards.
- Close the cassette tape door.
- Slide the mode switch to "TAPE".
- Press the PLAY button to start playback.
- Adjust the volume using the volume control dial.
- Use FFWD (Fast Forward) and REW (Rewind) buttons to navigate the tape.
- Press the STOP button to halt playback.
- The Auto Reverse function allows the tape to play continuously by reversing direction at the end of a side. The Loop Play setting provides infinite reverse.
5.3 AM/FM Radio Operation
- Extend the telescopic antenna for better reception.
- Slide the mode switch to "RADIO".
- Select either AM or FM band using the AM/FM mode switch.
- Use the radio tuning dial to find your desired station. The digital LED screen will display the frequency.
- Adjust the volume using the volume control dial.
5.4 Recording Functions
The device supports recording from both radio and the built-in microphone onto a blank cassette tape.
- Insert a blank cassette tape into the cassette compartment.
- To Record from Radio:
- Switch to "RADIO" mode and tune to your desired AM/FM station.
- Press the RECORD button to begin recording.
- Press STOP to end recording.
- To Record Voice (Voice Memo):
- Ensure the mode switch is set to "TAPE".
- Press the RECORD button. Speak clearly into the built-in microphone.
- Press STOP to end recording.

Image Description: This image illustrates the digital clock display set to 2:30 PM. Below it, the cassette player is shown with musical notes emanating from it, symbolizing audio playback. The bottom section depicts the player recording AM/FM radio frequencies (FM 89.60 MHz, FM 102.60 MHz, AM 1300 KHz) onto a cassette tape, with a microphone icon indicating recording capability.

Image Description: This image demonstrates the voice recorder function of the cassette player. A stylized illustration of a person is shown speaking into the device, with a microphone icon indicating that external voice or sound can be recorded onto a cassette tape through the internal microphone.
5.5 Digital Clock and Timer
The integrated digital LED screen displays the current time. Use the TIME SET, HOUR, and MINUTE buttons to set the clock. The timer function allows you to schedule the device to automatically turn on a pre-set FM or AM radio station at a specific time.

Image Description: A front view of the All-in-1 Retro Cassette Player is displayed, highlighting its digital LED screen showing "FM 105.6 MHz". Control buttons for "ALARM SET", "TIME SET", "HOUR", and "MINUTE" are visible, along with the "ALARM ON/OFF" switch and AM/FM band selection buttons.
6. Maintenance
- Cleaning: Use a soft, dry cloth to clean the exterior of the device. Do not use liquid cleaners or abrasive materials.
- Tape Head Cleaning: Periodically clean the tape heads with a specialized cassette head cleaning kit to ensure optimal sound quality and prevent tape damage.
- Battery Replacement: If using batteries, replace them when the device's performance diminishes. Remove batteries if the device will not be used for an extended period to prevent leakage.
- Storage: Store the device in a cool, dry place away from direct sunlight and extreme temperatures.
7. Troubleshooting
| Problem | Possible Cause | Solution |
|---|---|---|
| Device does not power on. | No power supply or dead batteries. | Ensure USB power cord is securely connected to a working power source, or replace AA batteries. |
| Poor radio reception. | Antenna not extended or poor signal area. | Fully extend the telescopic antenna and adjust its position. Try moving to a different location. |
| Cassette tape not playing or distorted sound. | Tape incorrectly inserted, dirty tape heads, or worn tape. | Ensure tape is inserted correctly. Clean tape heads. Try a different tape. |
| Recording quality is poor. | Microphone too far, background noise, or worn tape. | Speak closer to the microphone in a quiet environment. Use a new, high-quality blank tape. |
8. Specifications
- Item Weight: 11 ounces
- Item Model Number: Allaboutadapters-X
- Brand: AllAboutAdapters
- Color: Silver
- Special Feature: Portable
- Connectivity Technology: Auxiliary
- Tuner Technology: AM, FM
- Style: Retro
- Power Source: Battery Powered (2 AA batteries, not included) or DC 5V (USB power cord included)
- Radio Bands Supported: AM, FM
- Included Components: Earphone
- Recommended Uses For Product: Music, News
- Dimensions: Approximately 4.75" (width) x 3.4" (height) x 1.5" (depth)
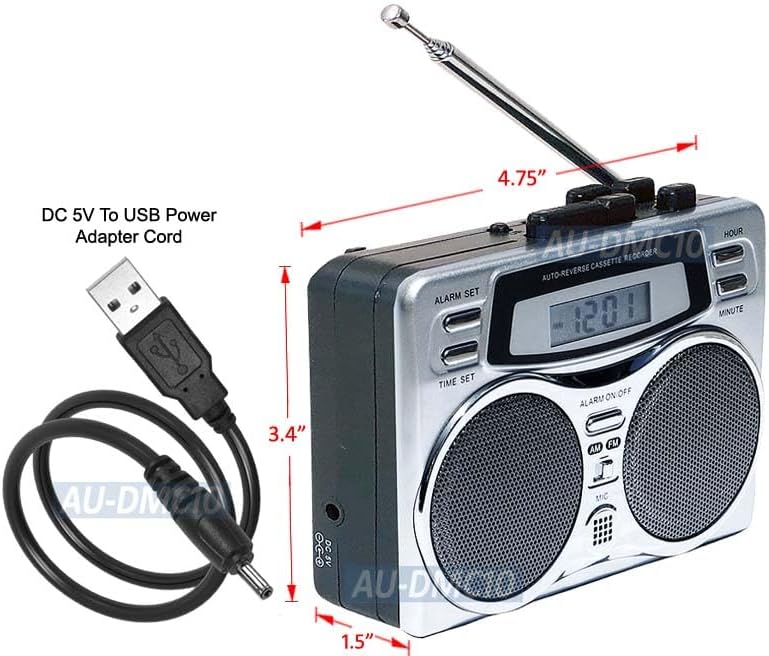
Image Description: This image displays the cassette player with its approximate dimensions labeled: 4.75 inches in width, 3.4 inches in height, and 1.5 inches in depth. The DC 5V to USB power adapter cord is also shown.
9. Warranty and Support
For warranty information or technical support, please contact the seller directly through your purchase platform or refer to any warranty documentation included with your product. Keep your purchase receipt as proof of purchase.


