1. Introduction
This manual provides essential information for the installation, operation, and maintenance of your Creality Spider High-Temperature and High-Speed Hotend. Designed for 3D printers, this hotend features an all-metal construction, enabling high-temperature and high-speed printing with a wide range of filaments.
Key Features:
- High-Temperature Capability: Supports printing temperatures up to 500°C.
- High-Speed Printing: Achieves printing speeds up to 250mm/s due to optimized filament fluidity.
- All-Metal Design: Features a full metal heat sink, throat tube, heating block, and nozzle for enhanced durability and performance.
- Clog-Resistant Design: The fluid-polished inner wall of the heat break and nozzle (Ra<0.3) and stainless steel thermal heat break minimize clogging.
- Wide Filament Compatibility: Compatible with PLA, ABS, PETG, TPU, PP, PC, Nylon, PEEK, PEI, and various composite materials.
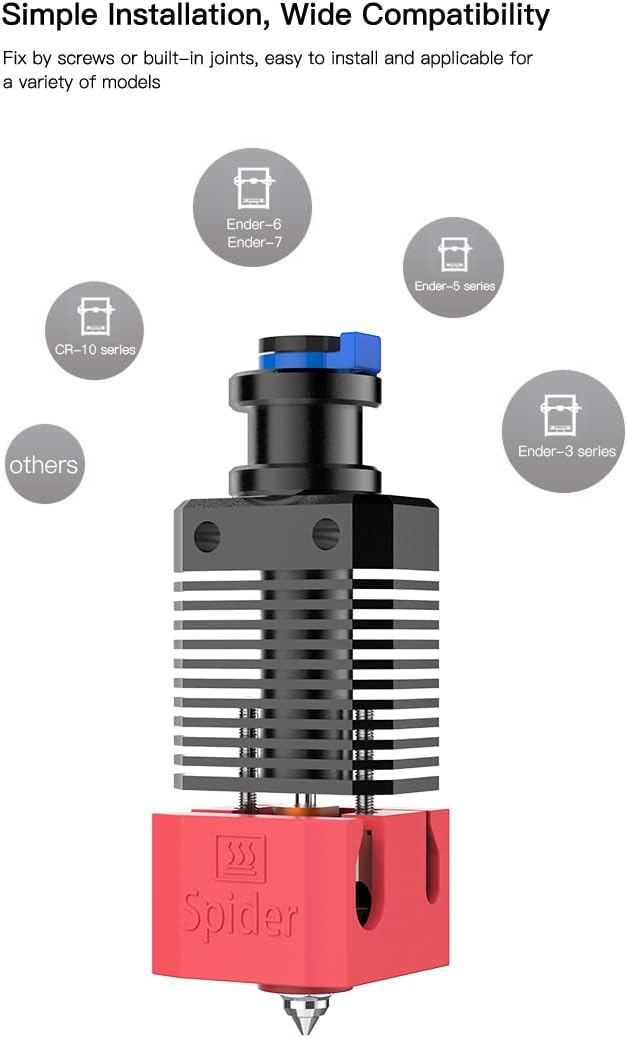
- Broad Printer Compatibility: Designed for easy installation on various 3D printer models, including Ender-2/3/5/6/7 series and CR-10 series.

2. Product Specifications
| Specification | Detail |
|---|---|
| Nozzle Diameter | 0.4mm, 0.6mm (included) |
| Color | Black (heat sink), Red (heating block) |
| Net Weight | 70g |
| Materials | High thermal conductivity copper alloy, High strength aluminum alloy, Fluid polished throat tube (stainless steel) |
| Maximum Printing Temperature | 500°C |
| Maximum Printing Speed | 250mm/s |
| Compatible Filaments | PLA, ABS, PETG, TPU, PP, PC, Nylon, PEEK, PEI, and composite materials (carbon brazing, steel, wood, boron carbide, tungsten, phosphorescent pigments) |
| Compatible Models | Ender-2, Ender-3, Ender-3 Max, Ender-3 Pro, Ender-3 V2, Ender-5, Ender-5 Plus, Ender-5 Pro, Ender-6, Ender-7, CR-10, CR-10S, CR-10-S5, CR-10 MINI, CR-10-S4 |
| Package Dimensions | 4.37 x 2.64 x 1.97 inches |
| Item Weight (Package) | 5.6 ounces |

3. Package Contents
Verify that all components are present in your package:
- Spider High-Temperature and High-Speed Hotend (assembled)
- Nozzles (0.4mm x1, 0.6mm x1)
- Thermistor (1PC)
- M3 Hex wrench (1PC)
- M2 Hex wrench (1PC)
- M3 nut (2PCS)
- Open wrench (1PC)
- Adapter (1PC)
- M3x20 screw (4PCS)
- Cable ties (5PCS)

4. Installation Guide
The Spider Hotend is designed for straightforward installation. It can be fixed using screws or built-in joints, depending on your 3D printer model. Always refer to your specific 3D printer's manual for detailed instructions on hotend replacement.
General Installation Steps:
- Power off and unplug your 3D printer. Allow the existing hotend to cool completely.
- Carefully remove the existing hotend assembly from your 3D printer. This typically involves disconnecting wires (heater cartridge, thermistor, fan) and unscrewing mounting hardware.
- Assemble the Spider Hotend components if necessary (refer to Figure 4 for an exploded view). Ensure the throat tube is securely seated between the heat sink and heating block.
- Mount the Spider Hotend onto your printer's extruder assembly using the appropriate screws or joints.
- Connect the heater cartridge and thermistor wires to the corresponding ports on your printer's mainboard. Ensure correct polarity for the thermistor if applicable.
- Perform a PID tune for the new hotend to ensure stable temperature control. Consult your printer's firmware documentation for this procedure.
- Adjust Z-offset and level your print bed as the new hotend may have a different nozzle height.

Compatible Printer Models:
The Creality Spider Hotend is compatible with a wide range of 3D printers, including:
- Ender Series: Ender-2, Ender-3, Ender-3 Max, Ender-3 Pro, Ender-3 V2, Ender-5, Ender-5 Plus, Ender-5 Pro, Ender-6, Ender-7
- CR-10 Series: CR-10, CR-10S, CR-10-S5, CR-10 MINI, CR-10-S4
5. Operation
Filament Compatibility:
The all-metal design of the Spider Hotend allows for printing with a broad spectrum of filaments, including standard and engineering-grade materials:
- Standard: PLA, ABS, PETG, TPU
- Engineering: PP, PC, Nylon, PEEK, PEI
- Composite Materials: Filaments containing abrasive additives such as carbon brazing, steel, wood, boron carbide, tungsten, and phosphorescent pigments.

Printing Speed and Temperature:
The optimized internal structure and copper alloy nozzle enable the Spider Hotend to achieve high printing speeds and temperatures:
- Maximum Printing Speed: Up to 250mm/s. This is facilitated by the fluid-polished inner wall of the heat break and extended nozzle length, which improve filament flow.
- Maximum Operating Temperature: The hotend can safely operate at temperatures up to 500°C, making it suitable for advanced materials requiring higher processing temperatures.

6. Maintenance
Regular maintenance ensures optimal performance and longevity of your Spider Hotend.
Nozzle Care:
- Cleaning: Periodically clean the exterior of the nozzle and heating block to remove any accumulated filament residue. Ensure the hotend is cool before cleaning.
- Replacement: The hotend includes 0.4mm and 0.6mm nozzles. If a nozzle becomes worn or clogged beyond cleaning, replace it with a new one. Ensure the hotend is heated to printing temperature before attempting to remove or install a nozzle to prevent damage to the threads.
- Smooth Extrusion: The copper alloy nozzle and fluid-polished inner wall are designed for smooth extrusion. If you notice inconsistent extrusion, check for partial clogs or wear.

Heat Sink and Throat Tube:
- Ensure the heat sink fins are free from dust and debris to maintain efficient heat dissipation.
- The stainless steel throat tube provides thermal isolation. Avoid overtightening components during assembly to prevent damage to this critical part.
7. Troubleshooting
This section addresses common issues you might encounter with your hotend. For more specific troubleshooting related to your 3D printer, consult its official documentation.
Common Issues:
- Filament Clogging:
- Ensure the hotend temperature is appropriate for the filament being used.
- Check for debris in the nozzle or throat tube. A cold pull or needle can help clear minor clogs.
- Verify that the heat break cooling fan is operating correctly.
- Temperature Instability/Thermal Runaway:
- Confirm the thermistor and heater cartridge are securely connected and not damaged.
- Perform a PID tune for the hotend after installation or if temperature fluctuations occur.
- Ensure the thermistor is properly seated in the heating block.
- Poor Extrusion Quality:
- Check if the nozzle is worn and requires replacement.
- Verify that the filament diameter matches the printer settings.
- Ensure proper retraction settings in your slicer software to prevent stringing or oozing.