
LAMTTO C300
LAMTTO C300 3-Channel Dash Camera User Manual
Model: C300 | Brand: LAMTTO
Introduction
This user manual provides detailed instructions for the installation, operation, and maintenance of your LAMTTO C300 3-Channel Dash Camera. Please read this manual thoroughly before using the device to ensure proper functionality and safety.

Image: The LAMTTO C300 3-Channel Dash Camera, showing its main unit, a separate rear camera, and a 64GB SD card. The main unit features a front-facing lens and an interior-facing lens.
Package Contents
Verify that all components are present in the package:
- Triple-way Dash Camera (Main Unit)
- Suction Cup Mount
- Backup Camera (Rear Camera)
- Crowbar (for cable routing)
- Car Charger
- Mini USB Cable
- Cable Clamps
- Screws and Adhesive (for rear camera mounting)
- User Manual (this document)
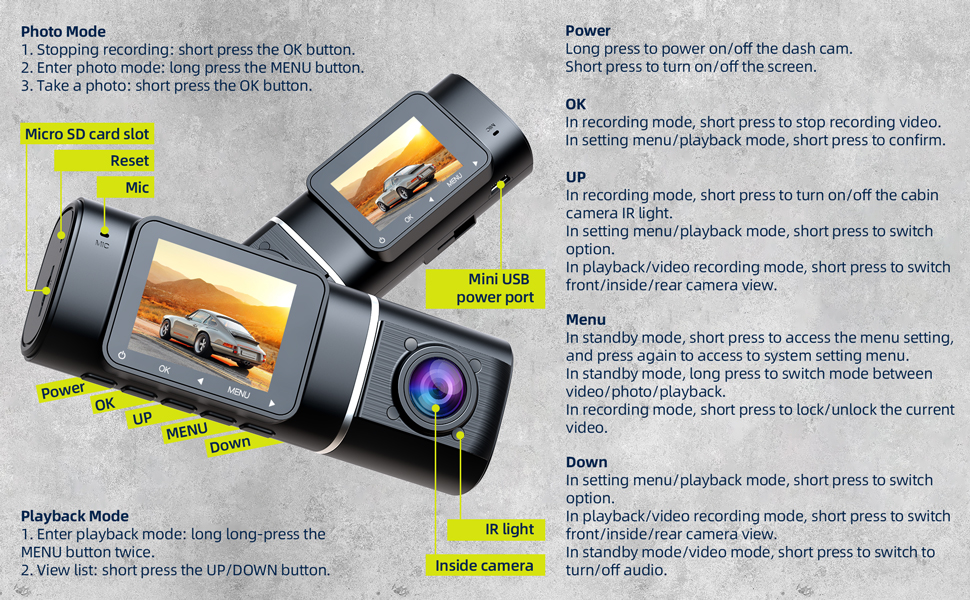
Image: An illustration detailing the components included with the LAMTTO C300 dash camera, alongside a diagram demonstrating the wiring for the front, interior, and rear cameras within a vehicle.
Setup and Installation
1. Initial Preparation
- SD Card Formatting: Before first use, insert a Class 10, U3 or higher speed Micro-SD card (not included, but 64GB is mentioned in product title, so assume it's included or recommended) into the dash camera. Format the SD card using the camera's settings menu.
- Power Source: The internal battery is primarily for parking monitoring. For continuous operation, connect the dash camera to your vehicle's power supply using the provided car charger. If parking monitoring is desired when the car is off, an external power bank may be required.
- Pre-Installation Test: Before permanent installation, connect the dash cam to the original cigarette lighter power source to verify that all three cameras (front, interior, rear) power on and record correctly.
2. Mounting the Dash Camera
The main dash camera unit is designed to be compact and can be installed behind the rearview mirror to avoid obstructing your view.
- Attach the suction cup mount to the main dash camera unit.
- Clean the chosen area on your windshield, preferably behind the rearview mirror, to ensure a secure suction.
- Press the suction cup firmly against the windshield and engage the locking mechanism.
- Adjust the camera angle to ensure the front lens captures the road ahead clearly.

Image: A hand demonstrating the installation of the LAMTTO C300 dash camera onto a car's windshield using its suction cup mount.
3. Connecting the Rear Camera
- Route the rear camera cable from the main dash camera unit to the rear of your vehicle. Use the provided crowbar to tuck the cable neatly along the headliner and pillar trim.
- Mount the rear camera on the rear windshield or near the license plate using the provided screws or adhesive. Ensure the camera has a clear view of the area behind your vehicle.
- Connect the rear camera cable to the "AV-IN" port on the main dash camera unit.
Operation
Device Controls and Ports

Image: A detailed diagram illustrating the various buttons, ports, and features of the LAMTTO C300 dash camera, including Power, OK, UP, MENU, Down buttons, Micro SD card slot, Reset, Mic, Mini USB power port, IR light, and Inside camera.
- Power Button:
- Long press to power on/off the dash cam.
- Short press to turn on/off the screen.
- OK Button:
- In recording mode, short press to stop recording video.
- In setting menu/playback mode, short press to confirm selection.
- To take a photo, short press the OK button in photo mode.
- UP Button:
- In recording mode, short press to turn on/off the cabin camera IR light.
- In setting menu/playback mode, short press to switch option.
- In playback/video recording mode, short press to switch front/inside/rear camera view.
- MENU Button:
- In standby mode, short press to access the menu setting, and press again to access system setting menu.
- In standby mode, long press to switch mode between video/photo/playback.
- In recording mode, short press to lock/unlock the current video.
- Down Button:
- In setting menu/playback mode, short press to switch option.
- In playback/video recording mode, short press to switch front/inside/rear camera view.
- In standby mode/video mode, short press to turn off/on audio recording.
- Micro SD Card Slot: Insert your Micro SD card here.
- Reset Button: Use a thin object to press the reset button if the device becomes unresponsive.
- Mini USB Power Port: Connect the car charger here for power.
Recording Modes and Features
- Three-Channel Recording: The C300 simultaneously records video from the front (170° wide-angle), interior (150° wide-angle), and rear (150° wide-angle) cameras, providing comprehensive coverage around your vehicle. All cameras record in 1080P resolution.
- Loop Recording: When the memory card is full, the dash camera automatically overwrites the oldest unlocked video files with new recordings, ensuring continuous recording. A 32GB SD card typically supports about 6 hours of recording.
- Accident Video Lock (G-Sensor): Equipped with a built-in gravitational acceleration sensor, the dash cam automatically detects sudden braking or collisions. In such events, the current video segment is locked and protected from being overwritten, serving as crucial evidence.

Image: A visual representation of the accident video lock feature, showing a padlock icon superimposed on a scene of a minor car collision, indicating video protection.
- Parking Monitoring & Motion Detection: In motion detection mode, the dash cam enters standby. It will automatically wake up and begin recording if the front camera detects movement. If an impact or collision is detected while the car is off, the dash cam will automatically turn on and record from all three cameras.

Image: A red car enclosed within a transparent bubble, with "24H" prominently displayed, symbolizing the 24-hour parking monitoring feature of the dash camera.
- Infrared (IR) Night Vision & WDR: The interior camera features 4 infrared lights for clear recording in low-light conditions, ensuring details like road signs and license plates are visible at night. Wide Dynamic Range (WDR) technology enhances video clarity in varying light conditions.

Image: A split image demonstrating the effectiveness of infrared night vision, with the top half showing a car interior in normal lighting and the bottom half showing the same interior clearly visible in darkness due to IR illumination.
Maintenance
- SD Card Maintenance: Regularly format your Micro SD card (e.g., once a month) to maintain optimal recording performance and prevent data corruption.
- Cleaning: Use a soft, dry cloth to clean the camera lenses and the device body. Avoid using abrasive cleaners or solvents.
- Temperature Considerations: The operating temperature range for the dash camera is -4°F to 122°F (-20°C to 50°C). Avoid exposing the camera to direct sunlight for extended periods, especially in hot climates. If parking in direct sun, consider adjusting the camera's position or removing it to prevent screen damage.
Troubleshooting
| Problem | Solution |
|---|---|
| Device is frozen or unresponsive. | Press the "OK" button to pause recording, then press the "MENU" button to access settings. If still unresponsive, use a thin object to press the Reset button. |
| Dash cam does not power on or turns off immediately. | Ensure the dash cam is properly connected to the car charger. The internal battery has limited capacity and is primarily for parking monitoring, not continuous operation. Verify the car charger is working. |
| Settings revert to default after turning off the car. | This indicates the internal battery may be depleted or faulty. Ensure the dash cam is always connected to a reliable power source when in use. Contact customer service if the issue persists. |
| Video quality is poor or blurry. | Clean the camera lenses. Ensure the protective film has been removed from the lenses. Check if the camera is within its optimal operating temperature range. |
| SD card error or recording stops. | Ensure you are using a Class 10, U3 or higher speed Micro-SD card. Format the SD card regularly. If the issue persists, try a different compatible SD card. |
Specifications
| Feature | Detail |
|---|---|
| Model Name | C300 |
| Product Dimensions | 1.37 x 4.33 x 1.57 inches |
| Item Weight | 1.15 pounds |
| Video Capture Resolution | 1080p (Front, Interior, Rear) |
| Front Camera Angle | 170° |
| Interior Camera Angle | 150° |
| Rear Camera Angle | 150° |
| Special Features | IR Night Vision, Parking Monitor, Motion Detection, Accident Lock (G-Sensor), Loop Recording |
| Connectivity Technology | USB |
| Mounting Type | Suction Mount |
| Control Method | Touch (referring to button presses on device) |
| Battery | 1 Lithium Polymer battery (internal, small capacity for parking monitor) |
| Color | Black |
| Manufacturer | LAMTTO |
Warranty and Customer Support
LAMTTO provides comprehensive support for its products:
- Lifetime Warranty: The product comes with a lifetime warranty.
- Free Exchange: Free exchange is available within the first 3 months of purchase.
- 24/7 Technical Support: 7 days a week, 24 hours a day technical support is available to assist with any queries or issues.
For assistance, please contact LAMTTO customer service. Refer to the product packaging or official LAMTTO website for contact details.

Image: An illustration summarizing LAMTTO's customer support commitments, including 24-hour response, 90-day return/exchange policy, and lifetime after-sale service.
Related documentsC300


Ask a question about this manual
Ask about setup, troubleshooting, compatibility, parts, safety, or missing instructions. Manuals+ will review the question and use this page’s manual context to help answer it.