1. Introduction and Overview
The Raymarine Element 7 HV is a 7-inch chart plotter designed for marine navigation and fishfinding. It integrates advanced CHIRP Sonar, HyperVision technology, Wi-Fi connectivity, and GPS capabilities. This unit provides a high-visibility, sunlight-viewable display for clear data presentation in various marine conditions. The fast quad-core processor ensures quick chart redraws and smooth 3D rendering, enhancing the user experience. Dedicated keypad controls simplify operation, and an oversized waypoint key allows for easy marking of important locations.

Figure 1.1: The Raymarine Element 7 HV Chart Plotter, showcasing its display and keypad controls.
2. Safety Information
- Always ensure the unit is securely mounted to prevent dislodgement during vessel movement.
- Disconnect power before performing any installation, maintenance, or troubleshooting procedures.
- Avoid exposing the unit to extreme temperatures or direct sunlight for prolonged periods when not in use.
- Do not attempt to open the unit's casing; this will void the warranty and may cause damage.
- Ensure all electrical connections are properly sealed and protected from water ingress.
- This product contains chemicals known to the State of California to cause cancer and birth defects or other reproductive harm. Handle with care and wash hands after contact.
3. Package Contents
Verify that all components are present in the package:
- Element 7 HV Display Unit
- Mounting Bracket (Bail with swivel)
- Power Cable
- Documentation Pack (including this manual)
- LightHouse North America Chart Card (pre-loaded or included separately)
- Mounting Hardware
Note: This specific model (E70532-00-102) does not include a transducer. A compatible transducer must be purchased separately for sonar functionality.
4. Setup and Installation
4.1 Mounting Options
The Element 7 HV supports two primary mounting methods:
- Bail with Swivel Mount: This method uses the included bracket, allowing for angle adjustment.
- Flush Mount: For a more integrated look, the unit can be flush-mounted into a panel. This requires cutting an opening and using appropriate flush mount hardware (sold separately).
4.2 Power Connection
Connect the supplied power cable to a 12V DC power source on your vessel. Ensure proper polarity (red to positive, black to negative) and use an appropriately rated fuse or circuit breaker for protection. Refer to the wiring diagram in the full installation guide for detailed instructions.

Figure 4.1: Rear view of the Element 7 HV, illustrating the power and transducer connection ports.
4.3 Transducer Connection (Optional)
If you have purchased a compatible HyperVision transducer, connect it to the designated port on the rear of the Element 7 HV unit. Ensure the connection is secure and waterproof.
5. Operating Instructions
5.1 Initial Power-On and Setup Wizard
Upon first power-on, the unit will guide you through an initial setup wizard. This includes language selection, time zone, and basic unit configuration. Follow the on-screen prompts.
5.2 Keypad Controls
The Element 7 HV features a dedicated keypad for intuitive control:
- Power Button: Press and hold to power on/off. Short press for quick menu access.
- Directional Pad (D-Pad): Navigate menus and pan charts.
- OK Button: Confirm selections.
- Back/Menu Button: Go back in menus or access main menu.
- Waypoint (WPT) Button: Quickly mark a waypoint at your current location.
- Home Button: Return to the home screen.
- Plus (+) / Minus (-) Buttons: Zoom in/out on charts, adjust sonar gain.
5.3 Navigating the User Interface
The home screen provides access to various applications such as Chart, Fishfinder, and Dashboard. Use the D-Pad to highlight an application and press OK to open it.

Figure 5.1: The Element 7 HV home screen, displaying various application icons for navigation, sonar, and system settings.
5.4 Chart Plotter Functions
The Element 7 HV comes with pre-loaded LightHouse North America Charts. Navigate the chart by panning with the D-Pad and zooming with the +/- buttons. Create and manage waypoints, routes, and tracks for efficient navigation.

Figure 5.2: A detailed chart view on the Element 7 HV, showing depth contours and vessel position.
5.5 Sonar Functions (CHIRP and HyperVision)
The unit supports standard CHIRP sonar for general fishfinding and HyperVision for super-high resolution sonar imagery. HyperVision operates at 1.2 megahertz, providing detailed views of underwater structures and fish. Access sonar views from the home screen. Adjust gain, range, and frequency settings as needed for optimal performance.

Figure 5.3: A HyperVision sonar display on the Element 7 HV, showing detailed underwater structure.
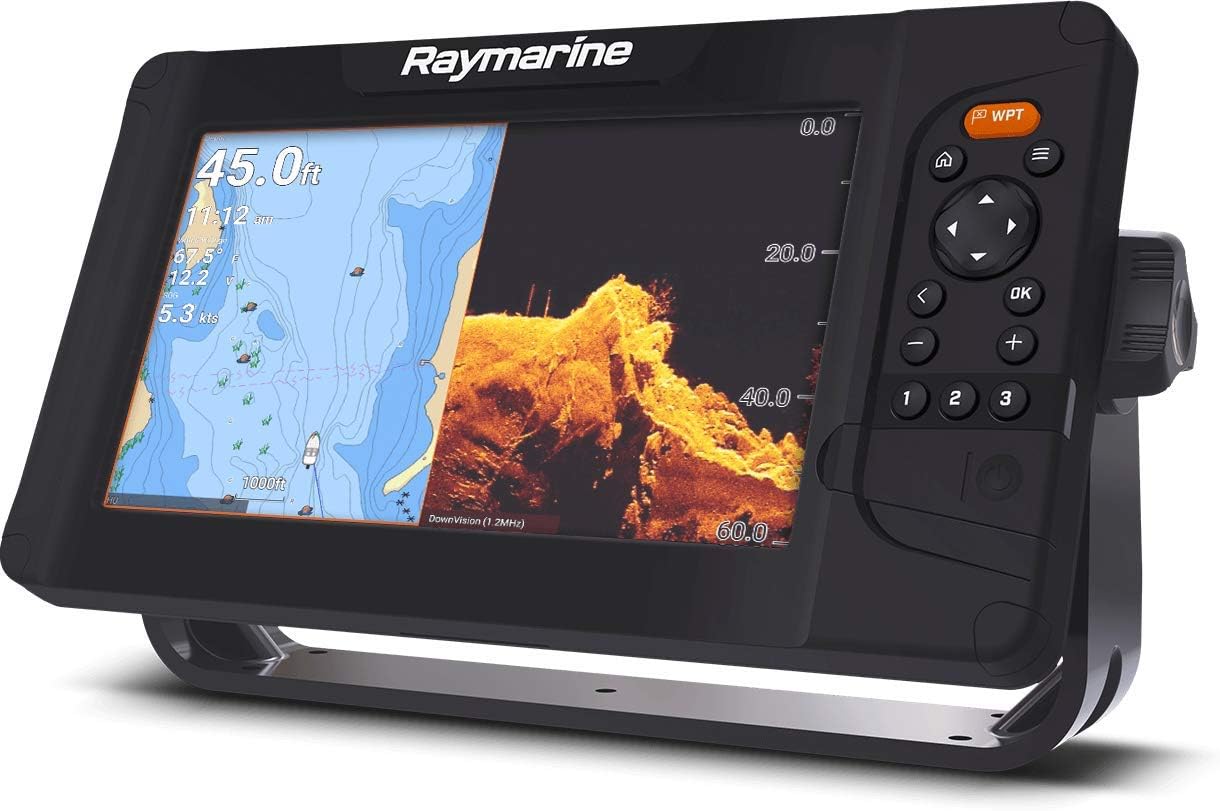
Figure 5.4: A split-screen view on the Element 7 HV, combining chart navigation with a DownVision sonar display.
5.6 Wi-Fi Connectivity
The integrated Wi-Fi allows for connection to mobile devices via the Raymarine Link app. This enables viewing and control of the Element 7 HV from your smartphone or tablet, as well as software updates.

Figure 5.5: The Element 7 HV installed on a boat, demonstrating its high-visibility display in an outdoor marine environment.
6. Maintenance
- Cleaning: Clean the display with a soft, damp cloth. Avoid abrasive cleaners or solvents. For stubborn marks, use a mild soap solution.
- Software Updates: Regularly check for and install software updates via Wi-Fi or by downloading from the Raymarine website to an SD card. Updates provide new features and performance improvements.
- Cable Inspection: Periodically inspect all cables and connections for signs of wear, corrosion, or damage.
7. Troubleshooting
| Problem | Possible Cause | Solution |
|---|---|---|
| Unit does not power on | No power, incorrect wiring, blown fuse | Check power cable connection, verify fuse, ensure correct polarity. |
| No GPS position | Poor satellite reception, unit not acquiring satellites | Ensure clear view of the sky, allow time for satellite acquisition. |
| No sonar image | Transducer not connected, faulty transducer, air bubbles under transducer | Check transducer connection, ensure transducer is clean and properly submerged. |
| Display is dim or unreadable | Brightness setting too low, direct sunlight glare | Adjust display brightness in settings, reposition unit or use a sun cover. |
8. Specifications
| Feature | Specification |
|---|---|
| Model Name | E70532-00-102 |
| Screen Size | 7 Inches |
| Display Type | LCD |
| Connectivity Technology | Wi-Fi |
| Map Type | North America (LightHouse Charts) |
| Sonar Technology | CHIRP Sonar, HyperVision (1.2 MHz) |
| Human Interface Input | Keypad |
| Item Weight | 3 Pounds |
| Item Dimensions (LxWxH) | 2.4 x 9.3 x 5.3 inches |
| Mounting Type | Bail with swivel, Flush |
| Processor | Fast quad-core |
9. Warranty and Support
9.1 Manufacturer Warranty
The Raymarine Element 7 HV is covered by a manufacturer's warranty. For specific details regarding warranty duration, coverage, and terms, please refer to the warranty card included with your product or visit the official Raymarine website. Keep your proof of purchase for warranty claims.
9.2 Technical Support
For technical assistance, troubleshooting beyond this manual, or service inquiries, please contact Raymarine customer support. Visit the official Raymarine website (www.raymarine.com) for contact information, FAQs, and additional resources.


