Introduction
This manual provides detailed instructions for the safe and proper operation, setup, and maintenance of your Heng Long 1/16 Scale KV-II Gigant RC Tank. Please read this manual thoroughly before use and retain it for future reference.

Image: Front-side view of the Heng Long 1/16 Scale KV-II Gigant RC Tank, showcasing its detailed camouflage paint scheme and main gun.
Safety Information
Please observe the following safety precautions to prevent injury or damage to the product:
- This product is intended for adult use.
- The product box may have been opened for inspection purposes.
- Some accessory parts may require minor processing or adjustment for attachment. If you are not confident in performing such adjustments, please exercise caution when purchasing. Claims regarding unattachable parts will not be accepted.
- Minor scratches or dirt may be present due to the nature of the product. Individuals seeking perfect condition should consider this before purchase.
- Do not modify or disassemble the product yourself. Any modifications or disassembly will void the warranty.
- Keep the delivery note as proof of purchase for warranty purposes.
Package Contents
Verify that all items listed below are included in your package:
- Tank Main Unit
- 2.4GHz 16-Channel Transmitter (requires 6 AAA batteries, not included)
- Li-ion 7.4V 1800mAh Battery (with XT60 connector)
- USB Charger (requires a separate USB wall adapter for direct wall charging)
- Infrared Receiver Unit
- BB Bullets
- Accessory Parts (various attachments)
- Figure
- Decals
- Smoke Liquid
- Target
- Instruction Manual (Japanese, English, Chinese)
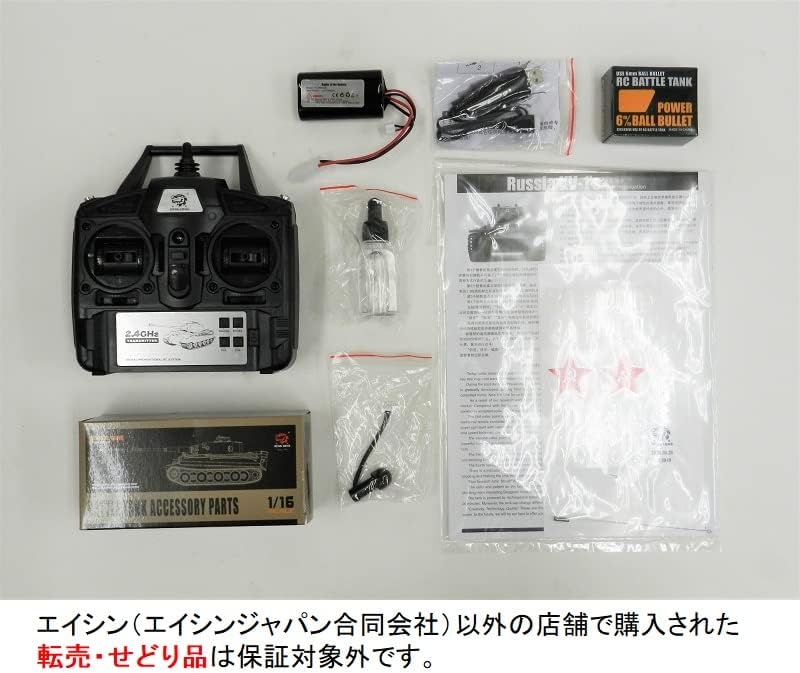
Image: All components included in the package, laid out on a white surface. This includes the tank, remote control, battery, charger, BB bullets, smoke liquid, various small accessory parts, and the instruction manual.
Product Features
- Realistic Effects: Equipped with sound, light, and movement gimmicks for an immersive experience.
- 2.4GHz Frequency: Allows multiple tanks to operate simultaneously without interference.
- Infrared Battle Unit: Engage in battles with other infrared-compatible RC tanks.
- BB Bullet Firing: Fire BB bullets with realistic gun recoil action.
- Smoke Function: Realistic smoke emission from the tank's rear (requires included smoke liquid).
- Turret Control: Turret can rotate left and right, and the gun barrel can elevate and depress via the transmitter.
- Engine Start Sound: Press the start button on the transmitter to hear the engine start sound before operation.
- Machine Gun: Press the machine gun button for sound effects with accompanying light.
- Movement: Forward/reverse (low/high speed), left/right turns, pivot turns, and super pivot turns.
- Independent Suspension: Left and right independent motor suspension for enhanced maneuverability.
- Detailed Design: Meticulously crafted details, including headlights and taillights, making it suitable as a display model.
Setup
1. Battery Installation (Tank)
- Locate the battery compartment on the underside of the tank.
- Open the battery compartment cover.
- Connect the Li-ion 7.4V 1800mAh battery (XT60 connector) to the tank's power connector.
- Carefully place the battery inside the compartment and close the cover.

Image: The Li-ion 7.4V 1800mAh battery with its XT60 connector, ready for installation into the tank.
2. Battery Charging
- Connect the included USB charger to the Li-ion battery.
- Plug the USB charger into a USB power source (e.g., computer USB port, USB wall adapter).
- The charging indicator light on the USB charger will show the charging status (refer to charger instructions for specific light indications).
- Charging typically takes approximately 4 hours. Do not overcharge the battery.
- Disconnect the charger once charging is complete.
3. Transmitter Battery Installation
- Locate the battery compartment on the back of the 2.4GHz transmitter.
- Open the battery compartment cover.
- Insert 6 AAA batteries (not included) according to the polarity markings (+/-).
- Close the battery compartment cover securely.
4. Accessory Attachment
Refer to the included accessory parts list and diagrams in the comprehensive manual for attaching the various small parts, figure, and decals to the tank. Some parts may require careful fitting or minor adjustments.
Operating Instructions
1. Power On/Off
- Ensure the tank battery is fully charged and installed.
- Turn on the power switch on the tank (usually located on the underside).
- Turn on the power switch on the transmitter. The transmitter and tank should automatically pair.
- To turn off, switch off the tank first, then the transmitter.
2. Basic Controls
Familiarize yourself with the transmitter controls:
- Movement: Use the left joystick for forward/reverse and the right joystick for left/right turns. Independent track control allows for pivot and super pivot turns.
- Turret Rotation: Use the designated buttons or joystick on the transmitter to rotate the turret left or right.
- Gun Elevation/Depression: Use the designated buttons to move the gun barrel up or down.
- BB Bullet Firing: Load BB bullets into the designated compartment. Press the firing button to shoot. The tank will exhibit a recoil action.
- Machine Gun: Press the machine gun button for sound effects with accompanying light.

Image: A detailed front view of the KV-II Gigant RC tank, highlighting its main gun and front armor. This perspective is useful for understanding the tank's forward movement and firing capabilities.

Image: A side profile of the KV-II Gigant RC tank, showing its tracks, road wheels, and the length of the main gun. This view helps illustrate the tank's overall dimensions and track system.

Image: A side view of the KV-II Gigant RC tank with its turret rotated, demonstrating the range of motion for the main gun. This image is helpful for understanding turret control and aiming.
3. Special Functions
- Smoke Function: Add a few drops of the included smoke liquid into the designated smoke generator port (refer to the main manual for exact location). Activate the smoke function via the transmitter.
- Infrared Battle: Ensure the infrared receiver unit is properly installed. Engage in infrared battles with other compatible RC tanks. Hits will be registered by the receiver.
Maintenance
- After use, turn off both the tank and the transmitter.
- Remove batteries from the tank and transmitter if storing for extended periods.
- Clean the tank with a soft, dry cloth. Avoid using water or chemical cleaners.
- Store the tank and accessories in a cool, dry place, away from direct sunlight.
- Regularly check tracks and gears for debris and clear as needed.
Troubleshooting
| Problem | Possible Cause | Solution |
|---|---|---|
| Tank does not respond to transmitter. |
|
|
| BB bullets do not fire. |
|
|
| Smoke function not working. |
|
|
Specifications
- Model: 3949-1
- Scale: 1/16
- Frequency: 2.4GHz
- Tank Dimensions (Approx.):
- Length: 480mm
- Width: 210mm
- Height: 210mm
- Battery: Li-ion 7.4V 1800mAh (XT60 connector)
- Charging Time: Approximately 4 hours
- Operating Time: Approximately 15-20 minutes (may vary with temperature and usage conditions)
- Material: Plastic
- Country of Origin: China
Warranty and Support
This product comes with a 30-day warranty covering initial defects from the date of arrival. Please retain your delivery note, as it serves as your warranty certificate.
The warranty does not cover issues arising from customer modifications, disassembly, or improper use. For any product malfunctions or inquiries, please contact the seller for repair or refund options within the warranty period.
Product Video
Watch this video for a 360-degree view of a similar RC tank model, demonstrating its features and movement capabilities.
Video: A 360-degree demonstration of an RC tank, showcasing its design, turret rotation, and movement. This video provides a visual overview of the product's dynamic features.


