1. Introduction
The VEVOR Milk Cream Separator is designed for efficient separation of whole milk into cream and skim milk. This manual provides essential information for the safe and effective use, assembly, operation, and maintenance of your separator. Please read all instructions carefully before operating the device.

Image: VEVOR Multifunctional Electric Cream Separator, emphasizing its durable construction.
2. Safety Instructions
- Always read and understand all instructions before operating the separator.
- Ensure the device is placed on a stable, level, and non-slip surface to prevent tipping during operation.
- Keep hands, hair, and loose clothing clear of all moving parts during operation.
- Unplug the separator from the power outlet before assembly, disassembly, cleaning, or any maintenance.
- Do not immerse the motor unit (red base) in water or any other liquid. Clean only with a damp cloth.
- Use only with the specified voltage input (100V-240V) and the provided power adapter.
- This appliance is not intended for use by persons with reduced physical, sensory, or mental capabilities, or lack of experience and knowledge, unless they have been given supervision or instruction.
- Keep the appliance and its cord out of reach of children.
- Do not operate the separator if any parts are damaged or missing.
3. Product Overview and Components
The VEVOR Milk Cream Separator consists of several key components designed for efficient and hygienic operation. The parts in contact with food are made from 304 stainless steel for durability and corrosion resistance.
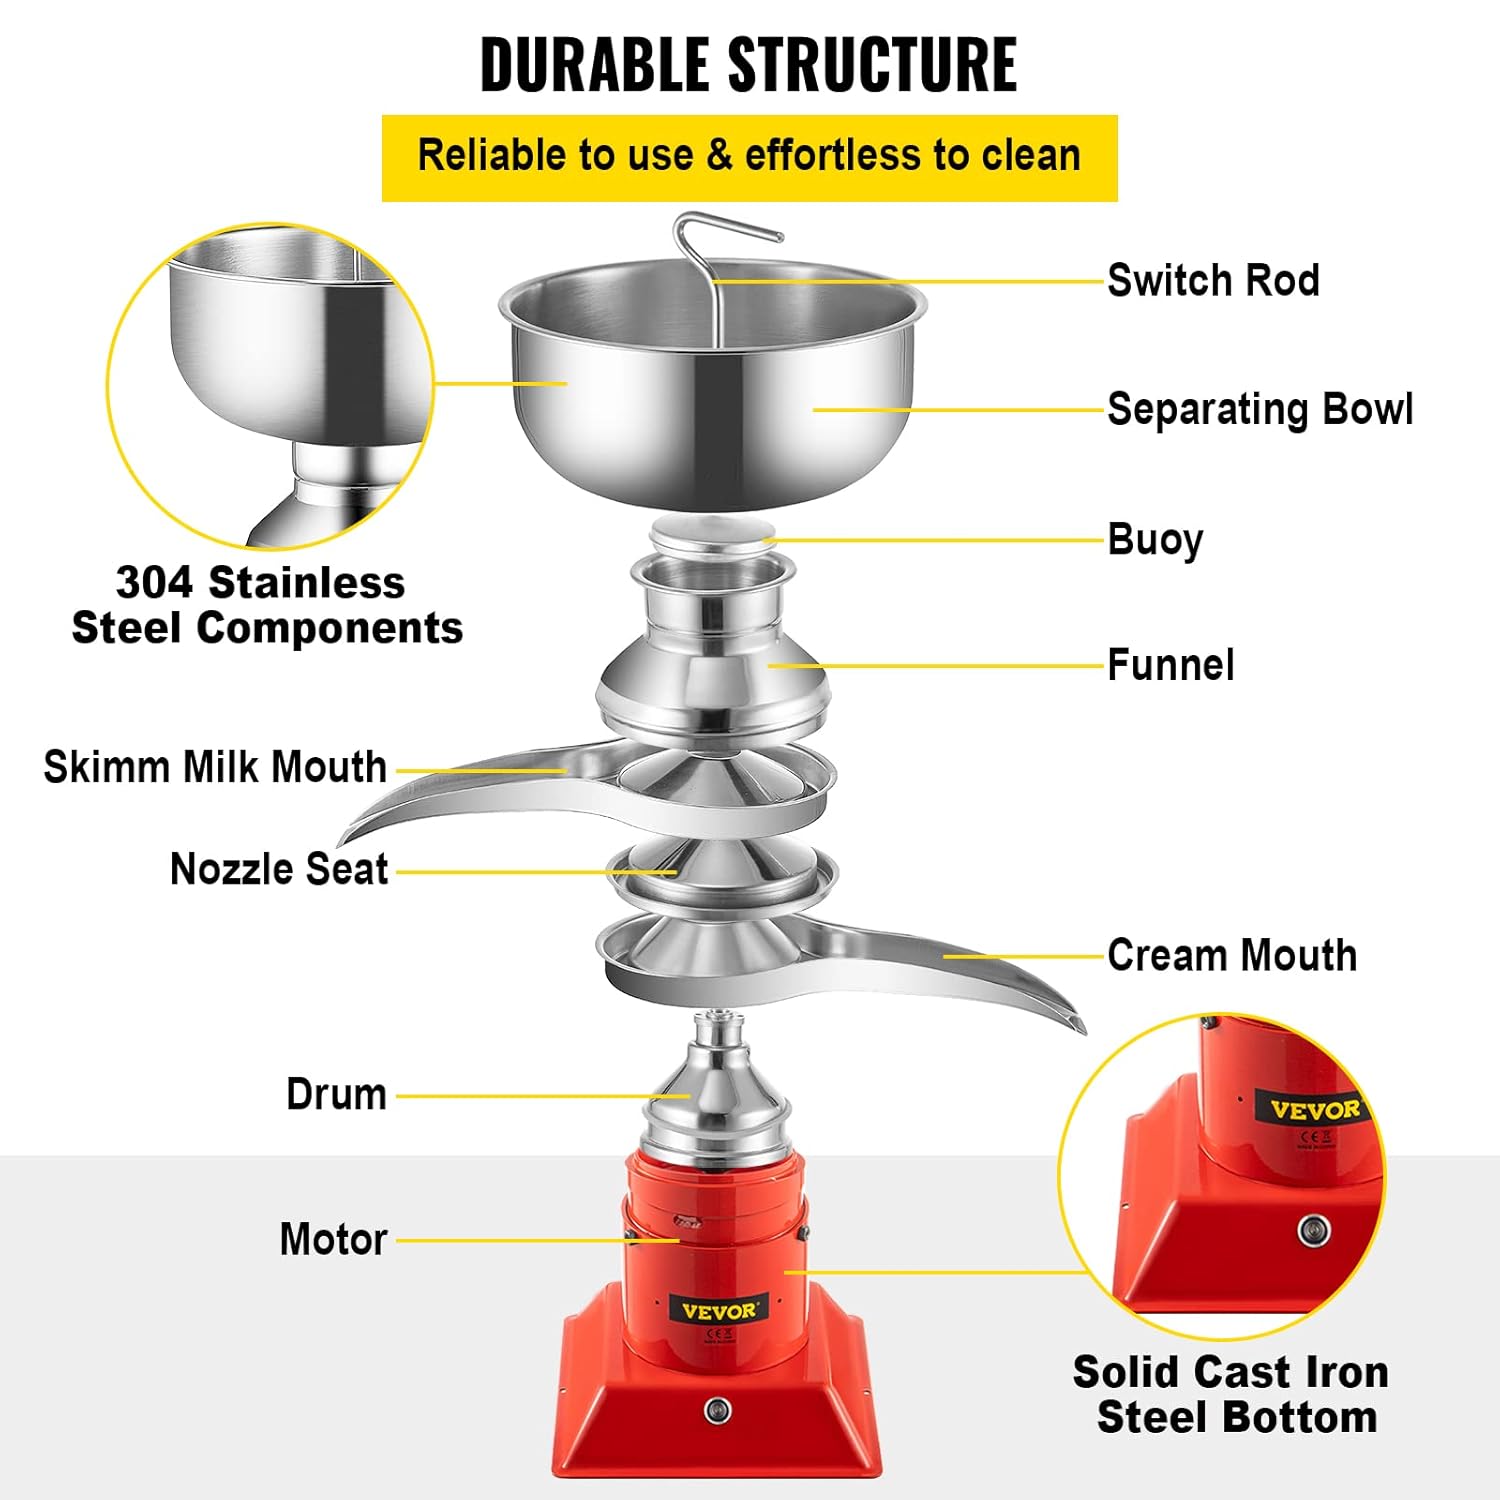
Image: Exploded view illustrating the main components of the VEVOR Milk Cream Separator.
Component List:
- Motor Unit: The red base containing the motor and power switch. Features a solid cast iron bottom for stability.
- Drum: The central rotating component where separation occurs.
- Cream Mouth: Outlet for separated cream.
- Skim Milk Mouth: Outlet for separated skim milk.
- Nozzle Seat: Supports the skim milk mouth.
- Funnel: Directs milk into the drum.
- Buoy: Regulates milk flow and contains the cream density adjustment screw.
- Separating Bowl (Milk Pot): 5-liter capacity bowl for holding raw milk.
- Switch Rod: Controls the flow of milk from the separating bowl to the drum.
4. Setup and Assembly
Follow these steps to correctly assemble your VEVOR Milk Cream Separator:
- Place the motor unit (red base) on a stable, level surface.
- Carefully place the drum onto the motor shaft, ensuring it is seated correctly.
- Attach the cream mouth and skim milk mouth to their respective positions on the main body, ensuring they are securely fitted.
- Place the nozzle seat over the drum.
- Position the funnel on top of the nozzle seat.
- Insert the buoy into the center of the funnel.
- Place the large separating bowl on top of the assembled components.
- Insert the switch rod into the designated opening in the separating bowl.
- Ensure all connections are tight and secure before plugging in the device.
5. Operation
Operating the VEVOR Milk Cream Separator involves a few simple steps to achieve efficient milk and cream separation.

Image: Visual guide for the three-step operation process.
Basic Operation Steps:
- Ensure the separator is fully assembled and plugged into a suitable power outlet.
- Pour the raw milk into the separating bowl.
- Press the power switch on the motor unit to turn on the machine. Ensure the milk pot switch (switch rod) is in the closed position initially.
- Allow the machine to run for approximately 30 seconds to reach full operating speed.
- After 30 seconds, turn on the milk pot switch (move the switch rod to the open position) to allow milk to flow into the separation drum.
- Place appropriate containers under the cream mouth and skim milk mouth to collect the separated products.
- Once all the milk has been processed, turn off the milk pot switch, then turn off the power switch on the motor unit.
Adjusting Cream Density:
The fat content of the cream can be adjusted to your preference. This adjustment is typically made via a screw located on the buoy assembly.

Image: Instructions for adjusting cream density.
- Turn off the power switch to stop the separation process.
- After the separator has completely stopped rotating, carefully disassemble the upper parts (separating bowl, buoy, funnel, nozzle seat, drum).
- Locate the adjustment screw on the buoy. Turning the screw to the right will result in thinner cream, while turning it to the left will produce thicker cream.
- Reassemble the separator and test the cream density with a small batch of milk.
6. Maintenance and Cleaning
Regular cleaning and maintenance are crucial for the longevity and hygienic operation of your milk cream separator.
- After Each Use: Immediately after each use, disassemble all parts that come into contact with milk.
- Washing: Wash all stainless steel components (separating bowl, funnel, buoy, drum, cream mouth, skim milk mouth, nozzle seat) with warm water and a mild, food-safe detergent. Use the provided brush to clean hard-to-reach areas.
- Rinsing: Rinse all parts thoroughly with clean water to remove any detergent residue.
- Drying: Dry all components completely before reassembly or storage to prevent water spots and bacterial growth. Air drying is recommended, or use a clean, dry cloth.
- Motor Unit: Wipe the motor unit (red base) with a damp cloth. Never immerse the motor unit in water.
- Storage: Store the clean and dry separator in a cool, dry place, away from direct sunlight and dust.
7. Troubleshooting
If you encounter issues with your VEVOR Milk Cream Separator, refer to the following common problems and solutions:
| Problem | Possible Cause | Solution |
|---|---|---|
| Machine does not turn on | No power supply; Power switch not engaged; Damaged power cord/adapter. | Check power connection; Ensure switch is fully pressed; Inspect cord for damage and replace if necessary. |
| Milk or cream leakage | Parts not assembled correctly; Gaskets/seal rings improperly seated or damaged. | Disassemble and reassemble all parts, ensuring they are tight and correctly aligned; Check seal rings for damage and replace if needed. |
| Ineffective separation (cream still in skim milk) | Cream density adjustment incorrect; Milk temperature too low/high (if applicable); Drum not reaching full speed. | Adjust the cream density screw (refer to Section 5); Ensure milk is at room temperature or slightly warmed (not boiling); Allow machine to run for 30 seconds before opening milk flow. |
| Excessive vibration or noise | Unstable surface; Parts improperly assembled or unbalanced drum. | Place on a firm, level surface; Disassemble and reassemble, ensuring all parts are correctly seated and balanced. |
8. Specifications
Detailed technical specifications for the VEVOR Milk Cream Separator:

Image: Comprehensive product specifications and dimensions.
- Model Number: Cream Separator 100L/h (NNJ-F50)
- Input Voltage: AC100-240V 50-60Hz 1.5A
- Rated Power: 40W
- Separation Efficiency: 100L/H (26.4 gallons/hour)
- Rotating Speed: 10500 RPM
- Milk Bowl Capacity: 5L (1.32 gallons)
- Fat Content in Skim Milk: Less than or equal to 0.03%
- Adjustable Fat Ratio: 1:4 to 1:10
- Main Materials: 304 Stainless Steel (food contact parts), Carbon Steel (base/motor housing)
- Product Weight: 16.51 lbs / 7.49 kg
- Product Dimensions (L x W x H): 19.3 in x 9.1 in x 12.6 in (49 cm x 23 cm x 32 cm)
- Accessories Included: 1 x Manual, 4 x Self-tapping Screws, 1 x Seal Ring, 1 x Brush, 1 x Special Wrench, 1 x Float Ball
9. Warranty and Support
For warranty information, please refer to the documentation included with your purchase or visit the official VEVOR website. If you require technical support, assistance with parts, or have any questions regarding the operation of your VEVOR Milk Cream Separator, please contact VEVOR customer service through their official channels.


