
1. Introduction
This manual provides comprehensive instructions for the safe and efficient installation and operation of your RunLessWire RW9-R2DKWH Wireless Dual-Rocker Switch Kit. This kit allows you to add a new indoor light switch without the need for running new wires or creating wall openings, providing control for two separate devices such as a fan and a light.
Please read this manual thoroughly before installation and retain it for future reference. Ensure all safety precautions are understood and followed.
2. Package Contents
Verify that all components listed below are included in your package:
- Two (2) 5 amp, 3-wire RF controllers/receivers
- One (1) Dual-Rocker Light Switch
- Four (4) Mounting Screws
- One (1) Installation Guide (this document)

Image: Contents of the RunLessWire RW9-R2DKWH kit, showing the dual-rocker switch and two receivers.
3. Key Features
- Wireless Operation: Utilizes RF technology to send signals up to 150+ feet, eliminating the need for new wiring.
- Self-Powered (No Batteries): The switch generates its own power through kinetic energy with each press, requiring no batteries.
- Dual Control: One dual-rocker switch can independently control two separate devices, such as a ceiling fan and its light.
- Easy Installation: Simple setup process without the need for complex electrical work or wall modifications.
- Mount Anywhere: The standard Decora-style switch can be mounted on any flat surface using screws or adhesive tape.
- Pre-Linked: Switches and receivers arrive pre-linked for immediate installation.
- No Interference: Designed to operate on unique frequencies to prevent interference with other devices.
- Energy Efficient: Lower energy consumption and contributes to reducing battery waste.

Image: Illustration highlighting the "No Batteries Needed" feature, emphasizing kinetic energy operation.

Image: Visual comparison demonstrating the simplicity of wireless installation versus traditional wired methods.
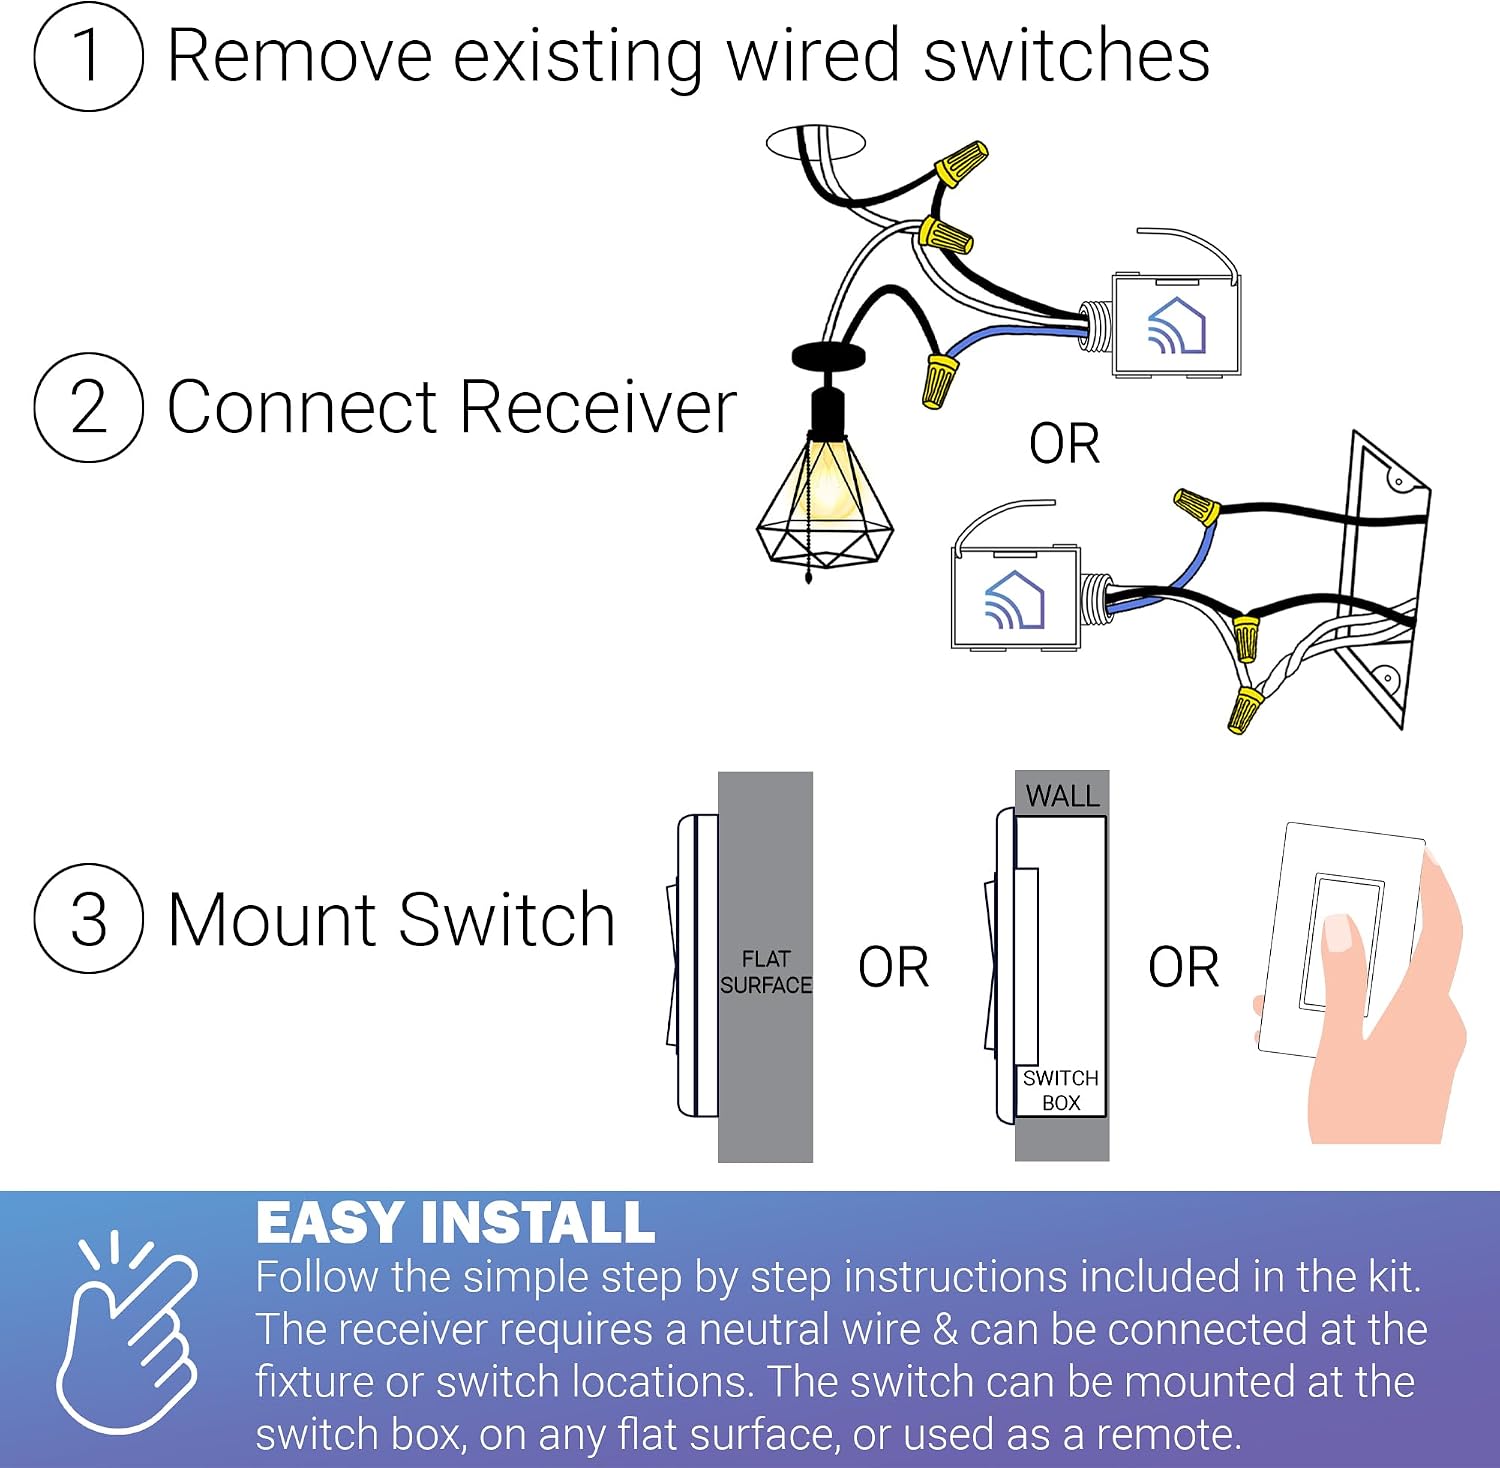
Image: Examples of the switch mounted in different home environments, illustrating its versatile placement options.
4. Installation Instructions
Important Safety Information: Before beginning any electrical work, ensure the power to the circuit is turned OFF at the circuit breaker or fuse box. If you are unsure about any steps, consult a qualified electrician.
4.1. Receiver Installation
The receivers can be installed in a light fixture junction box or a switch box. Each receiver controls one device (e.g., one for the fan, one for the light).
- Turn Off Power: Locate the circuit breaker controlling the fixture or switch you are working on and turn it OFF. Verify power is off using a voltage tester.
- Access Wiring: Remove the existing switch or light fixture to expose the wiring.
- Connect Receiver 1 (Light):
- Connect the black wire from the receiver to the hot (load) wire of the light fixture.
- Connect the white wire from the receiver to the neutral wire of the light fixture.
- Connect the blue wire from the receiver to the switched hot wire of the light fixture.
- Connect Receiver 2 (Fan):
- Connect the black wire from the second receiver to the hot (load) wire of the fan.
- Connect the white wire from the second receiver to the neutral wire of the fan.
- Connect the blue wire from the second receiver to the switched hot wire of the fan.
- Secure Receivers: Carefully tuck the receivers and wiring into the junction box, ensuring no wires are pinched.
- Restore Fixture/Switch: Reinstall the light fixture or switch plate.

Image: Wiring diagram illustrating the connection of two receivers to control a fan and a light independently.
4.2. Switch Mounting
The wireless switch can be mounted on any flat surface.
- Choose Location: Select a desired location for your wireless switch. Ensure it is within the operational range of the receivers (up to 150+ feet).
- Mounting Options:
- Screw Mount: Use the provided screws to attach the switch plate to the wall or any flat surface.
- Adhesive Mount (Not included): For non-permanent installation or surfaces where screws are not suitable, strong double-sided adhesive tape can be used (purchased separately).
- Secure Switch: Attach the switch to the mounted plate.

Image: Detailed installation steps, from removing old switches to connecting receivers and mounting the new wireless switch.
4.3. Power On and Test
Once the receivers and switch are installed:
- Restore Power: Turn the power back ON at the circuit breaker.
- Test Operation: Press each rocker on the dual switch to verify that the corresponding light and fan turn ON and OFF.
5. Operating Instructions
The RunLessWire RW9-R2DKWH switch is designed for simple operation.
- Turning On/Off: Press the top part of a rocker to turn the associated device ON. Press the bottom part of the same rocker to turn the associated device OFF.
- Dual Control: The dual-rocker switch has two independent rockers. One rocker controls the light, and the other controls the fan.
- Kinetic Power: Each press of the switch generates the necessary kinetic energy to send a wireless signal to its paired receiver. No external power or batteries are required for the switch itself.

Image: A visual representation of the self-powered switch in action, showing a finger pressing the rocker and wireless signals being transmitted.
6. Maintenance
The RunLessWire RW9-R2DKWH switch kit requires minimal maintenance.
- Cleaning: Wipe the switch surface with a soft, dry cloth. Do not use abrasive cleaners or solvents.
- No Batteries: Since the switch is self-powered, there are no batteries to replace or recharge.
- Receiver: The receivers are designed for long-term, maintenance-free operation once installed.
7. Troubleshooting
If you encounter issues with your RunLessWire switch kit, refer to the following common problems and solutions:
| Problem | Possible Cause | Solution |
|---|---|---|
| Device does not respond to switch. |
|
|
| Intermittent operation. |
|
|
| Only one device responds. |
|
|
8. Specifications
| Feature | Detail |
|---|---|
| Model Number | RW9-R2DKWH |
| Brand | RunLessWire |
| Switch Style | Dual Rocker Switch |
| Mounting Type | Wall Mount (Screws included) |
| Receiver Amperage | 5 Amp (each receiver) |
| Wireless Range | 150+ feet (line of sight) |
| Power Source | Kinetic Energy (Switch), Wired (Receivers) |
| Product Dimensions | Switch: 0.5 x 4.25 x 3.75 inches (approx.) |
| Item Weight | 11.2 ounces (total package approx.) |
| Color | White |
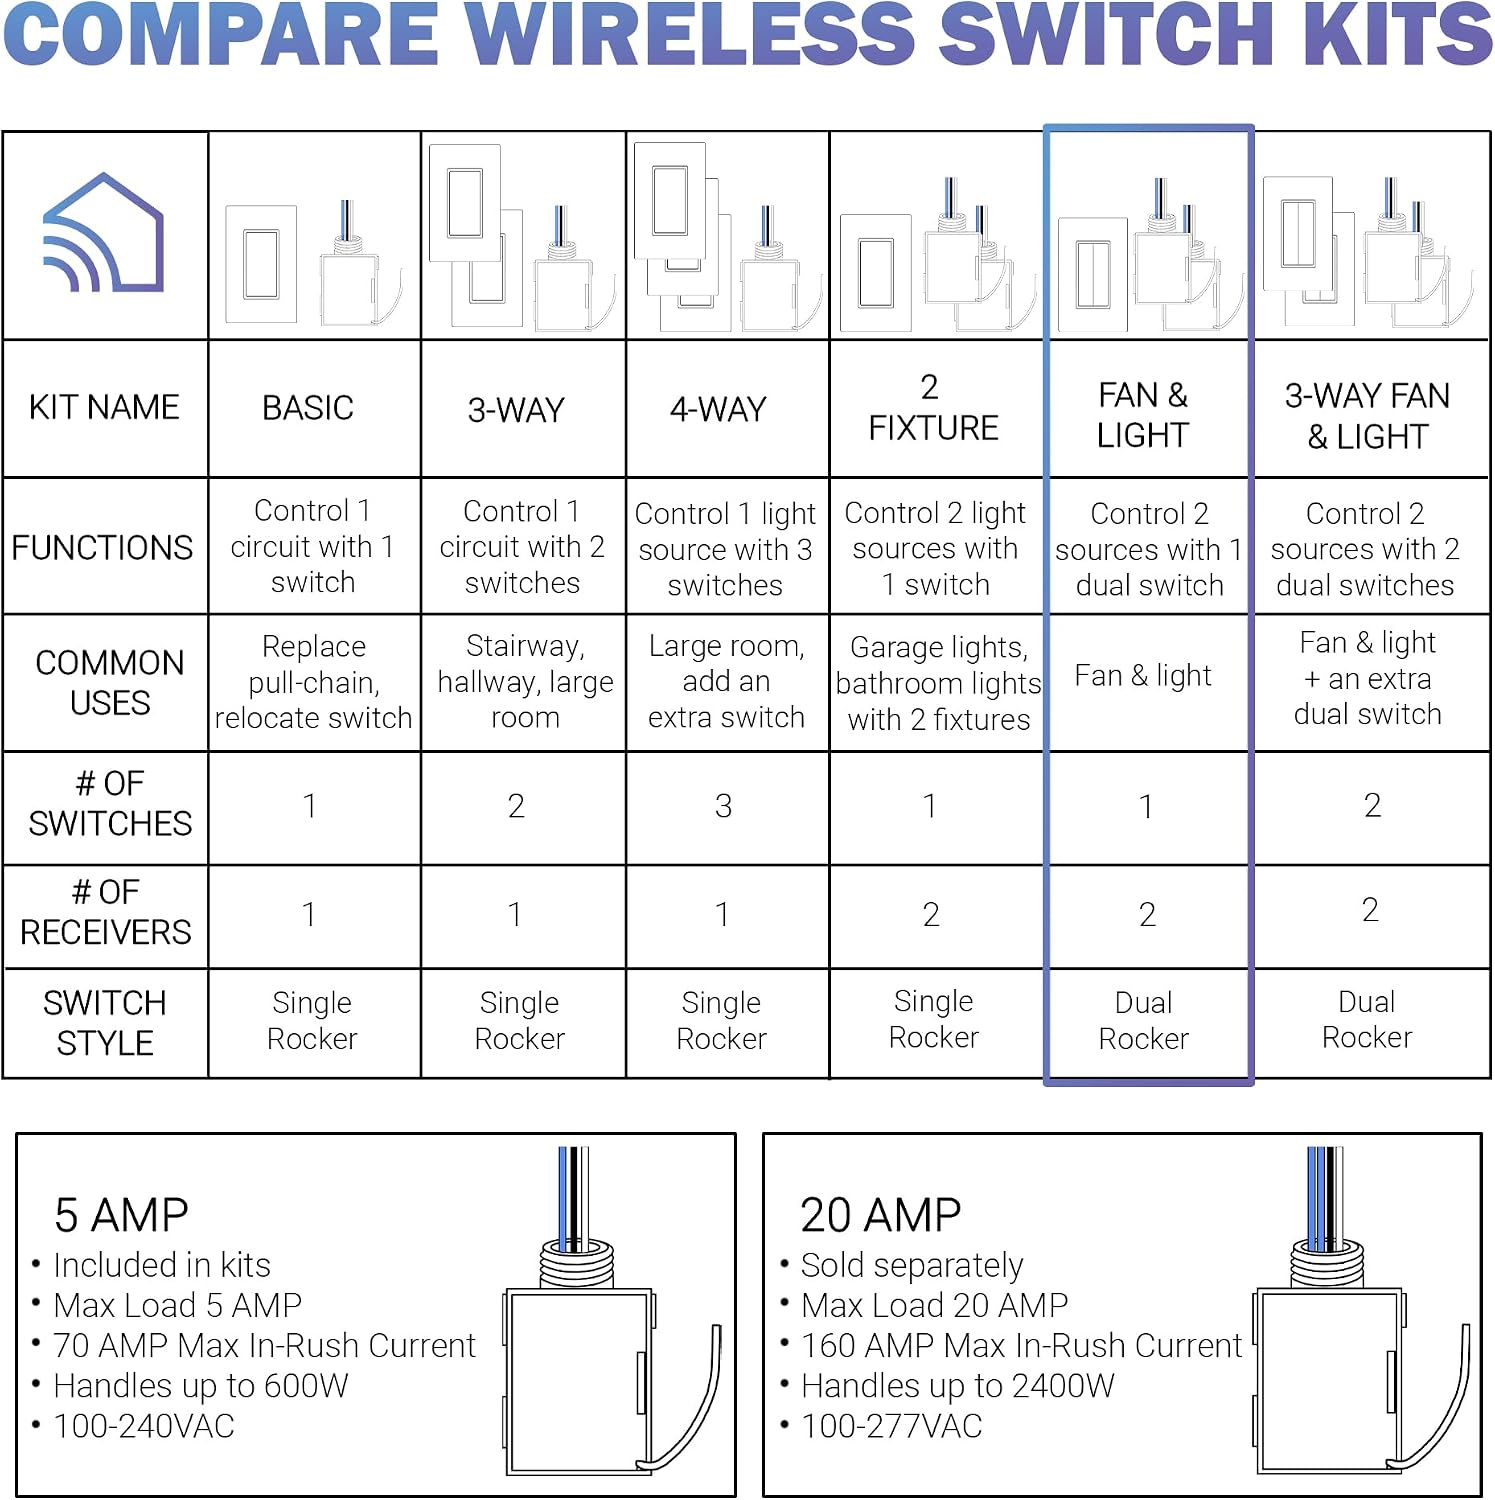
Image: Dimensional drawings of the switch and receiver, highlighting their compact size and environmental benefits.
9. Warranty and Support
9.1. Warranty Information
The RunLessWire RW9-R2DKWH Wireless Dual-Rocker Switch Kit comes with a 5-year warranty from the date of purchase. This warranty covers defects in materials and workmanship under normal use. It does not cover damage caused by misuse, accident, unauthorized modification, or improper installation.
Please retain your proof of purchase for warranty claims.
9.2. Customer Support
For technical assistance, troubleshooting, or warranty inquiries, please contact RunLessWire customer support. Refer to the official RunLessWire website for the most current contact information.
Online Resources: Visit the RunLessWire Store on Amazon for additional product information and support.


