1. Introduction
The Yinker 8x8 HDMI Matrix Switcher is designed to connect up to eight HDMI input sources to eight HDMI output displays. This device allows for flexible routing, enabling any input to be directed to any output, or a single input to be distributed to multiple outputs simultaneously. It supports 4K@30Hz resolution, EDID management, HDCP 1.4, and offers multiple control methods including a Web GUI for enhanced usability.
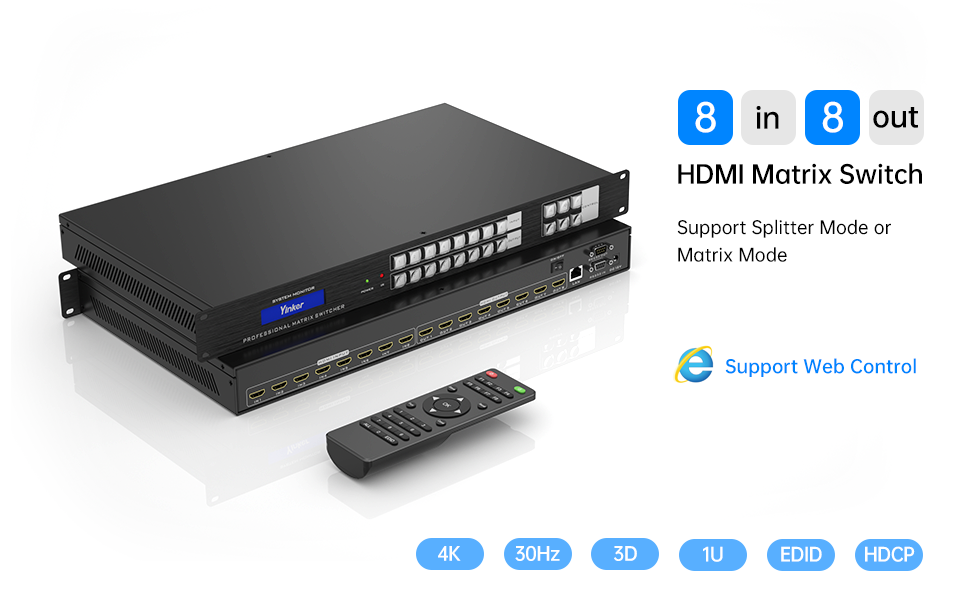
Image: Yinker 8x8 HDMI Matrix Switcher with Web Control feature highlighted. This image provides an overview of the product, emphasizing its 8-input, 8-output capability and web control support.
2. Safety Information
- Ensure proper ventilation around the device to prevent overheating.
- Use only the provided power adapter. Using an unauthorized adapter may damage the device and void the warranty.
- Do not expose the device to water, moisture, or extreme temperatures.
- Avoid disassembling the unit. Refer all servicing to qualified personnel.
- Keep the device away from strong electromagnetic fields.
3. Package Contents
Verify that all items are present in the package:
- Yinker 8x8 HDMI Matrix Switcher x1
- IR Remote Control x1
- Power Adapter (DC 12V) x1
- RS232 Serial Cable x1
- CD Driver x1 (contains software and detailed user manual)

Image: Contents of the Yinker 8x8 HDMI Matrix Switcher package. This image displays all items included in the product package: the HDMI Matrix unit, an IR remote controller, a power adapter, an RS232 serial cable, and a CD driver.
4. Product Overview
4.1 Front Panel
The front panel features an LCD display, power indicator, IR receiver, input/output selection buttons, and control buttons for menu navigation and EDID management.
4.2 Back Panel
The back panel includes eight HDMI input ports, eight HDMI output ports, a LAN port, an RS232 port, and the DC 12V power input.

Image: Detailed diagram illustrating the front panel with LCD display, power indicator, IR receiver, input/output buttons, and menu controls. The back panel shows HDMI input/output ports, LAN port, RS232 port, and DC 12V power input.

Image: A detailed view of the control section on the front panel, showing buttons for 'ALL', 'EDID', 'UP', 'ENTER', 'MENU', and 'DOWN' for direct device management.
5. Installation and Setup
5.1 Physical Connection
- Connect your HDMI source devices (e.g., set-top boxes, laptops, PCs, video game consoles) to the HDMI INPUT ports (IN1-IN8) on the back of the matrix switcher.
- Connect your HDMI display devices (e.g., HDTVs, monitors, projectors) to the HDMI OUTPUT ports (OUT1-OUT8) on the back of the matrix switcher.
- For advanced control, connect an Ethernet cable to the LAN port for network control or an RS232 cable to the RS232 port for serial control.
- Connect the provided DC 12V power adapter to the matrix switcher and then plug it into a power outlet.
- Power on all connected source and display devices.

Image: A visual representation of a typical installation, showing several laptops connected as input sources to the Yinker HDMI matrix, which then distributes signals to multiple displays.
5.2 Rack Mounting
The Yinker 8x8 HDMI Matrix Switcher is designed for standard 1U 19-inch rack cabinet installation. Secure the unit using appropriate rackmount screws (not included) through the mounting ears on the sides of the device.
6. Operating Instructions
6.1 Control Methods
The matrix switcher supports five methods for control and switching:
- Front Panel Buttons: Directly select inputs and outputs using the buttons on the device.
- IR Remote Control: Use the included infrared remote for convenient switching from a distance.
- RS232 Port Control: Connect to a computer or control system via the RS232 port for serial command control. Software is provided on the included CD.
- LAN Port Control: Connect to a network for control via a dedicated software application (provided on CD).
- Web GUI Control: Access the matrix switcher's control interface through a web browser on a device connected to the same local network. No software download is required for this method.

Image: This image demonstrates the five available methods for controlling the HDMI matrix: via IR remote, front panel keypad, LAN port (TCP/IP protocol), RS232 serial connection, and a web-based interface.

Image: This image visually reinforces the five control methods and illustrates the device's suitability for rack mounting in professional environments.
6.2 Switching Operations (Front Panel Example)
To switch an input to an output using the front panel:
- Press the desired INPUT button (1-8) to select the source. The corresponding input LED will illuminate.
- Press the desired OUTPUT button (1-8) to select the destination display. The corresponding output LED will illuminate.
- Press the "ENTER" button to confirm the selection. The video signal will then be routed.
- To send one input to multiple outputs, select the input, then select each desired output, and press "ENTER" after each output selection.

Image: This diagram explains how the matrix can be configured: 1) Each display selects a standalone input source, 2) All displays share the same input source, and 3) Part of displays share the same input source, demonstrating flexible signal distribution.
6.3 Web GUI Control
To use the Web GUI:
- Ensure the matrix switcher is connected to your local network via the LAN port.
- Find the IP address of the matrix switcher (refer to the CD driver manual for default IP or discovery method).
- Open a web browser on a device connected to the same network and enter the IP address.
- Log in using the default credentials (refer to the CD driver manual).
- The web interface will provide a visual representation of inputs and outputs, allowing for easy switching and configuration.
7. EDID Management
The matrix switcher supports EDID management to ensure optimal compatibility between source devices and displays. EDID (Extended Display Identification Data) provides information about a display's capabilities to the source device. The EDID settings can typically be adjusted via the front panel menu, IR remote, or control software/Web GUI. Refer to the detailed manual on the CD for specific EDID configuration steps.

Image: This image highlights the support for Crystal Clear Picture quality, 4K resolution, EDID management, and 3D content.
8. Troubleshooting
- No Picture/Signal:
- Ensure all HDMI cables are securely connected.
- Verify that the correct input is selected for the desired output.
- Check the power status of the matrix switcher and all connected devices.
- Try adjusting EDID settings.
- Picture Flickering/Distortion:
- Ensure HDMI cables are of high quality and suitable for 4K transmission.
- Reduce cable lengths if possible.
- Check for interference from other electronic devices.
- Remote Control Not Working:
- Check and replace batteries in the remote control.
- Ensure there are no obstructions between the remote and the IR receiver on the matrix switcher.
- Control Software/Web GUI Issues:
- Verify network connectivity between the control device and the matrix switcher.
- Ensure the correct IP address is being used.
- Consult the CD driver manual for specific software/Web GUI setup and troubleshooting.
If problems persist, refer to the comprehensive manual on the included CD or contact Yinker support.
9. Specifications
| Feature | Specification |
|---|---|
| Model Number | 8 in 8 out with WEB |
| Inputs | 8 x HDMI |
| Outputs | 8 x HDMI |
| Max Resolution | 4K (3840x2160) @30Hz |
| Downscale Support | 1080p 3D @60Hz/120Hz |
| HDCP Compliance | HDCP 1.4 |
| Audio Formats | PCM, Dolby AC3, DTS5.1, DTS7.1, DSD |
| Control Methods | Front Panel Buttons, IR Remote, RS232, LAN, Web GUI |
| Rack Mountable | Standard 1U 19-inch Rack Cabinet |
| Power Supply | DC 12V |
| Item Weight | 9.18 pounds |
| Package Dimensions | 22.1 x 17.2 x 5.4 inches |
10. Maintenance
- Clean the device regularly with a soft, dry cloth. Do not use liquid or aerosol cleaners.
- Ensure all cables are free from kinks or damage.
- Store the device in a cool, dry place when not in use for extended periods.

Image: This image highlights the durable metal body construction of the Yinker HDMI Matrix Switcher, indicating robust design for longevity.
11. Warranty and Support
For any questions, problems, or technical support, please contact YINKER OFFICIAL. Refer to the contact information provided in the detailed user manual on the included CD or visit the official Yinker website for support resources.


