Introduction
The AudioControl The EPICENTER Micro is a compact bass restoration processor and line output converter designed to enhance the low-frequency performance of your car audio system. It integrates digital bass restoration technology with world-renowned OEM integration capabilities, providing a powerful and clean bass output. This manual provides detailed instructions for installation, operation, and maintenance of your EPICENTER Micro.
What's in the Box
- EPICENTER Micro unit
- ACR-4 dash mount knob
- Remote cable
- User Manual
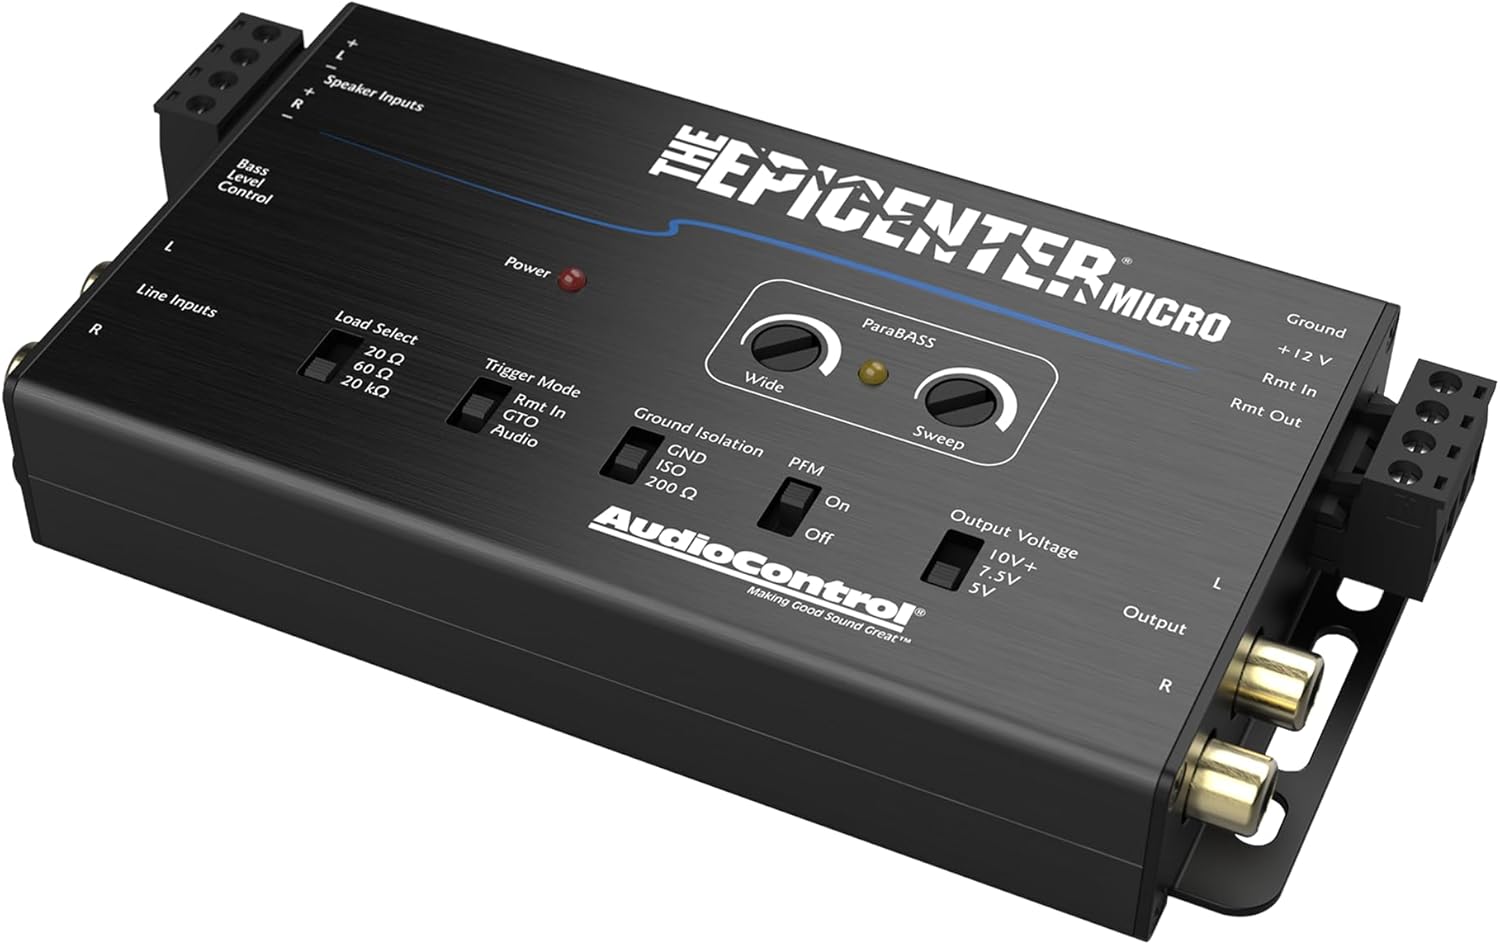
Image: Contents of the EPICENTER Micro package, including the main unit, ACR-4 remote, and connecting cable.
Key Features
- Active 2-channel line driver and output converter: Boosts even the faintest bass signals.
- Digital bass restoration: Combines AudioControl’s legendary digital bass restoration with OEM integration capabilities.
- Multiple trigger modes: Includes traditional +12V remote in, GTO Signal Sense, and Audio Sense.
- PFM Subsonic Filter: Can be bypassed for unrestricted low-frequency power or engaged for subwoofer protection.
- Compact Mini Form Factor: Designed to fit discreetly within any car audio sound system.
- ParaBASS: A single band parametric equalizer for fine-tuning the bass output.
- ACR-4 Dual Knob Dash Mount Control: Included for independently adjusting bass restoration and output levels.
- EPICENTER LINK: Seamlessly connects with EPIC Monoblock or 5-channel amplifiers for enhanced audio and 1A fuse protection.

Image: The EPICENTER Micro unit highlighting key features such as 40V max input handling, 20Hz subsonic filter, >105dBA signal-to-noise ratio, and 10Hz-22kHz frequency response.
Installation and Setup
Mounting
Choose a secure, dry location for the EPICENTER Micro, away from direct heat sources and excessive moisture. Ensure adequate ventilation around the unit. The compact size allows for flexible placement options within your vehicle.
Wiring Connections
- Power Connections: Connect the +12V terminal to a constant 12-volt power source, the GND terminal to a solid chassis ground point, and the Rmt In terminal to your head unit's remote turn-on lead. The Rmt Out terminal can provide a remote signal for other components in your audio system.
- Speaker Inputs: If integrating with a factory or aftermarket head unit that only provides speaker-level outputs, connect your vehicle's speaker wires to the designated Speaker Input terminals. The EPICENTER Micro can handle up to 40V input.
- Line Inputs: For head units with dedicated line-level (RCA) outputs, connect these to the Line Inputs on the EPICENTER Micro.
- Output: Connect the RCA outputs of the EPICENTER Micro to the RCA inputs of your amplifier.
- ACR-4 Remote: Connect the remote cable from the EPICENTER Micro to the ACR-4 dash mount knob.
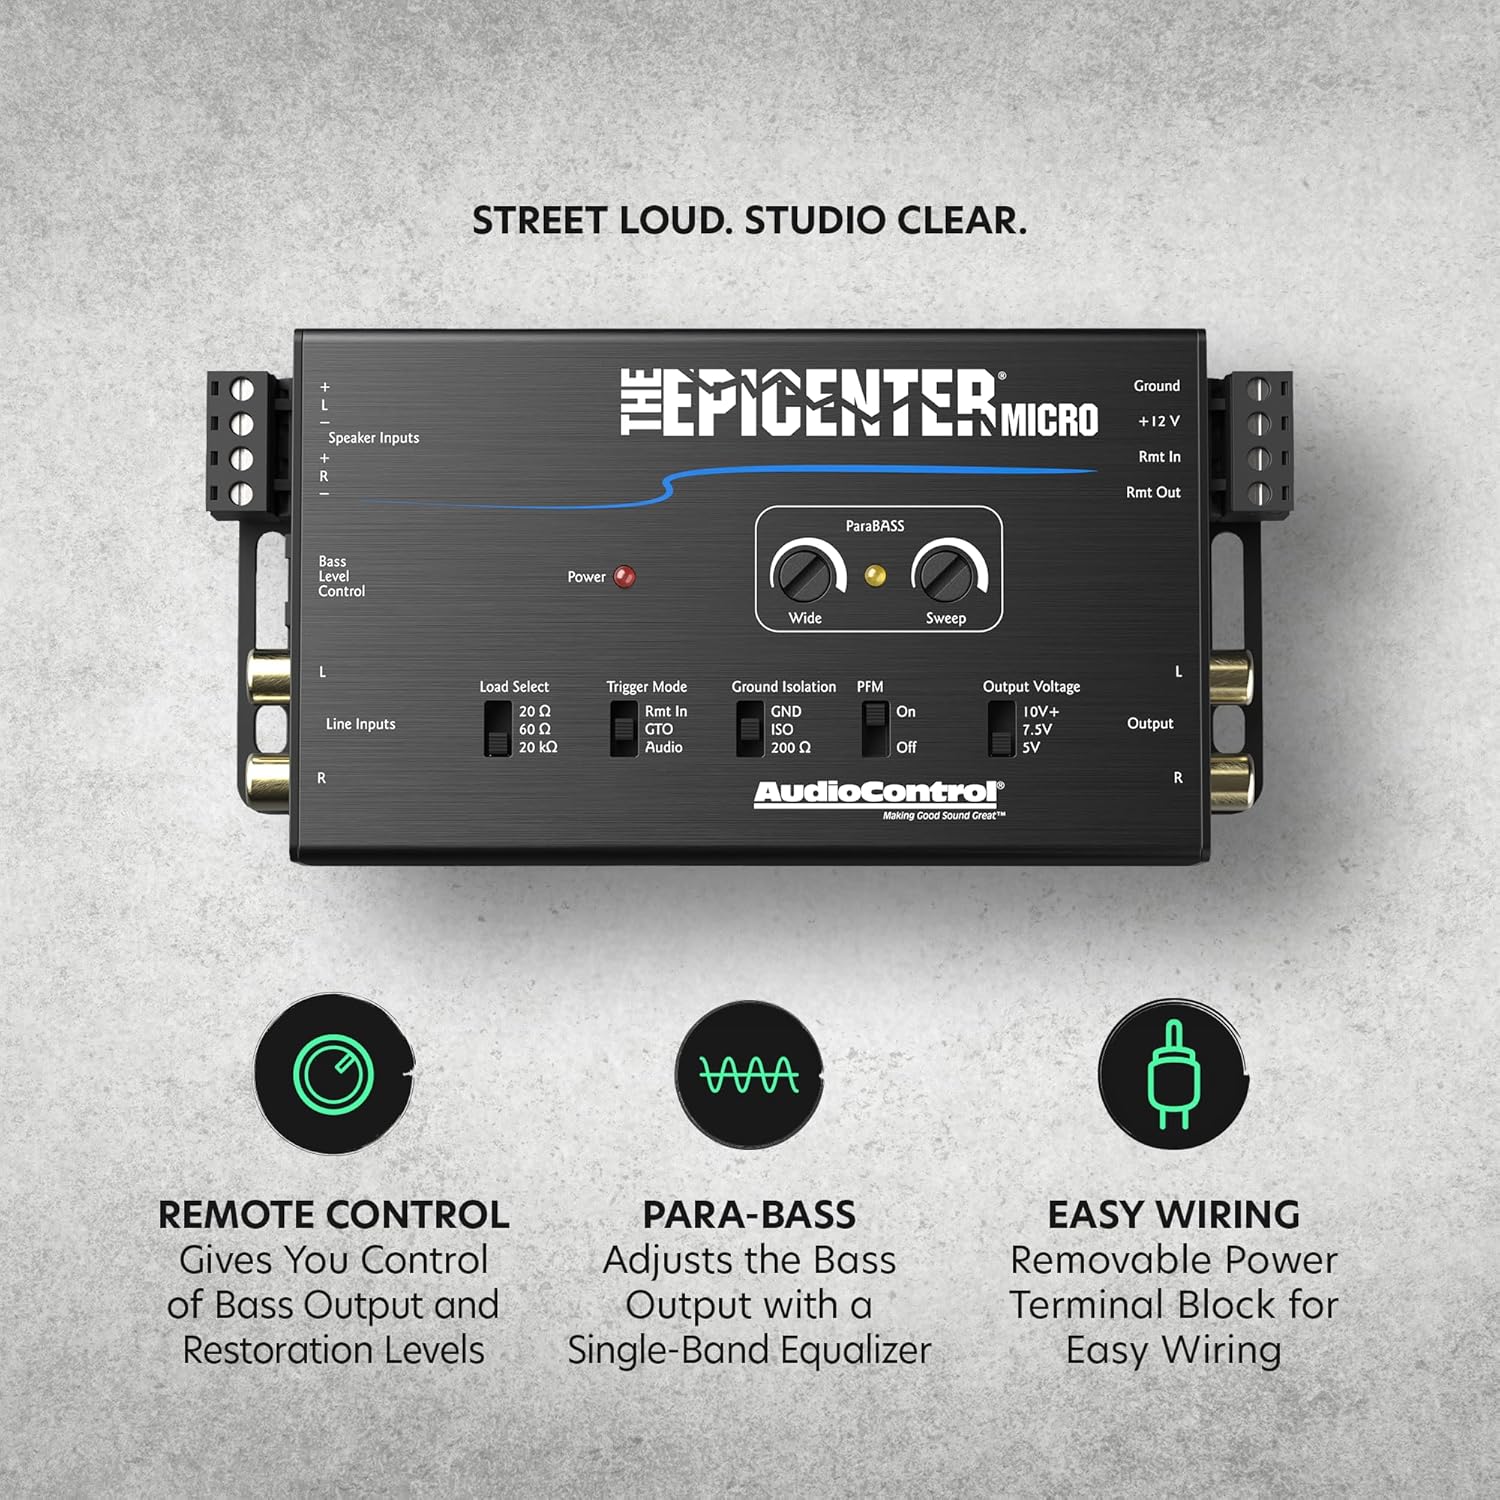
Image: Top view of the EPICENTER Micro, illustrating the speaker inputs, line inputs, power connections, and RCA outputs.
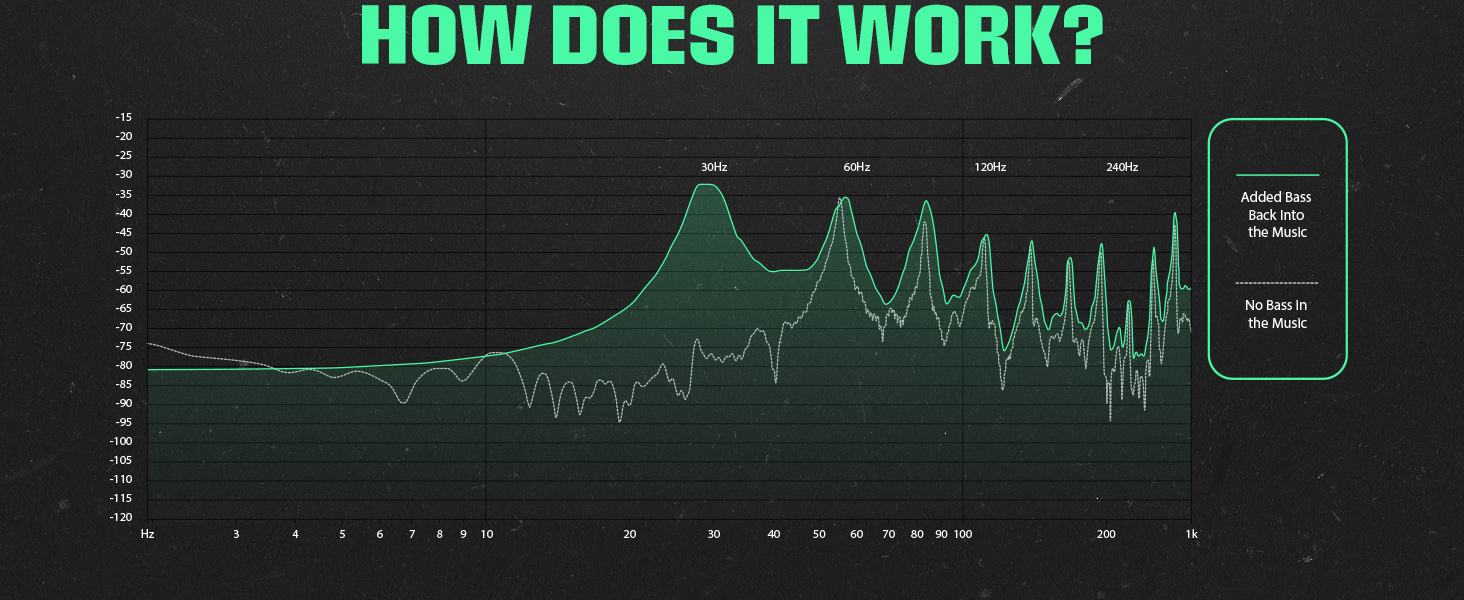
Image: Detail of the speaker level inputs, demonstrating the unit's capability for factory system integration with high input handling.
Initial Configuration
- Load Select: Adjust this switch (20Ω, 60Ω, 20kΩ) to match the impedance of your input source for optimal signal transfer and performance.
- Trigger Mode: Select the desired turn-on method: Rmt In (traditional 12V remote), GTO Signal Sense (turns on when an audio signal is detected), or Audio Sense (turns on with audio signal).
- Ground Isolation: Use the GND, ISO, or 200Ω settings to eliminate potential ground loop noise. Start with GND and switch if noise is present.
- Output Voltage: Select the appropriate output voltage (10V+, 7.5V, 5V) to match your amplifier's input sensitivity, preventing clipping and maximizing signal-to-noise ratio.
Operation
Bass Restoration Controls
- Wide: This knob adjusts the bandwidth of the bass restoration circuit, determining how broad or narrow the frequency range affected by the bass restoration is.
- Sweep: This knob selects the center frequency for the bass restoration, allowing you to target specific low frequencies for enhancement.
- ParaBASS: This feature acts as a single-band parametric equalizer for the bass output, enabling precise fine-tuning of the restored bass frequencies.

Image: Detail of the 'Wide' and 'Sweep' knobs, which control the bass restoration characteristics.
PFM Subsonic Filter
The PFM (Programmable Frequency Match) Subsonic Filter helps protect your subwoofers from ultra-low frequencies that can cause damage or excessive excursion. It can be set to "On" or "Off" (bypassed) depending on your system's capabilities and your listening preferences. Engaging the filter is recommended for most subwoofer applications.
Image: The EPICENTER Micro unit highlighting the PFM Subsonic Filter switch for complete bass control.
ACR-4 Remote Control
The included ACR-4 dual-knob dash mount remote allows for convenient, independent adjustment of the bass restoration effect level and the overall subwoofer output level directly from your driving position. This enables on-the-fly adjustments to suit different music genres or personal preferences.

Image: A hand adjusting the ACR-4 dash-mountable knob, demonstrating ease of control over bass output and restoration levels.
Maintenance
To ensure the longevity and optimal performance of your EPICENTER Micro, follow these simple maintenance guidelines:
- Keep the unit clean and free from dust and debris. Use a soft, dry cloth for cleaning. Avoid abrasive cleaners or solvents.
- Avoid exposing the unit to extreme temperatures, direct sunlight, or excessive moisture.
- Periodically check all wiring connections to ensure they are secure and free from corrosion. Loose connections can lead to signal loss or noise.
Troubleshooting
If you encounter issues with your EPICENTER Micro, refer to the following common troubleshooting steps:
- No Power: Verify that the +12V, Ground, and Remote In connections are secure and correctly wired. Check any inline fuses for the +12V power supply.
- No Audio Output: Ensure all RCA and speaker input/output connections are firmly seated. Confirm that the correct Trigger Mode is selected and functioning.
- Distorted Bass: Reduce the 'Wide' and 'Sweep' settings on the unit. Adjust the Output Voltage to match your amplifier's input sensitivity. Ensure the PFM subsonic filter is engaged if your subwoofers are struggling with ultra-low frequencies.
- Noise/Hum: Experiment with the Ground Isolation switch (GND, ISO, 200Ω) to find the setting that eliminates noise. Check for proper grounding of all audio components in your system.
- Weak Bass: Increase the 'Wide' and 'Sweep' settings. Ensure the input signal to the EPICENTER Micro is strong enough. Check the settings on the ACR-4 remote control.
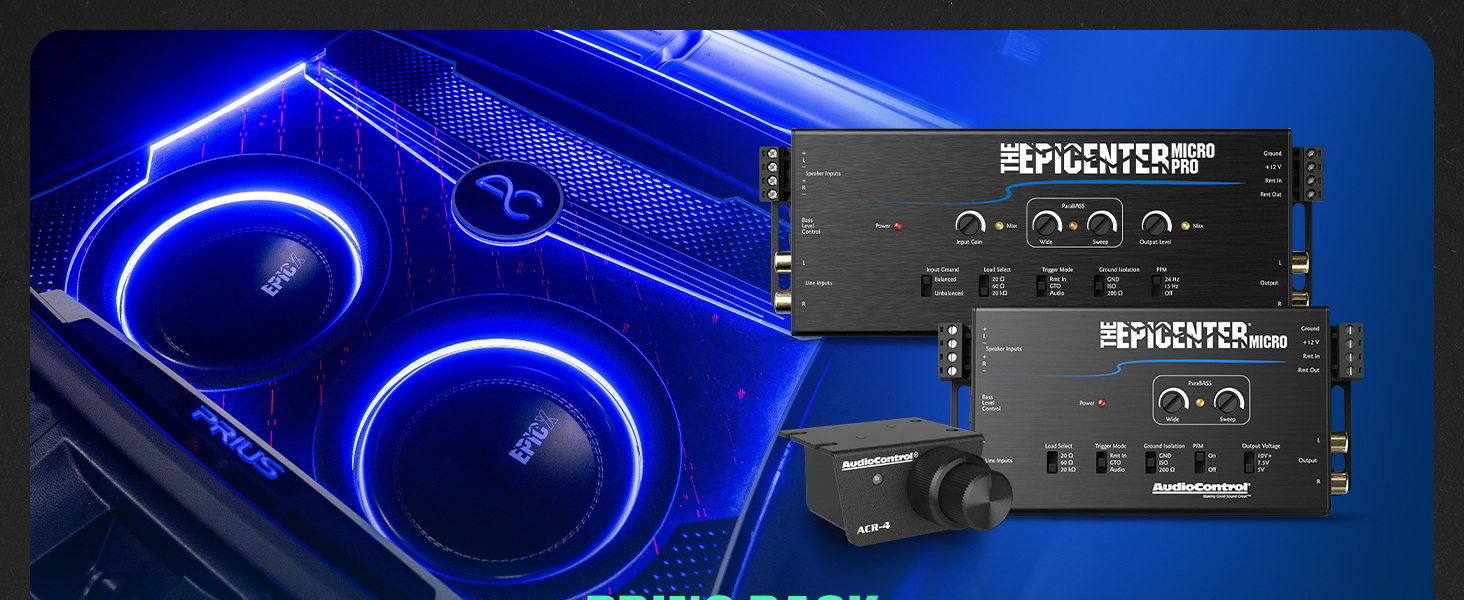
Image: A frequency response graph demonstrating how the EPICENTER Micro adds bass back into music that originally lacked low-frequency content.
Specifications
| Item Weight | 9.6 ounces |
| Product Dimensions | 5.75 x 3 x 1 inches |
| Max Input Handling | 40V |
| Max Output Level | 10V+ |
| Frequency Response | 10Hz-22kHz |
| Subsonic Filter | 20 Hz (or bypass) |
| Signal to Noise | >105dBA |
| Total Harmonic Distortion | 0.03% |
| Item Model Number | The Epicenter Micro |
Warranty Information
The AudioControl The EPICENTER Micro is covered by a 1-Year Manufacturer Warranty. This warranty covers defects in materials and workmanship under normal use. Please retain your original proof of purchase for any warranty claims. Unauthorized repairs or modifications will void the warranty.
Technical Support
For technical assistance, installation questions, or warranty inquiries, please contact AudioControl customer support. Visit the official AudioControl website (www.audiocontrol.com) for the most current contact information, FAQs, and additional resources.


