
1. Introduction
This manual provides comprehensive instructions for the installation, operation, and maintenance of your FITCAMX 4K Dash Cam. Designed for seamless integration, this dash cam offers high-definition video recording and essential safety features for your vehicle.

Image: Integrated Dash Cam, Authentic by FITCAMX. This image shows a car's interior view from the driver's perspective, looking out onto a scenic road, highlighting the integrated nature of the dash cam.
2. Compatibility
The FITCAMX 4K Dash Cam (Model B09Q8WB6S6) is specifically designed for the following Toyota vehicle models:
- Toyota Tundra: 2017-2021 (Limited, SR5, Crewmax, Double Cab, chassis_XK50/XK60)
- Toyota Sequoia: 2017-2022 (SR, TRD Pro, Platinum, chassis_XK50/XK60)
Note: This dash cam is NOT compatible with Toyota Tundra 2022 models or newer.

Image: Comparison of Toyota Tundra 2nd Gen (XK50) Facelift 3 (2017-2021) and 3rd Gen (XK70) (2022-Now) overhead console designs, illustrating how to choose the correct dash cam model based on vehicle year and generation.
3. Package Contents
Please verify that all items listed below are included in your package:
- FITCAMX 4K Front Dash Cam Unit
- 64GB MicroSD Card (pre-installed or included separately)
- Y-Cable for power connection
- Removal Pry Tool
- USB Card Reader
- User Manual

Image: An overview of the FITCAMX dash cam package contents, including the dash cam, 64GB SD card, Y-cable, card reader, pry tool, and user manual.
4. Setup and Installation
The FITCAMX dash cam is designed for an integrated, OEM-like installation behind your rearview mirror, ensuring no visible wires and no obstruction of your windshield. Follow these steps for a smooth installation:
4.1 Installation Steps
- Push forward to remove front cover: Gently push the existing plastic cover behind your rearview mirror forward to detach it.
- Remove the back cover: Carefully remove the back cover of the existing housing.
- Transfer orange clips from original cover to dash cam: Detach any orange clips from the original cover and secure them onto the new dash cam housing.
- Unplug the A.C.C. connector: Locate and unplug the A.C.C. (Accessory) power connector from your vehicle's existing wiring.
- Connect the Y cable: Connect the provided Y-cable to the unplugged A.C.C. connector and then to the dash cam unit.
- Push backward to mount the front cover: Align the dash cam with the front cover and push backward to secure it in place.
- Mount the back cover: Attach the back cover to complete the housing assembly around the dash cam.
- Installation done: Ensure all parts are securely fastened.
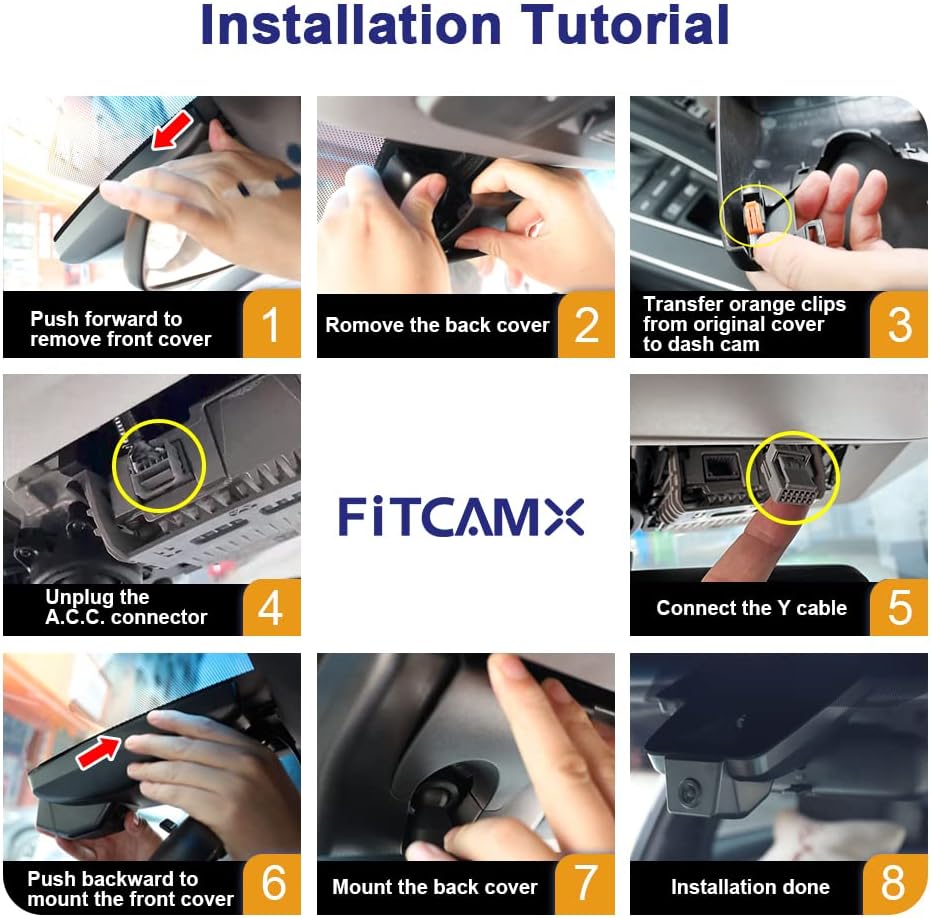
Image: An 8-step visual guide demonstrating the installation process of the FITCAMX dash cam, from removing covers to connecting cables and reassembling the unit.

Image: A 'Before' and 'After' comparison showing the vehicle's rearview mirror area. The 'Before' image shows the original setup, while the 'After' image displays the FITCAMX dash cam seamlessly integrated, highlighting its OEM-like appearance.
4.2 Installation Video
Video: Official FITCAMX installation tutorial for Toyota vehicles. This video demonstrates the step-by-step process of installing the dash cam, including connecting the power cord and securing the unit.
5. Operating Instructions
Your FITCAMX dash cam automatically begins recording when your vehicle starts. Manage settings and view footage using the dedicated mobile application.
5.1 4K Ultra Clear Video Recording
Equipped with a Novatek Chip and f/1.6 large aperture lens, the dash cam records high-definition video at 2160P/30fps. WDR (Wide Dynamic Range) technology automatically adjusts exposure for clear footage day and night, capturing details like license plates and road signs.

Image: A smartphone screen displaying 4K UHD 2160P video footage from the dash cam, showcasing the high clarity of the recorded video.

Image: A night scene from a car's perspective, illustrating the dash cam's ability to capture clear video even in low-light conditions, with icons for CMOS Sensor, f/1.6 Aperture, WDR Tech, and Novatek Chip.
5.2 Wi-Fi Connectivity and FITCAMX App
The built-in Wi-Fi allows you to connect your smartphone to the dash cam via the FITCAMX app. This enables real-time video viewing, access to recorded footage, and downloading important clips directly to your phone. Ensure cellular data/Bluetooth is turned off on your phone if you experience issues with live preview.
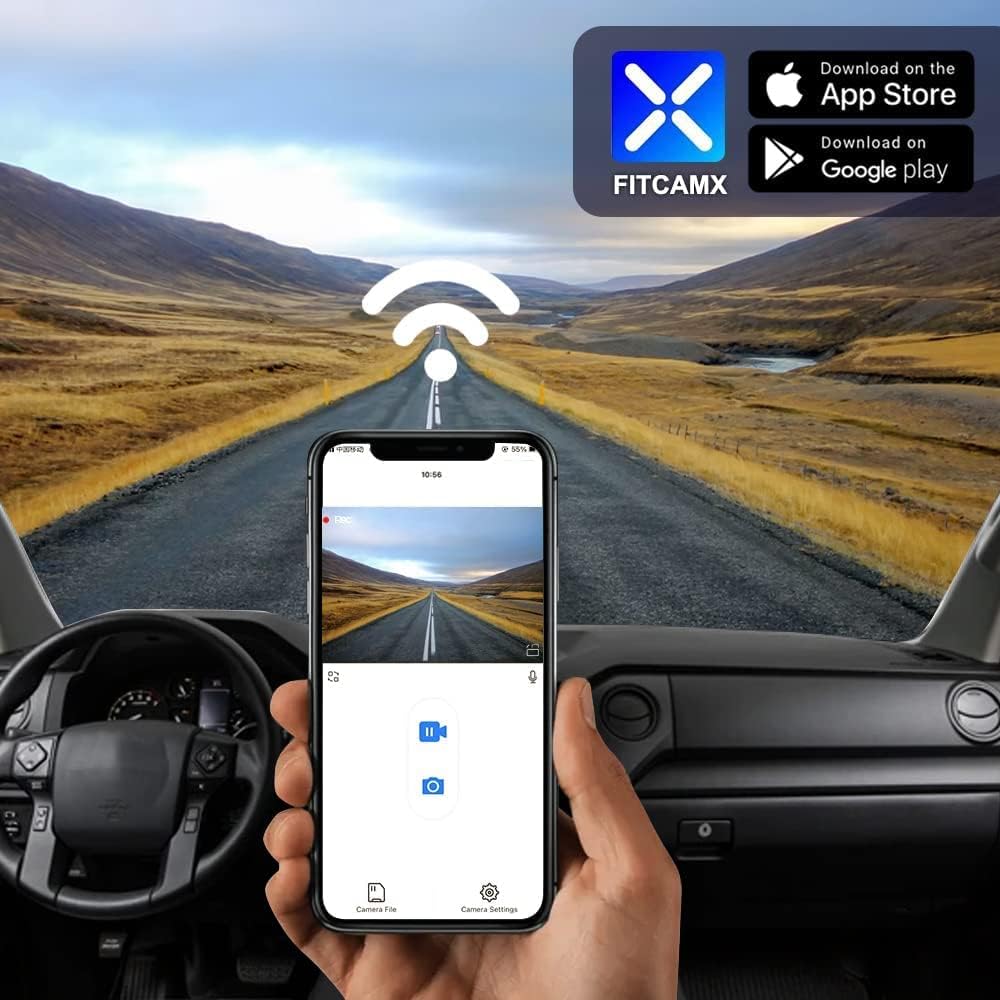
Image: A smartphone displaying the FITCAMX app interface, showing a live view from the dash cam with Wi-Fi signal icon, and options to download the app from App Store or Google Play.
5.3 Loop Recording
The dash cam features seamless loop recording. When the memory card is full, the oldest unlocked footage will be automatically overwritten with new content. This ensures continuous recording without manual intervention. The recording time for a 64GB card is approximately 5 hours, and for a 128GB card, it is approximately 10 hours.

Image: A visual representation of loop recording, showing a filmstrip of recorded video and an icon indicating that old videos are overwritten when the card is full.
5.4 G-Sensor (Gravity Sensor)
The built-in G-Sensor detects sudden collisions or impacts. In the event of such an incident, the dash cam automatically saves and locks the current footage to a specified folder, preventing it from being overwritten by loop recording. This ensures critical evidence is preserved.

Image: A car crash scene with a lock icon overlay, illustrating how the G-Sensor detects a collision and locks the video footage to prevent overwriting.
5.5 Parking Mode (Optional Upgrade)
The standard FITCAMX 4K Dash Cam does NOT include parking mode functionality. To enable parking monitoring, an optional fuse box cable accessory is required. This upgrade allows for continuous recording even when the vehicle is parked.
To upgrade with parking monitoring, search for ASIN: B09PQ9KDYX to order the fuse box cable.

Image: Two types of cables for upgrading to parking mode: a fuse box cable for non-24h recording and an On-Board Diagnostics (OBD) cable for 24h and non-24h recording options.
6. Maintenance
- SD Card Maintenance: Regularly format the MicroSD card (at least once a month) using the FITCAMX app to ensure optimal performance and prevent data corruption.
- Cleaning: Use a soft, dry cloth to clean the dash cam lens and housing. Avoid abrasive cleaners or solvents.
- Temperature: The dash cam is designed to operate in temperatures from -4℉ to 185℉ (-20℃ to 85℃). Avoid prolonged exposure to extreme temperatures outside this range.
7. Troubleshooting
- Dash cam not turning on: Ensure the Y-cable is securely connected to both the dash cam and the vehicle's A.C.C. power source. Check your vehicle's fuse box if necessary.
- Wi-Fi connection issues: Ensure your phone's cellular data and Bluetooth are temporarily turned off when attempting to connect to the dash cam's Wi-Fi for live preview.
- Video not recording or missing footage: Ensure the MicroSD card is properly inserted and formatted. If accessing files via the app, ensure you return to the main screen to resume recording after viewing.
- Cannot view video after turning off the car or remotely: The dash cam's Wi-Fi is not designed for remote access. Videos are saved to the MicroSD card. To view footage after the car is off, you must download it to your phone while the camera is powered on and connected via Wi-Fi, or remove the SD card and use a card reader.
- CarPlay/Bluetooth interference: You cannot connect your phone to CarPlay/Bluetooth and the dash cam's Wi-Fi simultaneously. The camera records automatically when the car starts, so continuous Wi-Fi connection to the camera is not required for recording.
8. Specifications
| Brand | FITCAMX |
| Model Name | Fitcamx |
| Video Capture Resolution | 4K (2160P) |
| Frame Rate | 30fps |
| Field Of View | 170 Degrees |
| Connectivity Technology | Wi-Fi |
| Special Feature | OEM Style, G-Sensor, Loop Recording, WDR Technology |
| Mounting Type | Rearview Mirror Mount |
| Included Memory Card Size | 64 GB MicroSD |
| Flash Memory Supported Size Maximum | 256 GB (Note: Product specifications state 128 GB, but feature bullets mention 256 GB. Please refer to the latest product information for exact maximum supported size.) |
| Maximum Aperture | f/1.6 |
| Optical Sensor Technology | CMOS |
| Control Method | App |
| Operating Temperature | -4℉ to 185℉ (-20℃ to 85℃) |
9. Warranty and Support
FITCAMX provides prompt technical support for any issues you may encounter. Please do not hesitate to contact customer service for assistance with installation, operation, or troubleshooting. Refer to your purchase documentation for specific warranty details.