
1. Introduction
Thank you for choosing the BONTEC Dual Monitor Desk Mount. This manual provides detailed instructions for the safe and efficient installation, operation, and maintenance of your new monitor mount. Please read this manual thoroughly before beginning installation and retain it for future reference.
This desk mount is designed to support two monitors ranging from 13 to 27 inches, with VESA mounting patterns of 75x75mm or 100x100mm. Each arm can hold up to 22 lbs (10 kg). It offers full motion adjustability, including tilt, swivel, and rotation, to optimize your viewing experience and workspace ergonomics.
2. Safety Information
- Read all instructions: Ensure you understand all instructions and warnings before installation.
- Weight Capacity: Do not exceed the maximum weight capacity of 22 lbs (10 kg) per arm. Overloading can result in serious injury or product damage.
- Monitor Size: This mount is suitable for monitors between 13 and 27 inches.
- VESA Compatibility: Ensure your monitors have VESA 75x75mm or 100x100mm mounting holes.
- Desk Material: Do not install on desks made of particle board (PB), medium-density fiberboard (MDF), or glass, as these materials may not provide sufficient stability.
- Secure Installation: Verify that the mount is securely fastened to the desk before attaching monitors.
- Assembly: Assemble the product according to the instructions. Improper assembly may cause damage or serious personal injury.
- Children: Keep small parts away from children.
3. Package Contents
Verify that all components are present and undamaged before proceeding with installation. If any parts are missing or damaged, please contact BONTEC customer support.

Figure 3.1: Overview of BONTEC Dual Monitor Desk Mount components.
- Central Pole (1)
- Monitor Arms (2)
- VESA Plates (2)
- C-Clamp Base (1)
- Grommet Base (1)
- Cable Management Clips (Set)
- Hardware Kit (Screws, Washers, Allen Keys)
4. Setup and Installation
The BONTEC Dual Monitor Desk Mount offers two installation methods: C-Clamp and Grommet Mounting. Choose the method best suited for your desk.
4.1. Choose Installation Method

Figure 4.1: C-Clamp and Grommet Mounting Options.
- C-Clamp Mounting: Ideal for desks with a thickness between 0.39 inches (10mm) and 3.35 inches (85mm).
- Grommet Mounting: Requires a desk hole with a diameter between 0.39 inches (10mm) and 3.35 inches (85mm), and a desk thickness between 0.39 inches (10mm) and 3.15 inches (80mm).
4.2. Assemble Base and Pole
- Attach the chosen base (C-Clamp or Grommet) to the central pole.
- Securely fasten the assembled base and pole to your desk. Ensure it is stable and does not wobble.
4.3. Attach VESA Plates to Monitors

Figure 4.2: Attaching VESA Plate to Monitor.
- Carefully place your monitor face down on a soft, clean surface.
- Align the VESA plate with the mounting holes on the back of your monitor.
- Secure the VESA plate using the provided screws. Hand screws are included for easy, tool-free attachment.
4.4. Mount Monitors to Arms
- Slide the monitor arms onto the central pole at your desired height. Tighten the collar to secure.
- Carefully slide the VESA plate with the attached monitor onto the arm's mounting head until it clicks into place.
- Repeat for the second monitor.
4.5. Cable Management

Figure 4.3: Integrated Cable Management.
Utilize the integrated cable management clips along the arms and the central pole to route your monitor cables neatly. This helps maintain a clean and organized workspace.
5. Operating and Adjustments
The BONTEC Dual Monitor Desk Mount offers extensive adjustability to achieve optimal viewing angles and ergonomic positioning.

Figure 5.1: Full Motion Adjustability.
5.1. Height Adjustment
To adjust the height of the monitors, loosen the collar on the central pole, slide the arms to the desired height, and then re-tighten the collar securely. The maximum height adjustment is approximately 17 inches (430mm).
5.2. Tilt Adjustment

Figure 5.2: Monitor Tilt Adjustment.
The monitor can be tilted +90 degrees (up) and -90 degrees (down) to reduce glare and optimize viewing comfort. Gently push or pull the top or bottom of your monitor to achieve the desired tilt angle.
5.3. Swivel Adjustment
The monitor arms can swivel 180 degrees at the pole connection and at the monitor mounting point, allowing you to position your screens for collaborative work or individual viewing. Simply rotate the monitor or arm to the desired angle.
5.4. Rotation Adjustment

Figure 5.3: Monitor Rotation for Landscape or Portrait Viewing.
Each monitor can be rotated 360 degrees, allowing for quick and easy switching between landscape and portrait orientations without removing the monitor.
6. Maintenance
- Cleaning: Clean the mount with a soft, damp cloth. Avoid abrasive cleaners or solvents.
- Periodic Checks: Periodically check all screws and connections to ensure they remain tight and secure. Re-tighten if necessary.
- Lubrication: No lubrication is required for the moving parts.
7. Troubleshooting
| Problem | Possible Cause | Solution |
|---|---|---|
| Monitors are not stable or wobble. | Mount not securely fastened to desk; VESA screws loose; monitor weight exceeds capacity. | Ensure C-clamp or grommet base is tightened. Check VESA screws on monitors. Verify monitor weight is within 22 lbs (10 kg) per arm. |
| Difficulty adjusting monitor position (too stiff). | Joints are too tight. | Loosen the adjustment screws on the arm joints slightly using the provided Allen keys. |
| Monitor sags or tilts downwards. | Tilt mechanism is loose. | Tighten the tilt adjustment screw located on the VESA plate connection point. |
| Cannot install mount on desk. | Desk thickness or material incompatible. | Check desk thickness against specifications (C-clamp: 0.39-3.35 inches; Grommet: 0.39-3.15 inches). Ensure desk is not made of PB, MDF, or glass. |
8. Specifications
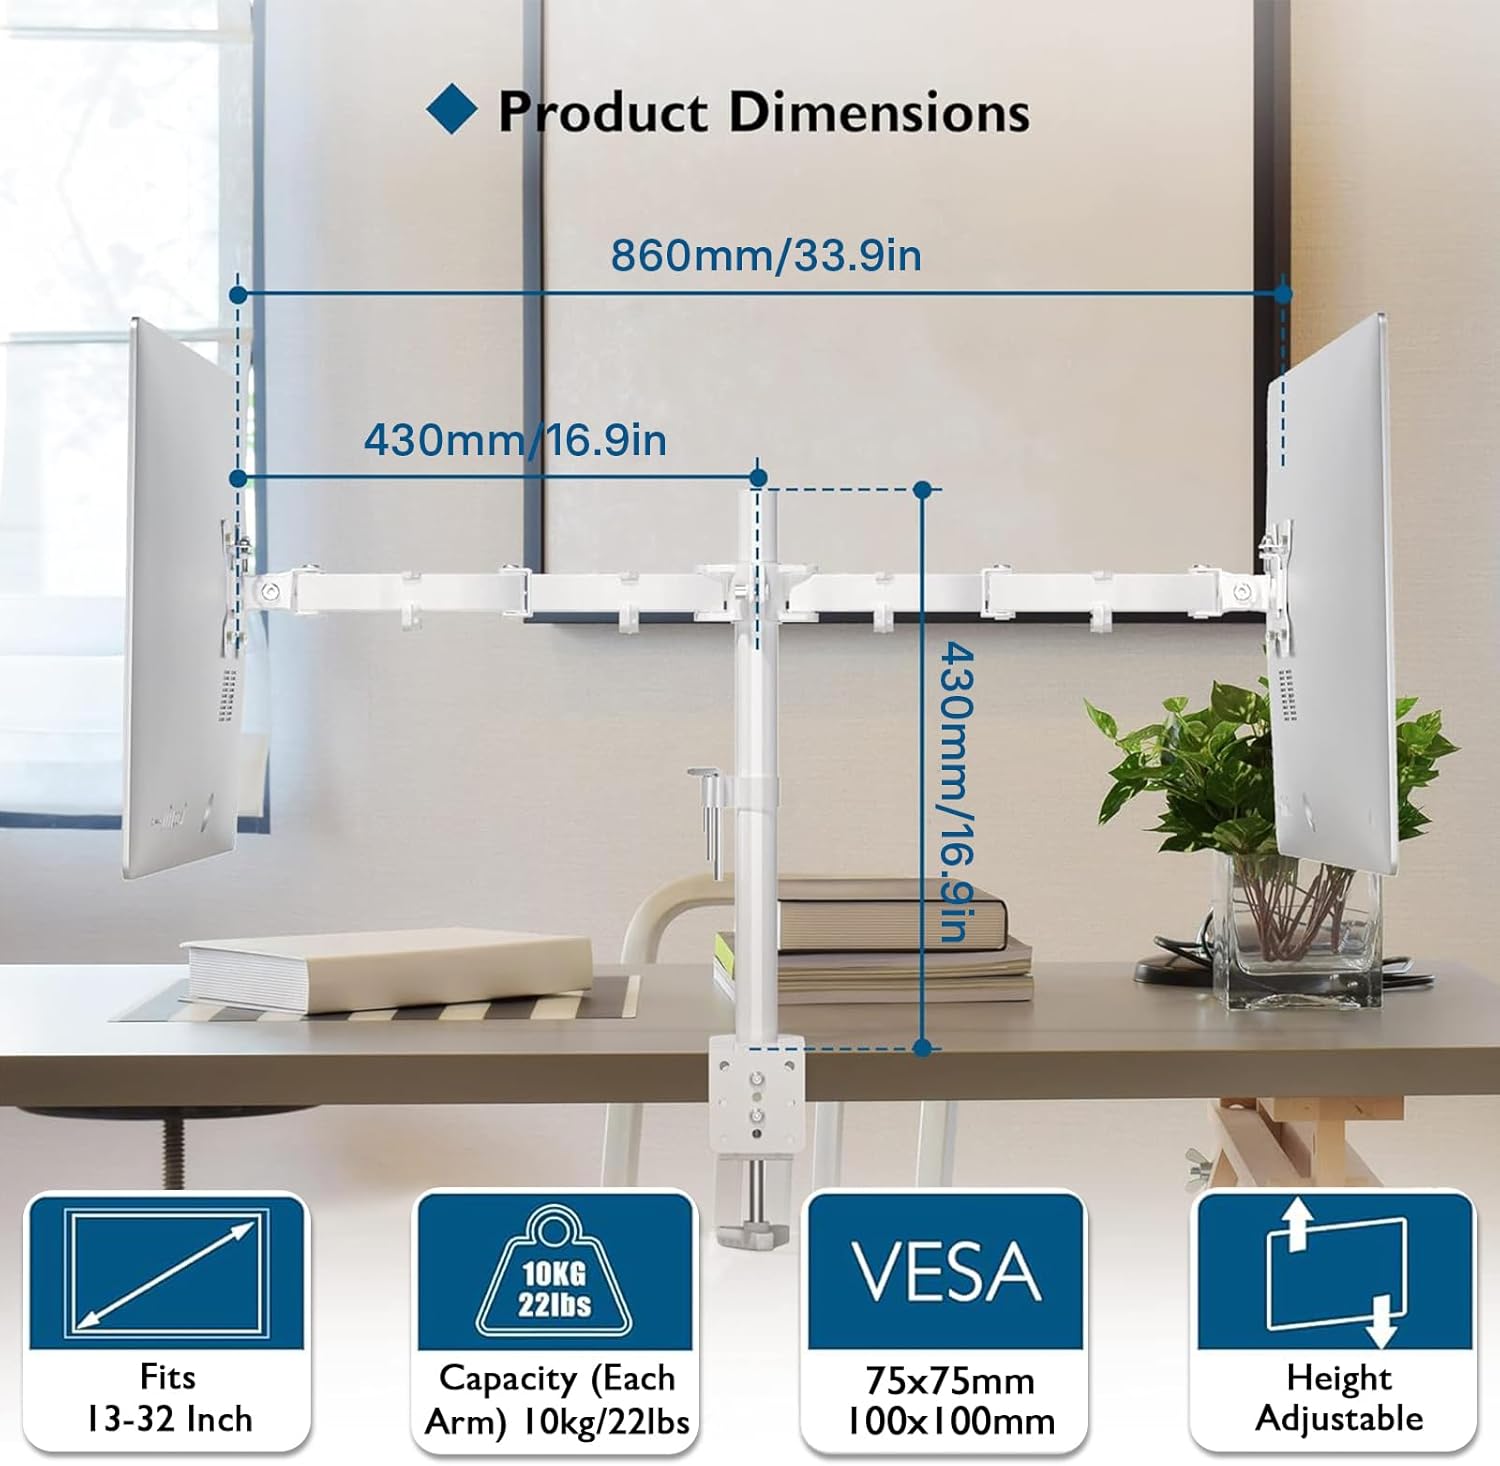
Figure 8.1: Product Dimensions and Key Specifications.
- Model: MDM002-WH
- Material: Alloy Steel
- Color: White
- Screen Size Compatibility: 13 - 27 inches
- Weight Capacity (Each Arm): 22 lbs (10 kg)
- VESA Compatibility: 75x75mm, 100x100mm
- Tilt Range: +90° to -90°
- Swivel Range: 180°
- Rotation: 360°
- Maximum Arm Extension: 17 inches (430mm)
- C-Clamp Desk Thickness: 0.39 - 3.35 inches (10 - 85mm)
- Grommet Desk Thickness: 0.39 - 3.15 inches (10 - 80mm)
- Grommet Hole Diameter: 0.39 - 3.35 inches (10 - 85mm)
- Product Dimensions: 33.86 x 16.93 x 0.02 inches (860 x 430 x 0.5 mm) (approximate, as per image)
- Item Weight: 5.5 pounds (2.5 kg)
9. Warranty and Support
BONTEC products are manufactured with high-quality materials and undergo strict quality control. This product is covered by a limited warranty against manufacturing defects. For detailed warranty information, please refer to the warranty card included with your purchase or visit the official BONTEC website.
If you encounter any issues during installation or operation, or if you have any questions, please do not hesitate to contact BONTEC customer support. Our team is available to assist you.
Customer Support Contact:
Website: www.bontec.com (Example URL, please refer to actual product documentation for correct contact information)
Email: support@bontec.com (Example Email)


