1. Introduction
The Saramonic Blink 900 B2 is an advanced 2.4GHz wireless microphone system designed to deliver broadcast-quality audio for two individuals. It is compatible with a wide range of devices, including cameras, smartphones, tablets, and computers, making it suitable for various recording applications such as interviews, vlogging, and live streaming.
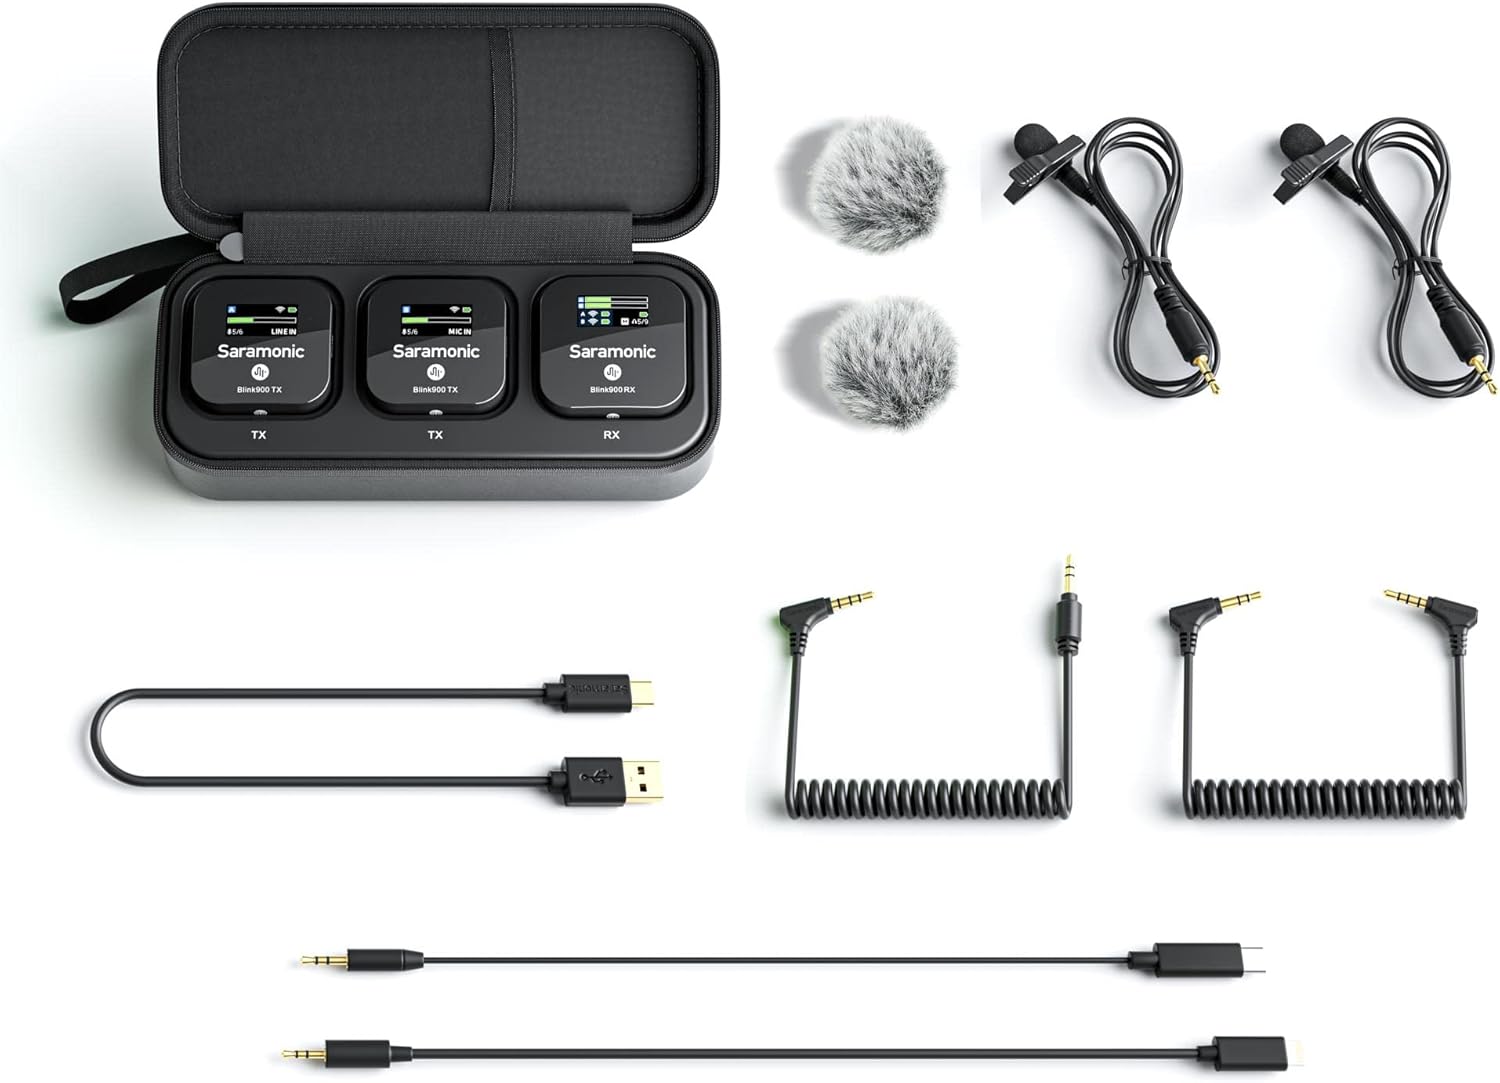
2. What's in the Box
Carefully unpack your Saramonic Blink 900 B2 system and ensure all components are present:
- 2 x Blink 900 TX Transmitters
- 1 x Blink 900 RX Receiver
- 1 x Blink 900 B2 Charging Case
- 2 x DK3G Premium Lavalier Microphones
- 2 x Furry Windscreens for Lavalier Microphones
- 1 x 3.5mm TRS to TRS Output Cable for Cameras
- 1 x 3.5mm TRS to TRRS Output Cable for Mobile Devices
- 1 x USB-C to USB-C Output Cable
- 1 x USB-C to Lightning Output Cable
- 1 x USB-A to USB-C Charging Cable
3. Component Identification
3.1 Blink 900 TX Transmitter

- Power/Mute Button: Press and hold to power on/off. Short press to mute/unmute.
- '+' Button: Increases gain, navigates menu.
- '-' Button: Decreases gain, navigates menu.
- MIC IN Port: 3.5mm input for external lavalier microphone.
- Built-in Microphone: Integrated omnidirectional microphone.
- Charging Contacts: For charging within the case.
- Belt Clip: For attaching to clothing.
3.2 Blink 900 RX Receiver

- Power Button: Press and hold to power on/off.
- Output Port: 3.5mm audio output to recording device.
- Headphone Output: 3.5mm for real-time audio monitoring.
- Mono/Stereo Switch: Selects output mode.
- Charging Contacts: For charging within the case.
- Belt Clip/Cold Shoe Mount: For attaching to clothing or camera.
3.3 DK3G Premium Lavalier Microphone

The included lavalier microphones are designed for discreet placement and high-quality voice capture. They connect to the MIC IN port on the TX transmitters.
3.4 Blink 900 B2 Charging Case

The charging case not only protects your system but also provides multiple charges on the go. It features a USB-C charging port.
4. Setup Instructions
4.1 Initial Charging
- Place the TX transmitters and RX receiver into the charging case.
- Connect the USB-A to USB-C charging cable to the charging case and a USB power adapter (not included).
- The units and case will indicate charging status via their respective screens/LEDs. Ensure all units are fully charged before first use.
4.2 Powering On/Off
To power on or off any unit (TX or RX), press and hold its power button for approximately 3 seconds.
4.3 Pairing
The Blink 900 B2 system is pre-paired at the factory. If re-pairing is necessary:
- Power on both the TX transmitters and the RX receiver.
- On the RX receiver, navigate to the pairing menu (refer to the on-screen menu for specific steps).
- Initiate pairing on the RX. The TX units should automatically detect and pair with the RX.
- A successful connection will be indicated on the screens of both TX and RX units.
4.4 Connecting to a Recording Device
Select the appropriate output cable for your recording device:
- For Cameras: Use the 3.5mm TRS to TRS cable. Connect one end to the RX's output port and the other to your camera's microphone input.
- For Smartphones/Tablets (3.5mm TRRS): Use the 3.5mm TRS to TRRS cable. Connect the TRS end to the RX's output port and the TRRS end to your device's headphone/microphone jack.
- For Smartphones/Tablets (USB-C): Use the USB-C to USB-C cable. Connect one end to the RX's output port and the other to your device's USB-C port.
- For iPhones/iPads (Lightning): Use the USB-C to Lightning cable. Connect the USB-C end to the RX's output port and the Lightning end to your device's Lightning port.


5. Operating Instructions
5.1 Transmitter (TX) Operation
- Microphone Input: You can use the built-in microphone or connect the DK3G lavalier to the 'MIC IN' port.
- Gain Control: Use the '+' and '-' buttons on the TX to adjust the microphone input gain. Monitor the audio levels on the RX receiver to prevent clipping.
- Mute Function: Short press the power button on the TX to mute or unmute the microphone. The screen will indicate the mute status.
- Low Cut Filter: The TX features a 4-stage low-cut filter to reduce unwanted low-frequency noise (e.g., wind, rumble). Access this setting via the TX menu.
- Auto Gain: The TX can automatically adjust gain levels for optimal audio. This feature can be enabled or disabled in the TX menu.
5.2 Receiver (RX) Operation
- Output Mode (Mono/Stereo): Use the RX menu to switch between Mono and Stereo output modes. In Mono, both TX inputs are mixed to both left and right channels. In Stereo, each TX input is sent to a separate channel (TX1 to Left, TX2 to Right).
- Headphone Monitoring: Connect headphones to the 3.5mm headphone jack on the RX to monitor audio in real-time. Adjust headphone volume via the RX menu.
- Level Meters: The RX screen displays audio level meters for both TX units, allowing you to visually monitor input levels.
- Automatic Brightness: The vivid color LCD screens on both TX and RX units feature automatic brightness adjustment for optimal visibility in various lighting conditions.
- Channel Switching: The system automatically switches channels to avoid static and dropouts, ensuring a stable connection.
6. Maintenance
- Cleaning: Use a soft, dry cloth to clean the units. Avoid using harsh chemicals or abrasive materials.
- Storage: Store the system in its charging case in a cool, dry place when not in use.
- Battery Care: For optimal battery life, fully charge the units and case regularly, even if not in frequent use. Avoid extreme temperatures.
- Windscreens: Regularly clean or replace the furry windscreens to maintain acoustic performance.
7. Troubleshooting
- No Sound/Low Sound:
- Ensure all units are powered on and paired.
- Check cable connections to the RX and your recording device.
- Adjust TX gain and RX output volume.
- Verify the recording device's input settings (e.g., external mic selected).
- Check if the TX is muted.
- Distorted Sound:
- Reduce TX gain to prevent clipping.
- Ensure the lavalier microphone is not rubbing against clothing.
- Check for strong interference sources nearby.
- Interference/Dropouts:
- Ensure TX and RX are within the specified operating range (up to 656 feet / 200m line-of-sight).
- Avoid physical obstructions between TX and RX.
- Move away from other 2.4GHz wireless devices (Wi-Fi routers, other wireless mics).
- The system automatically switches channels, but severe interference may still occur.
- Units Not Charging:
- Ensure the charging cable is securely connected to the case and power source.
- Verify the power adapter is functional.
- Ensure units are correctly seated in the charging case.
8. Specifications
| Feature | Specification |
|---|---|
| Wireless Type | 2.4GHz Digital |
| Operating Range | Up to 656 feet (200m) line-of-sight |
| Microphone Form Factor | Lavalier / Built-in |
| Polar Pattern | Omnidirectional |
| Number of Channels | 2 |
| Signal-to-Noise Ratio | 78 dB |
| Power Source | Battery Powered (Lithium Polymer) |
| Battery Life | Up to 6 hours (Transmitter/Receiver) |
| Charging Case Capacity | 4500mAh (provides up to 3 additional charges) |
| Connectivity Technology | USB |
| Compatible Devices | Smartphone, Tablet, Camera, Personal Computer |
| Dimensions (Product) | 4.33 x 3.15 x 7.87 inches |
| Item Weight | 1.32 pounds (0.6 Kilograms) |
9. Warranty and Support
Saramonic products are designed for reliability and performance. For warranty information, technical support, or service inquiries, please refer to the official Saramonic website or contact their customer support directly. Keep your proof of purchase for warranty claims.


