
1. Product Overview
This manual provides instructions for the BLACK+DECKER 1.5 HP Variable Speed Above Ground Pool Pump, Model BDXBTV24333. This pump is designed for above-ground pool applications, featuring variable speed operation for energy efficiency and quiet performance. It includes Wi-Fi connectivity for smart device control and is Energy Star certified.
Key Features:
- Self-Priming, Variable Speed Motor with low speed options for thorough filtration.
- Exclusive self-diagnostics for consistent performance.
- Consumer-friendly installation with 1.5” and 2” ports included.
- Easy-to-program touchpad for optimal speeds.
- Automatic smart dual voltage sensor (115V-230V) for versatile power connection.
- Permanent magnet technology for increased pump efficiency and energy savings.
- Wi-Fi Enabled: Connects to any smartphone or smart device.
- Totally Enclosed Fan-Cooled (TEFC) design for reliability and longevity.

Image 1.1: The BLACK+DECKER Variable Speed Above Ground Pool Pump, highlighting its self-priming and variable speed capabilities.

Image 1.2: An illustration detailing the key features of the pump, including its above-ground design, self-priming function, 1.5 HP motor, TEFC motor, and programmable variable speed controls.
2. Important Safety Information
Read and understand all instructions before installing or operating this pump. Failure to follow these instructions could result in serious injury or death.
- Electrical Safety: Always disconnect power to the pump before performing any service or maintenance. Ensure the pump is connected to a Ground Fault Circuit Interrupter (GFCI) protected circuit. Wiring should be performed by a qualified electrician and comply with all local and national electrical codes.
- Water Safety: Do not operate the pump if the water level is below the skimmer or if the pump is not properly primed. Operating the pump dry can cause severe damage and void the warranty.
- Pressure Safety: Do not exceed the maximum operating pressure of the filter or other system components. Ensure all clamps and connections are secure before operating.
- Children: Keep children away from the pump and all pool equipment.
- Installation: Install the pump in a well-ventilated area, protected from direct sunlight and excessive moisture. Ensure adequate drainage around the pump.
3. Installation and Setup
3.1 Unpacking and Inspection
Carefully remove the pump from its packaging. Inspect for any shipping damage. Report any damage to your supplier immediately. Ensure all components listed in the packing list are present.
3.2 Mounting the Pump
Mount the pump on a firm, level base that is resistant to vibration. The base should be capable of supporting the pump's weight and be positioned to allow for proper ventilation and access for maintenance. The pump is designed for above-ground use.
3.3 Plumbing Connections
The pump includes both 1.5-inch and 2-inch unions and traditional barbed hose fittings for versatile connection options. Ensure all connections are watertight using appropriate sealants and clamps.
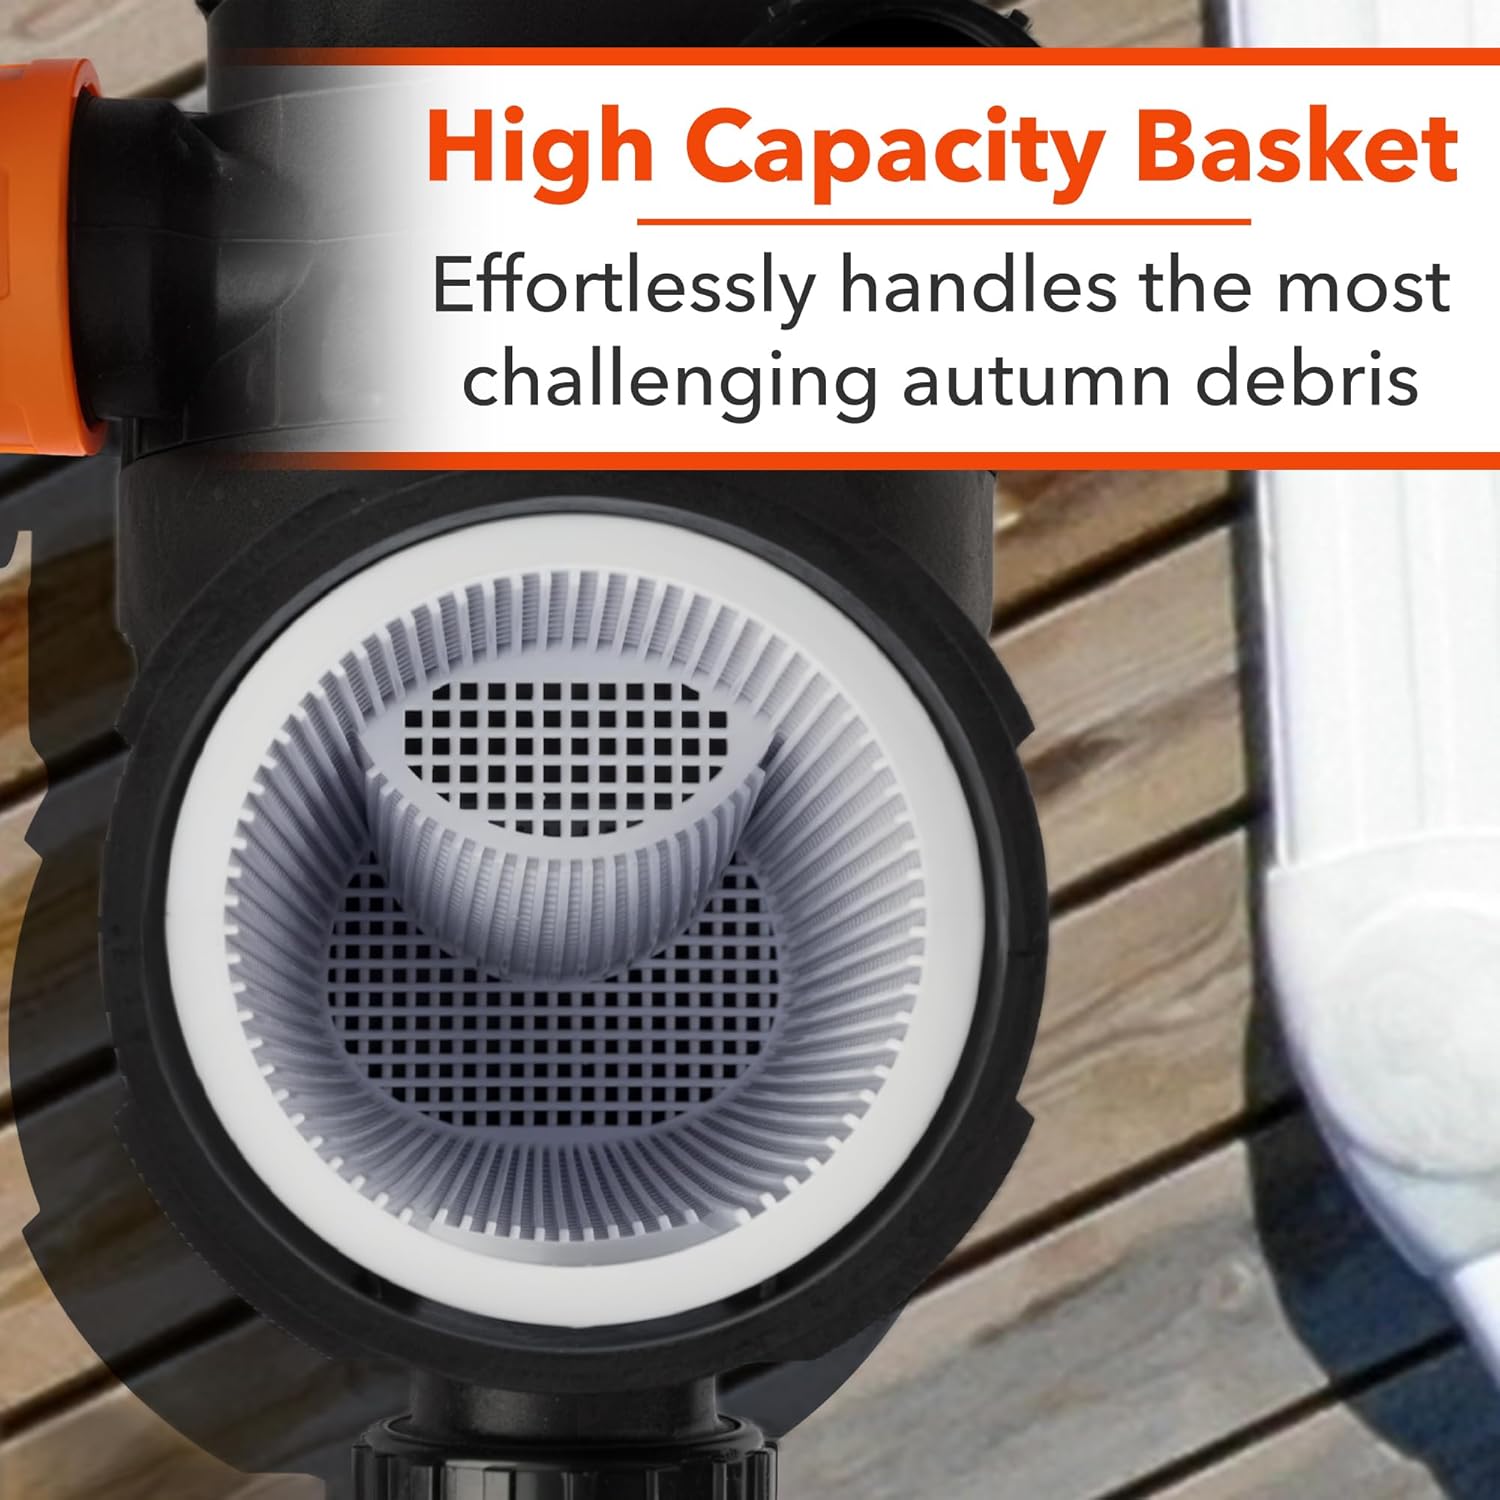
Image 3.1: The pump showing the included 1.5-inch and 2-inch unions and traditional barbed hose fittings for flexible plumbing connections.
The pump features a patented dual-port design, allowing you to easily switch from vertical to horizontal discharge. This design facilitates integration into most existing pool equipment setups.

Image 3.2: A view of the pump illustrating its patented dual-port design, which enables easy adjustment of discharge orientation.
3.4 Electrical Connection
This pump is equipped with a factory-installed 110V power cable. It features an automatic smart dual voltage sensor (115V-230V), but is primarily designed for 110V operation. Connect the pump to a dedicated, GFCI-protected electrical circuit. Consult a qualified electrician to ensure proper wiring and compliance with local codes.
3.5 Priming the Pump
Before starting the pump, ensure the skimmer and pump basket are full of water. Open all suction and return valves. Remove the clear lid from the pump basket and fill the basket with water. Replace the lid, ensuring it is securely tightened. The pump is self-priming, but initial manual priming assists in faster startup.
4. Operating Instructions
4.1 Control Panel Overview
The pump features an easy-to-program touchpad for setting optimal speeds. The variable speed motor allows for precise control over water flow, which can lead to significant energy savings.
4.2 Setting Pump Speeds
The pump typically offers multiple speed settings (e.g., Low, Medium, High). These can be adjusted via the touchpad to suit your pool's filtration needs. Lower speeds are ideal for routine filtration and quieter operation, while higher speeds are suitable for vacuuming or backwashing.
- Low Speed: Recommended for daily filtration to maintain water clarity and maximize energy efficiency.
- Medium Speed: Suitable for moderate filtration needs or when slightly more circulation is required.
- High Speed: Use for tasks requiring maximum flow, such as initial priming, vacuuming, or backwashing the filter.
Refer to the detailed programming instructions in the full manual for customizing speed settings and run times. Some settings may default to lower speeds after a set period; these can often be adjusted to maintain desired RPMs.
4.3 Wi-Fi Connectivity
This pump is Wi-Fi enabled, allowing connection to a smartphone or smart device for remote control and monitoring. Follow the instructions provided in the dedicated Wi-Fi setup guide to connect your pump to your home network and smart device application.
5. Maintenance
Regular maintenance ensures optimal performance and longevity of your pool pump.
5.1 Cleaning the Strainer Basket
The pump is equipped with a high-capacity strainer basket designed to collect debris. Regularly inspect and clean the basket to prevent blockages and maintain efficient water flow. The large clear lid removes effortlessly for easy access.

Image 5.1: A close-up view of the pump's high-capacity strainer basket, designed to efficiently capture debris.
- Turn off the pump and disconnect power.
- Rotate the clear lid counter-clockwise to remove it.
- Lift out the strainer basket.
- Empty debris and rinse the basket thoroughly with water.
- Inspect the O-ring on the lid for cracks or wear; replace if necessary.
- Place the clean basket back into the pump housing.
- Replace the lid, ensuring the O-ring is properly seated, and tighten clockwise until snug. Do not overtighten.
5.2 Winterization
In areas subject to freezing temperatures, the pump must be properly winterized to prevent damage. Consult your full product manual for detailed winterization procedures, which typically involve draining the pump and storing it in a dry, protected area.
6. Troubleshooting
This section addresses common issues you might encounter with your pool pump.
| Problem | Possible Cause | Solution |
|---|---|---|
| Pump does not start or trips GFCI | No power, faulty GFCI, motor overload, incorrect wiring. | Check power supply and circuit breaker. Reset GFCI. Ensure proper voltage (110V). Consult an electrician if issues persist. Some variable speed pumps may require specific GFCI types to prevent nuisance tripping. |
| Low water flow or no prime | Clogged strainer basket, air leak in suction line, low water level, closed valves. | Clean strainer basket. Check all suction line connections for leaks. Ensure pool water level is adequate. Open all suction and return valves. Re-prime the pump. |
| Pump is noisy | Air leak, cavitation, worn bearings, debris in impeller. | Check for air leaks in suction line. Ensure adequate water flow to prevent cavitation. If noise persists, contact customer support. |
| Difficulty programming speeds | Incorrect button sequence, misunderstanding of programming logic. | Refer to the detailed programming section in the full manual. Ensure you are saving settings correctly. Customer reviews indicate that default speed durations can be adjusted. |
7. Product Specifications
The following table outlines the technical specifications for the BLACK+DECKER 1.5 HP Variable Speed Above Ground Pool Pump.
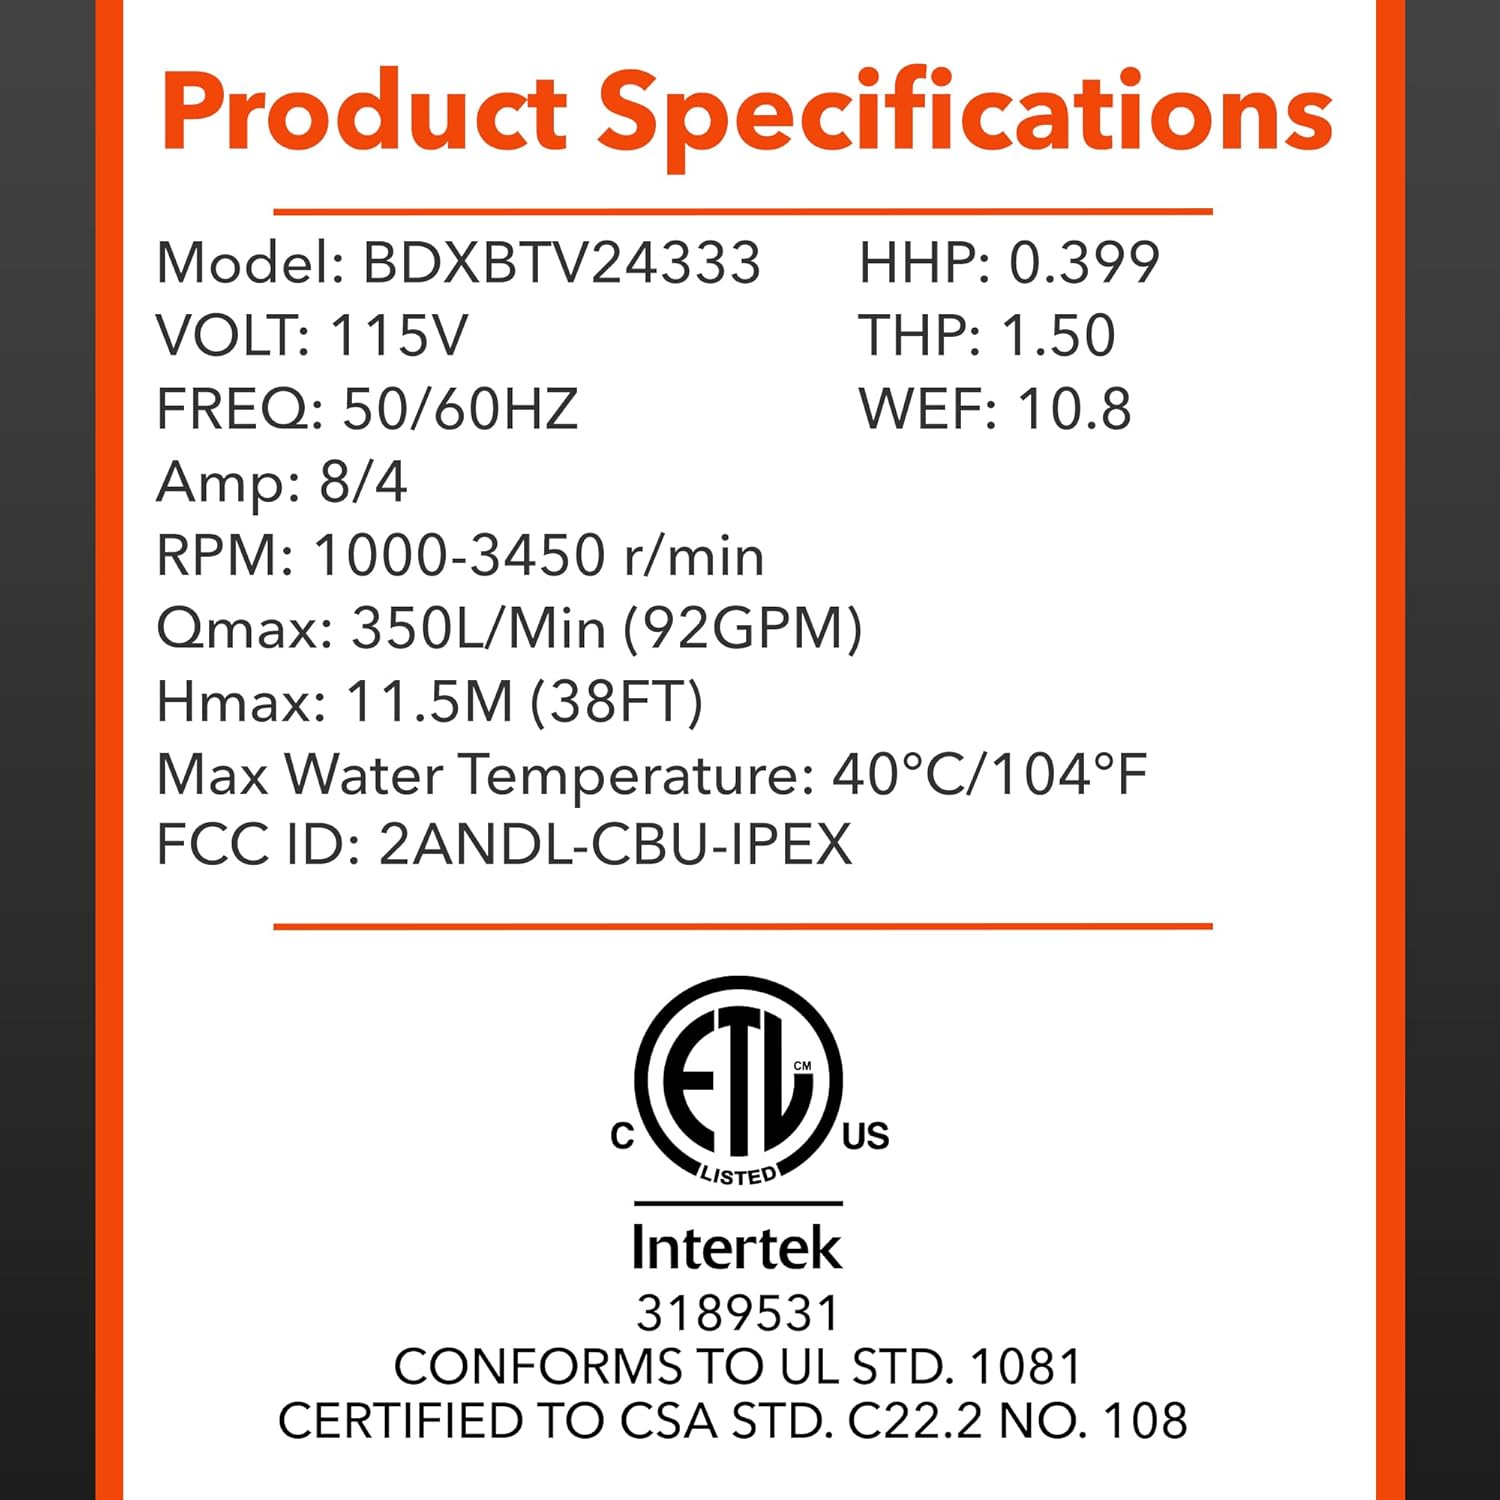
Image 7.1: A label displaying the detailed product specifications, including model number, voltage, frequency, amperage, RPM range, flow rates, and certifications.
| Specification | Value |
|---|---|
| Model | BDXBTV24333 |
| Horsepower (HP) | 1.5 hp |
| Voltage | 110 volts (with 115V-230V smart dual voltage sensor) |
| Maximum Flow Rate | 57.5 gpm (gallons per minute) / 350 L/Min (92 GPM) as per label |
| RPM Range | 1000-3450 r/min |
| Product Dimensions (L x W x H) | 24"L x 10"W x 12"H (approximate, based on image and product data) |
| Item Weight | 24.5 pounds |
| Material | Plastic |
| Power Source | Corded Electric |
| Certifications | Energy Star Certified, ETL Listed (Intertek 3189531), Conforms to UL STD. 1081, Certified to CSA STD. C22.2 NO. 108 |

Image 7.2: A visual representation of the pump's dimensions, indicating approximate length, width, and height.
8. Warranty Information
This BLACK+DECKER pool pump includes a 5-Year Warranty. This warranty covers defects in materials and workmanship under normal use and service. For specific terms, conditions, and limitations of the warranty, please refer to the warranty card included with your product or contact customer support.
9. Customer Support
If you have any questions, require technical assistance, or need to make a warranty claim, please contact BLACK+DECKER customer support. Contact information can typically be found on the product packaging, the manufacturer's official website, or the warranty documentation.
When contacting support, please have your pump's model number (BDXBTV24333) and serial number readily available.

