
1. Introduction
This manual provides essential information for the safe and effective operation, maintenance, and troubleshooting of your Kinzo 710W Impact Drill, Model HF-ID02-13. This powerful tool is designed for heavy-duty drilling tasks, including drilling into hard materials such as concrete, masonry, wood, and metal. Please read this manual thoroughly before using the drill and keep it for future reference.

Figure 1: Kinzo Impact Drill with auxiliary handle and depth gauge.
2. Safety Instructions
Always observe basic safety precautions to reduce the risk of fire, electric shock, and personal injury.
- Personal Protective Equipment (PPE): Always wear safety glasses, hearing protection, and work gloves when operating the drill. Hearing protection is crucial when sound pressure levels exceed 85 dB(A).
- Work Area Safety: Keep your work area clean and well-lit. Cluttered or dark areas invite accidents. Do not operate power tools in explosive atmospheres, such as in the presence of flammable liquids, gases, or dust.
- Electrical Safety: Ensure the power supply matches the specifications on the tool's nameplate (230V). Avoid body contact with earthed or grounded surfaces. Do not expose power tools to rain or wet conditions.
- Tool Use and Care: Do not force the power tool. Use the correct power tool for your application. Disconnect the plug from the power source before making any adjustments, changing accessories, or storing power tools.
- Secure Workpiece: Always secure the workpiece firmly before drilling to prevent movement during operation.
- Auxiliary Handle: Always use the auxiliary handle for better control, especially during hammer drilling.
3. Components and Parts
Familiarize yourself with the main components of your Kinzo Impact Drill.
- Chuck: Holds the drill bit securely.
- Auxiliary Handle: Provides additional grip and control, adjustable 360 degrees.
- Depth Gauge: Allows for precise control over drilling depth.
- Speed Control Dial: Adjusts the rotational speed of the drill.
- Hammer/Drill Mode Selector: Switches between standard drilling and hammer drilling functions.
- On/Off Switch: Activates and deactivates the drill.

Figure 2: Overview of the Kinzo Impact Drill on a workbench, showing its main body and components.
4. Setup
4.1 Attaching the Auxiliary Handle
The auxiliary handle provides stability and control.
- Loosen the auxiliary handle by rotating it counter-clockwise.
- Slide the handle onto the front of the drill body, behind the chuck.
- Adjust the handle to your desired position (it can rotate 360 degrees).
- Tighten the handle by rotating it clockwise until it is secure.
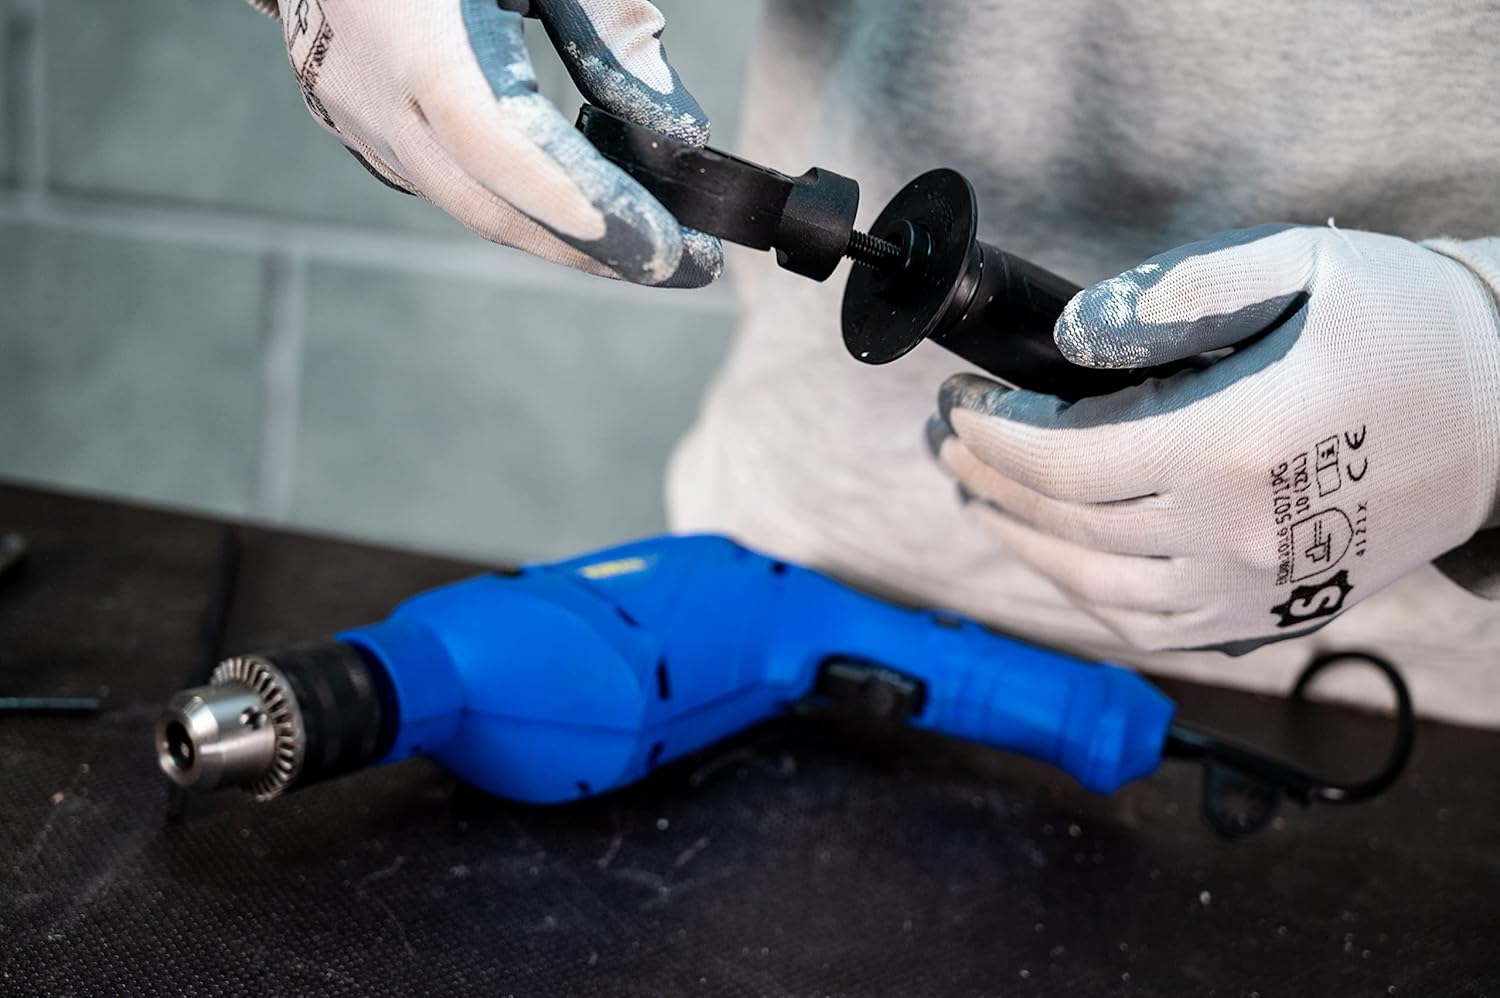
Figure 3: Steps for attaching the auxiliary handle to the drill.
4.2 Installing the Depth Gauge
The depth gauge ensures consistent drilling depth.
- Insert the depth gauge rod through the hole in the auxiliary handle.
- Adjust the depth gauge to the desired drilling depth. The tip of the drill bit should extend beyond the end of the depth gauge by the desired depth.
- Secure the depth gauge by tightening the screw or clamp on the auxiliary handle.
4.3 Inserting Drill Bits
Ensure the drill bit is securely fastened in the chuck.
- Unplug the drill from the power source before changing bits.
- Open the chuck jaws by rotating the chuck counter-clockwise.
- Insert the drill bit fully into the chuck.
- Tighten the chuck jaws by rotating clockwise until the bit is secure. Use the chuck key if provided and necessary for a firm grip.
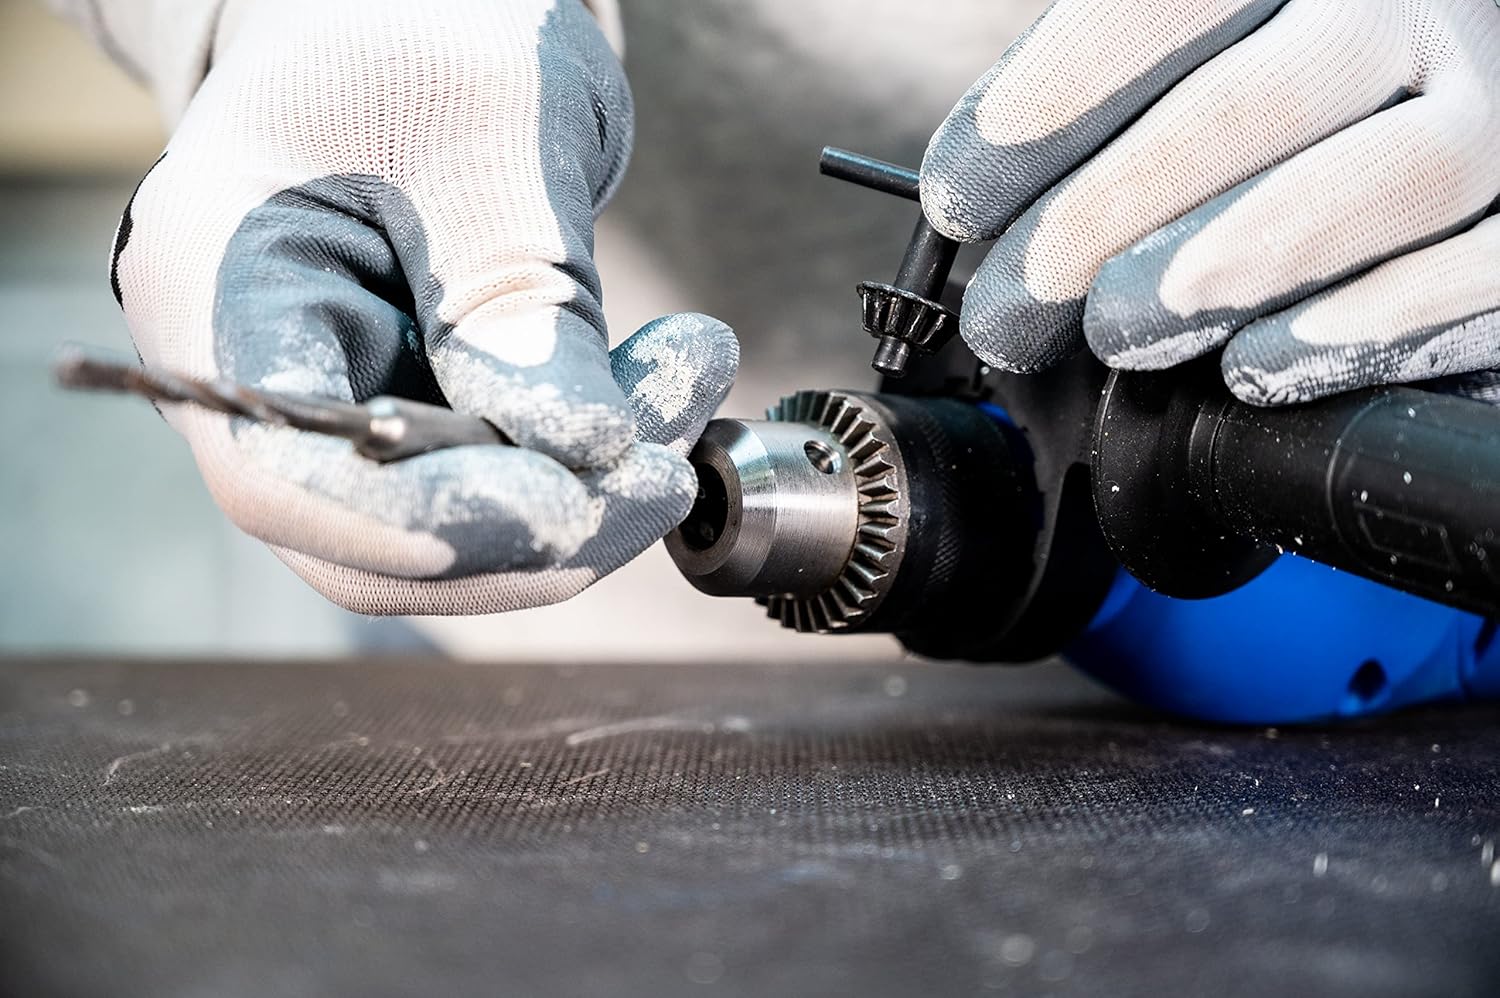
Figure 4: Proper method for inserting a drill bit into the chuck.
5. Operating Instructions
5.1 Power Connection
Connect the drill's power cord to a standard 230V electrical outlet.
5.2 Adjusting Speed
The Kinzo Impact Drill features a variable speed control (0-3000 min-1) located near the On/Off switch.
- Rotate the speed control dial to increase or decrease the drilling speed.
- Lower speeds are suitable for starting holes, drilling into softer materials, or when more torque is required.
- Higher speeds are ideal for drilling into harder materials or for smaller diameter holes.
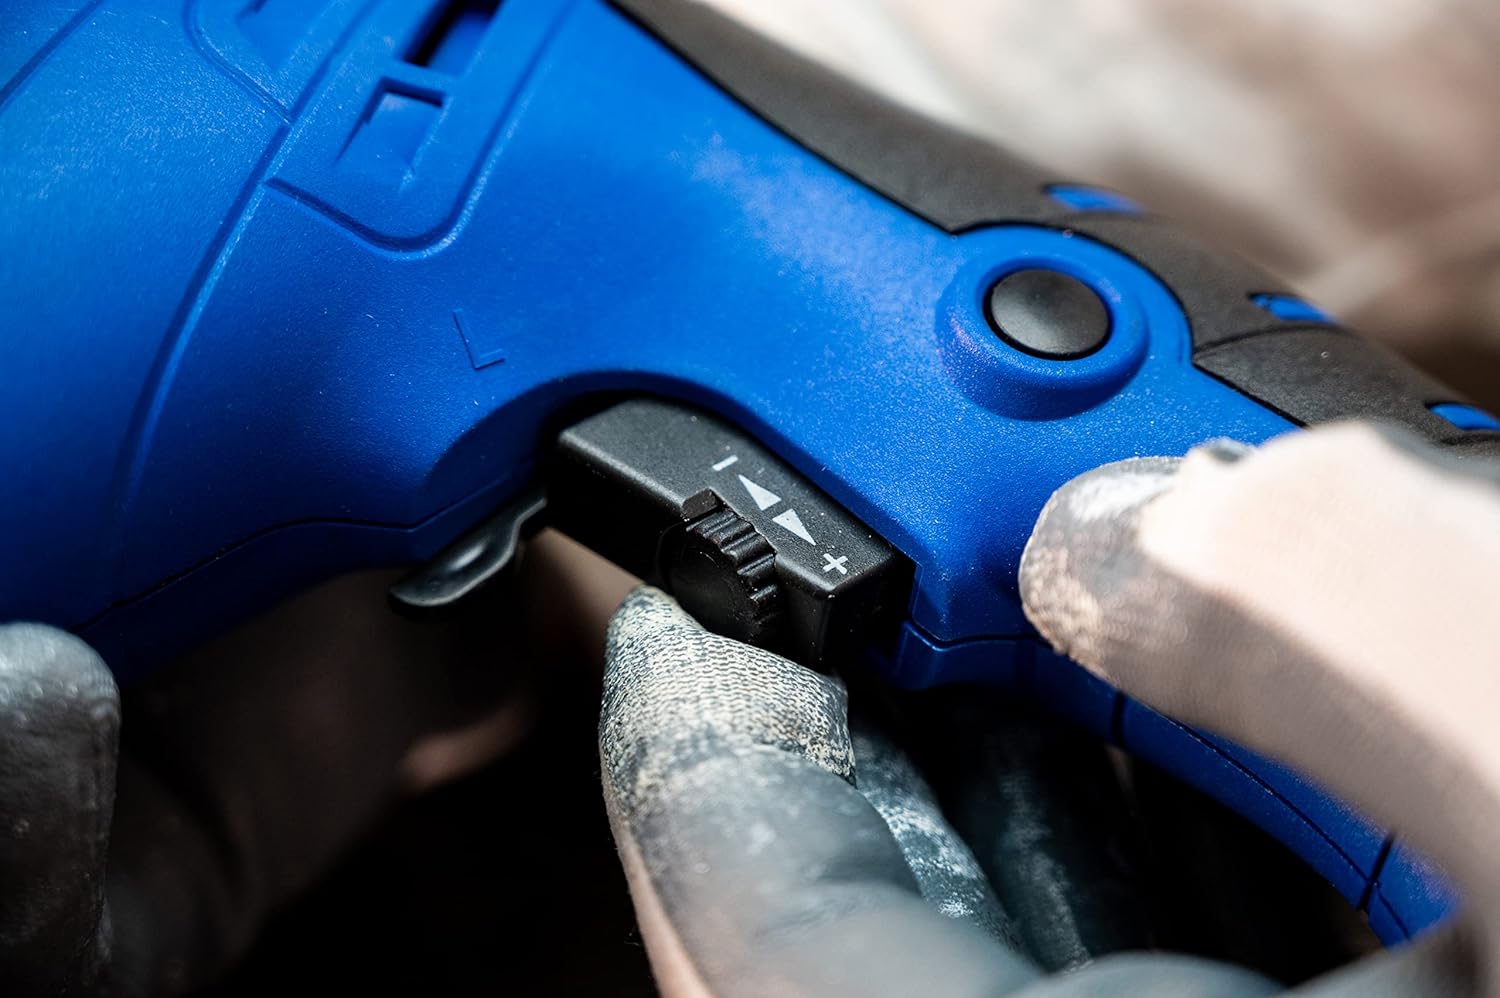
Figure 5: Close-up of the variable speed control dial on the drill.
5.3 Selecting Hammer or Drill Function
The drill has a selector switch to choose between standard drilling and hammer drilling modes.
- For drilling into metal, plastic, or soft rock, set the switch to the Drill position (indicated by a drill bit icon).
- For drilling into harder materials like concrete or hard rock, set the switch to the Hammer Drill position (indicated by a hammer icon).

Figure 6: The selector switch for choosing between drill and hammer drill modes.
5.4 Drilling Operation
Always ensure the workpiece is stable and secure before drilling.
- Select the appropriate drill bit for the material.
- Set the desired drilling depth using the depth gauge.
- Position the drill bit at the desired drilling point.
- Press the On/Off switch to start the drill. Apply steady, even pressure.
- Maintain a firm grip on both the main handle and the auxiliary handle.
- Once the desired depth is reached, release the On/Off switch and carefully withdraw the drill bit from the hole.

Figure 7: A user demonstrating the proper grip and use of the drill for precise drilling.

Figure 8: The drill in action, demonstrating its capability to drill into a wall with the depth gauge in place.
6. Maintenance
Regular maintenance ensures the longevity and optimal performance of your drill. Always unplug the drill before performing any maintenance.
- Cleaning: After each use, wipe down the drill with a clean, damp cloth. Do not use harsh chemicals or abrasive cleaners. Keep ventilation openings clear of dust and debris.
- Chuck Maintenance: Periodically clean the chuck jaws to ensure proper grip on drill bits. A small amount of light machine oil can be applied to the chuck threads if it becomes stiff.
- Cord Inspection: Regularly inspect the power cord for any signs of damage, cuts, or fraying. If damaged, have it repaired by a qualified professional.
- Storage: Store the drill in a dry, secure location, out of reach of children. Protect it from direct sunlight and extreme temperatures.
7. Troubleshooting
This section addresses common issues you might encounter.
| Problem | Possible Cause | Solution |
|---|---|---|
| Drill does not start. | No power supply; faulty switch; damaged cord. | Check power outlet and cord. If issues persist, contact service. |
| Drill bit slips in chuck. | Chuck not tightened sufficiently; dirty chuck jaws; worn drill bit shank. | Ensure chuck is fully tightened with key. Clean chuck jaws. Replace worn drill bit. |
| Poor drilling performance. | Incorrect drill bit for material; dull drill bit; incorrect speed/mode. | Use appropriate, sharp drill bit. Adjust speed and hammer/drill mode according to material. |
| Excessive vibration or noise. | Loose components; damaged internal parts. | Stop operation immediately. Check for loose parts. If problem persists, seek professional repair. |
| Missing components upon unboxing. | Packaging error. | Verify all included components against the product packaging list. Contact the seller or manufacturer for missing parts. |
8. Specifications
Technical specifications for the Kinzo Impact Drill, Model HF-ID02-13.
| Feature | Value |
|---|---|
| Model | HF-ID02-13 |
| Power | 710 W |
| Voltage | 230 V |
| Variable Speed | 0-3000 min-1 (Revolutions per minute) |
| Chuck Size | 13 mm |
| Cable Length | 1.8 meters (VDE) |
| Material Compatibility | Metal, Wood, Bricks, Plaster, Masonry |
| Weight | 1.6 kg |
| Main Handle Vibration Emission (ah, ID) | 8.540 m/s² |
| Auxiliary Handle Vibration Emission (ah, ID) | 7.495 m/s² |
| Sound Pressure Level (LpA) - No Load | 82 dB(A) |
| Sound Power Level (LwA) - No Load | 93 dB(A) |
| Sound Pressure Level (LpA) - Concrete Drilling | 92.4 dB(A) |
| Sound Power Level (LwA) - Concrete Drilling | 103.4 dB(A) |
Note: Wear hearing protection when sound pressure levels exceed 85 dB(A).
9. Warranty and Support
Specific warranty details are not provided in this manual. For information regarding warranty coverage, claims, or technical support, please refer to the product packaging or contact the retailer or manufacturer directly.
For further assistance, you may visit the Philips Store on Amazon (Note: Product brand is Kinzo, but the provided store link is for Philips. Please verify the correct support channel for Kinzo products).