
Kratos 29Y-011-NAT
Kratos Commercial Gas Floor Fryer Instruction Manual
Model: 29Y-011-NAT
1. Introduction
This manual provides essential information for the safe and efficient operation, installation, and maintenance of your Kratos Commercial Gas Floor Fryer, Model 29Y-011-NAT. This 50 lb. capacity natural gas fryer is designed for commercial kitchen environments, offering robust performance for deep frying various food items. Please read this manual thoroughly before installation and operation to ensure proper use and to prevent potential hazards.
2. Safety Information
WARNING: Improper installation, adjustment, alteration, service, or maintenance can cause property damage, injury, or death. Read the installation, operating, and maintenance instructions thoroughly before installing or servicing this equipment.
- Ensure the fryer is installed by a qualified professional in accordance with all local and national codes.
- Maintain adequate clearance around the fryer for proper ventilation and safe operation.
- Do not store or use gasoline or other flammable vapors and liquids in the vicinity of this or any other appliance.
- Keep the area around the appliance clear and free from combustible materials.
- Always disconnect the gas supply and power before cleaning or servicing the unit.
- Use caution when handling hot oil. Always allow oil to cool before draining or filtering.
- Never leave the fryer unattended during operation.
3. Setup and Installation
3.1 Unpacking
Carefully remove the fryer from its packaging. Inspect the unit for any shipping damage. Report any damage immediately to the carrier and your supplier.
3.2 Placement and Ventilation
Position the fryer on a level, non-combustible surface. Ensure proper ventilation is available, typically under a commercial exhaust hood. Maintain minimum clearances from combustible materials as specified by local codes and the appliance's rating plate.

Figure 3.1: Front view of the Kratos Commercial Gas Floor Fryer. This image shows the overall appearance of the stainless steel unit with two fry baskets in place.
3.3 Leveling
The fryer is equipped with adjustable stainless steel legs. Use a level to ensure the unit is perfectly level for optimal performance and safety. Adjust each leg by rotating it clockwise or counter-clockwise until the fryer is stable and level.

Figure 3.2: Close-up view of the adjustable stainless steel legs, which allow for precise leveling of the fryer on uneven surfaces.
3.4 Gas Connection
This model (29Y-011-NAT) is designed for natural gas and features a 3/4" NPT gas connection. All gas connections must be made by a licensed and qualified technician. Ensure all connections are leak-tested before operation.

Figure 3.3: Side view of the fryer with the access panel open, revealing the internal gas connections and heating tubes. This view highlights the robust construction and accessibility for maintenance.
3.5 Initial Cleaning
Before first use, thoroughly clean the fry tank and all accessories (baskets) with warm, soapy water. Rinse thoroughly and dry completely. This removes any manufacturing residues.
4. Operating Instructions
4.1 Filling the Fry Tank
Ensure the drain valve is closed. Fill the fry tank with cooking oil up to the "MIN" oil level mark. Do not overfill. The 50 lb. capacity refers to the oil capacity.
4.2 Lighting the Pilot
- Turn the main gas valve to the "OFF" position. Wait five (5) minutes to clear any gas.
- Turn the thermostat control knob to the "OFF" position.
- Locate the pilot button, which is positioned low on the unit. Press and hold the pilot button.
- While holding the pilot button, use a lit match or long lighter to ignite the pilot burner. Continue to hold the pilot button for approximately 60 seconds after the pilot flame is established.
- Release the pilot button. If the pilot flame extinguishes, repeat steps 3-5.
- Once the pilot is lit, turn the main gas valve to the "ON" position.
4.3 Setting Temperature
Turn the thermostat control knob to the desired frying temperature, ranging from 200°F to 400°F. The burners will ignite and begin heating the oil. The unit features four powerful 30,000 BTU heating tubes for a total of 120,000 BTU output.

Figure 4.1: Side view of the fryer, highlighting the location of the thermostat control knob and other operational components.
4.4 Using Fry Baskets
The fryer comes standard with two chrome-plated fry baskets. Place food items into the baskets and carefully lower them into the hot oil. Utilize the integrated basket hanger rails to allow excess oil to drain back into the tank after frying.

Figure 4.2: A close-up view of the two chrome-plated fry baskets positioned within the fryer tank, demonstrating their placement during operation.
5. Maintenance
5.1 Daily Cleaning
- Allow the oil to cool completely before cleaning.
- Drain the oil into a suitable container.
- Remove fry baskets and clean them with warm, soapy water.
- Wipe down the exterior of the fryer with a damp cloth and mild detergent.
- Clean the fry tank interior, removing any food debris or sediment.
5.2 Oil Filtration/Replacement
Regularly filter or replace cooking oil to maintain food quality and extend oil life. The frequency depends on usage volume and type of food fried.
5.3 Regular Inspections
Periodically inspect gas connections, hoses, and controls for any signs of wear or damage. Any issues should be addressed by a qualified technician.
6. Troubleshooting
| Problem | Possible Cause | Solution |
|---|---|---|
| Pilot will not light or stay lit. | Insufficient holding time of pilot button; gas supply issue; clogged pilot orifice. | Ensure pilot button is held for 60 seconds. Check gas supply. Contact a qualified technician for orifice cleaning or adjustment. |
| Burners do not ignite. | Pilot not lit; thermostat set to OFF; main gas valve closed. | Light pilot. Set thermostat to desired temperature. Open main gas valve. |
| Fryer not heating to desired temperature. | Thermostat malfunction; low gas pressure; excessive load. | Verify gas pressure. Reduce load if necessary. Contact technician for thermostat inspection. |
| Unit received with incorrect gas type (e.g., LP instead of Natural Gas). | Shipping error or misidentification. | Verify model number (29Y-011-NAT is Natural Gas). Contact supplier for correct unit or orifice conversion kit (requires professional installation). |
7. Specifications
- Brand: Kratos
- Model: 29Y-011-NAT
- Material: Stainless Steel
- Color: Silver
- Product Dimensions: 30.5"D x 15.5"W x 45.5"H
- Oil Capacity: 50 Pounds
- Total BTU Output: 120,000 BTU (Four 30,000 BTU heating tubes)
- Gas Connection: 3/4" NPT (Natural Gas)
- Temperature Range: 200-400°F
- UPC: 840232902891
- ASIN: B09Q3NF9BF
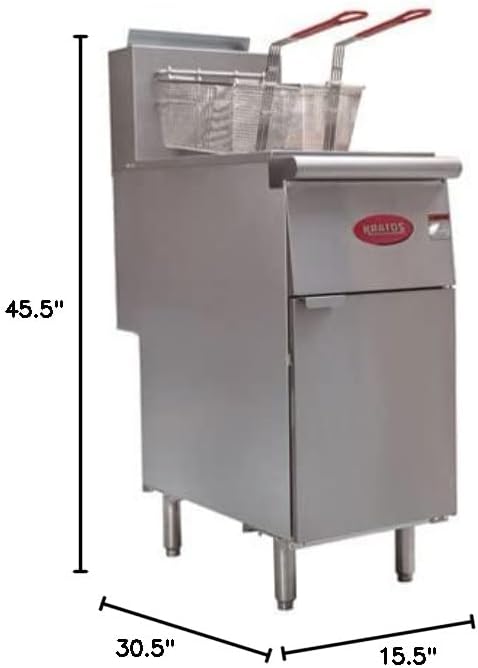
Figure 7.1: Dimensional diagram of the Kratos Commercial Gas Floor Fryer, indicating its depth, width, and height.
8. Product Videos
Kratos Restaurant Floor Fryers Overview
This video provides a detailed overview of the Kratos Restaurant Floor Fryers, highlighting key features and benefits of the product line, including the 50 lb. natural gas model.
9. Warranty and Support
The Kratos Commercial Gas Floor Fryer comes with a 1-year warranty. For technical assistance, parts, or warranty claims, please contact Kratos customer service. Kratos provides US-based customer service to assist with any inquiries.
For further support, you may visit the Kratos Store on Amazon.
Ask a question about this manual
Ask about setup, troubleshooting, compatibility, parts, safety, or missing instructions. Manuals+ will review the question and use this page’s manual context to help answer it.