
Optonica OT2061
Optonica OT2061 Square Flat Recessed Spot Support 100mm GU10 Max 35W User Manual
Model: OT2061 | Brand: Optonica
1. Introduction
This manual provides essential information for the safe and efficient installation, operation, and maintenance of your Optonica OT2061 Square Flat Recessed Spot Support. Please read these instructions carefully before installation and retain them for future reference.
2. Safety Information
- Always disconnect power at the main circuit breaker before installation, maintenance, or bulb replacement.
- Installation should be performed by a qualified electrician or competent person.
- Ensure the product is compatible with your electrical system (220-240V).
- Do not exceed the maximum wattage of 35W for the GU10 bulb.
- This product is rated IP20, meaning it is not waterproof. Do not install in areas exposed to water or high humidity.
- Handle with care to avoid damage to the fixture or electrical components.
3. Product Overview
The Optonica OT2061 is a white, square, flat recessed spot support designed for ceiling installation. It is compatible with GU10 or MR16 GU5.3 bulbs (sold separately) up to a maximum of 35W. A GU10 socket is included.

Figure 1: Front view of the Optonica OT2061 recessed spot support, showing the square frame and central bulb opening.
Key Features:
- Square flat design, white finish.
- Dimensions: 100 x 100 x 27mm.
- Compatible with GU10 / MR16 GU5.3 bulbs (max 35W).
- Includes GU10 socket.
- Material: Plastic + Aluminum.
- Non-waterproof (IP20).
4. Installation Instructions
Follow these steps for proper installation of your recessed spot support.
- Prepare the Installation Area: Ensure power is disconnected at the main circuit breaker. Mark the desired installation location on the ceiling.
- Cut the Opening: Create a square opening in the ceiling with dimensions of 100 x 100mm. The minimum installation height required is 97mm.
- Connect Wiring: Connect the electrical wiring from the ceiling to the provided GU10 socket. Ensure all connections are secure and comply with local electrical codes. The fixture operates on 220-240V.
- Insert Bulb: Carefully insert a GU10 or MR16 GU5.3 bulb (max 35W, sold separately) into the GU10 socket.
- Secure the Fixture: Gently push the spot support into the prepared ceiling opening. The spring clips on the sides will secure the fixture in place.

Figure 2: Rear view of the spot support, illustrating the spring clips and the GU10 socket for electrical connection.
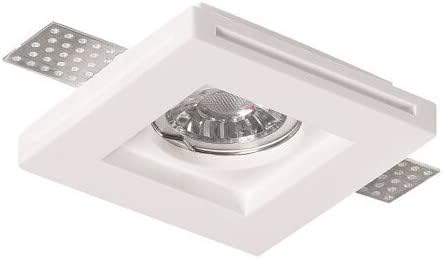
Figure 3: The recessed spot support with a GU10 bulb installed, ready for ceiling integration.
5. Operating Instructions
Once installed and the bulb is inserted, restore power at the main circuit breaker. The light fixture will operate via your standard wall switch or dimmer (if compatible with the installed bulb).
- Turning On/Off: Use the wall switch connected to the circuit to turn the light on or off.
- Dimming: If a dimmable GU10 bulb and a compatible dimmer switch are installed, you can adjust the light intensity.
6. Maintenance
- Cleaning: Disconnect power before cleaning. Wipe the fixture with a soft, dry cloth. Do not use abrasive cleaners or solvents.
- Bulb Replacement: Disconnect power. Allow the bulb to cool completely. Carefully remove the old bulb and insert a new GU10 or MR16 GU5.3 bulb (max 35W). Ensure the new bulb is securely seated before restoring power.
- Inspection: Periodically inspect the fixture for any signs of damage or loose connections. If any issues are found, disconnect power and consult a qualified electrician.
7. Troubleshooting
- Light does not turn on:
- Check if the power is connected at the main circuit breaker.
- Ensure the bulb is correctly inserted and not faulty.
- Verify electrical connections are secure.
- Light flickers:
- Ensure the bulb is fully screwed in or seated.
- Check for loose wiring connections.
- If using a dimmer, ensure the bulb is dimmable and compatible with the dimmer switch.
- Fixture is hot:
- Ensure the installed bulb does not exceed the maximum wattage of 35W.
- Ensure adequate ventilation around the fixture.
8. Specifications
| Attribute | Value |
|---|---|
| Brand | Optonica |
| Model Number | OT2061 |
| Color | White |
| Material | Plastic, Aluminum |
| Finish Type | Painted |
| Power Source | Corded Electric |
| Voltage | 220-240V |
| Maximum Wattage | 35 Watts |
| Bulb Type Compatibility | GU10 / MR16 GU5.3 |
| Ingress Protection (IP) Rating | IP20 (Non-waterproof) |
| Product Dimensions | 100 x 100 x 27mm |
| Installation Dimensions | 100 x 100mm (cut-out) |
| Minimum Installation Height | 97mm |
| Installation Type | Ceiling Mount |
9. Warranty and Support
For warranty information and customer support, please refer to the retailer or manufacturer's official website. Keep your purchase receipt as proof of purchase.
For technical assistance or further inquiries, contact Optonica customer service.
Ask a question about this manual
Ask about setup, troubleshooting, compatibility, parts, safety, or missing instructions. Manuals+ will review the question and use this page’s manual context to help answer it.