Introduction
Thank you for choosing the ELERA XL Cuff Blood Pressure Monitor. This device is designed for accurate and convenient blood pressure measurement at home. It features an extra-large cuff, a large backlit display, and memory for two users, making it suitable for a wide range of users. Please read this manual thoroughly before use to ensure proper operation and accurate readings.

Image: The ELERA XL Cuff Blood Pressure Monitor, showing the main unit, extra-large cuff, AAA batteries, and USB Type-C cable.
Safety Information
Always follow basic safety precautions when using this product. This device is intended for home use and should not replace professional medical advice. Consult your physician for interpretation of blood pressure readings.
- Do not self-diagnose or self-treat based on measurements.
- Consult your doctor if you have any concerns about your blood pressure.
- Keep the device out of reach of children and pets.
- Do not use the device in a moving vehicle.
- Avoid strong electromagnetic fields.
- Use only approved accessories and parts.
What's in the Box
Verify that all components are present upon opening the package:
- ELERA Upper Arm Electronic Blood Pressure Monitor (Model U81E)
- Extra Large Cuff (suitable for arm circumference 13-21 inches / 32-52 cm)
- 4 x AAA Batteries
- USB Type-C Cable
- Waterproof Carrying Bag
- Quick Start Guide
- Instruction Manual (this document)

Image: A visual representation of all items included in the product packaging, such as the monitor, cuff, batteries, USB cable, and carrying bag.
Setup
1. Power Options
The monitor can be powered by either AAA batteries or a USB Type-C cable.
- Battery Installation: Open the battery compartment cover on the back of the monitor. Insert 4 AAA batteries, ensuring correct polarity (+/-). Close the cover.
- USB Type-C Power: Connect the provided USB Type-C cable to the monitor's port and the other end to a compatible USB power source (e.g., wall adapter, computer USB port).

Image: The back of the blood pressure monitor with the battery compartment open, showing 4 AAA batteries inserted, and a USB Type-C cable connected to the side port.
2. Connecting the Cuff
Insert the air plug of the cuff firmly into the air jack on the left side of the monitor.
Operating Instructions
1. Before Measurement
- Relax for 5-10 minutes before taking a measurement.
- Avoid eating, smoking, exercising, or bathing 30 minutes prior to testing.
- Ensure your bladder is empty.
- Sit comfortably with your back supported and feet flat on the floor.
- Do not talk or move during the measurement.
2. Applying the Cuff
The ELERA XL cuff is designed for arm circumferences of 13-21 inches (32-52 cm).
- Place the cuff on your bare left upper arm, approximately 2-3 cm (about 1 inch) above the elbow joint.
- Ensure the air tube runs down the center of your arm in line with your middle finger.
- Wrap the cuff snugly around your arm, leaving enough space for one finger between the cuff and your arm.
- Position your arm so the cuff is at heart level.

Image: A person demonstrating how to properly apply the extra-large blood pressure cuff to their upper arm, showing the correct placement above the elbow.
Video: This video demonstrates the proper application of the ELERA blood pressure monitor's extra-large cuff to the arm, ensuring a correct fit for accurate readings.
3. Taking a Measurement
- Press the START/STOP button. The cuff will automatically inflate.
- Remain still and quiet during the measurement.
- The monitor will display your Systolic (SYS), Diastolic (DIA), and Pulse (PUL) readings after approximately 50 seconds.
- The monitor will automatically shut off after a period of inactivity to conserve power.

Image: The ELERA Blood Pressure Monitor displaying its large screen and clearly labeled buttons for easy operation, including START/STOP, memory, and user selection.
Video: This video provides a general overview of ELERA Blood Pressure Monitors for home use, highlighting features like the large backlight display and accurate measurement results.
4. Understanding Readings & Features
- Large Backlit Display: The 4.37-inch LCD screen provides clear readings, even in low light conditions.
- 2 Users Mode & Data Memory: The monitor supports two users, each with 99 memory slots to track historical measurements. Use the user selection button to switch between User 1 and User 2.
- Average Reading Function: The device can display the average of the last 3 measurements, providing a more stable reading.
- Irregular Heartbeat Detection: The monitor will display a symbol if an irregular heartbeat is detected during measurement. Consult your doctor if this occurs frequently.
- Cuff-Wrapping Detection: The monitor includes a self-test function to ensure the cuff is applied correctly for accurate results.

Image: Comparison showing a small screen monitor versus the ELERA monitor with its large, backlit LCD display, emphasizing readability.

Image: The ELERA Blood Pressure Monitor illustrating its two-user mode with 2x99 memory capacity, showing separate user profiles.
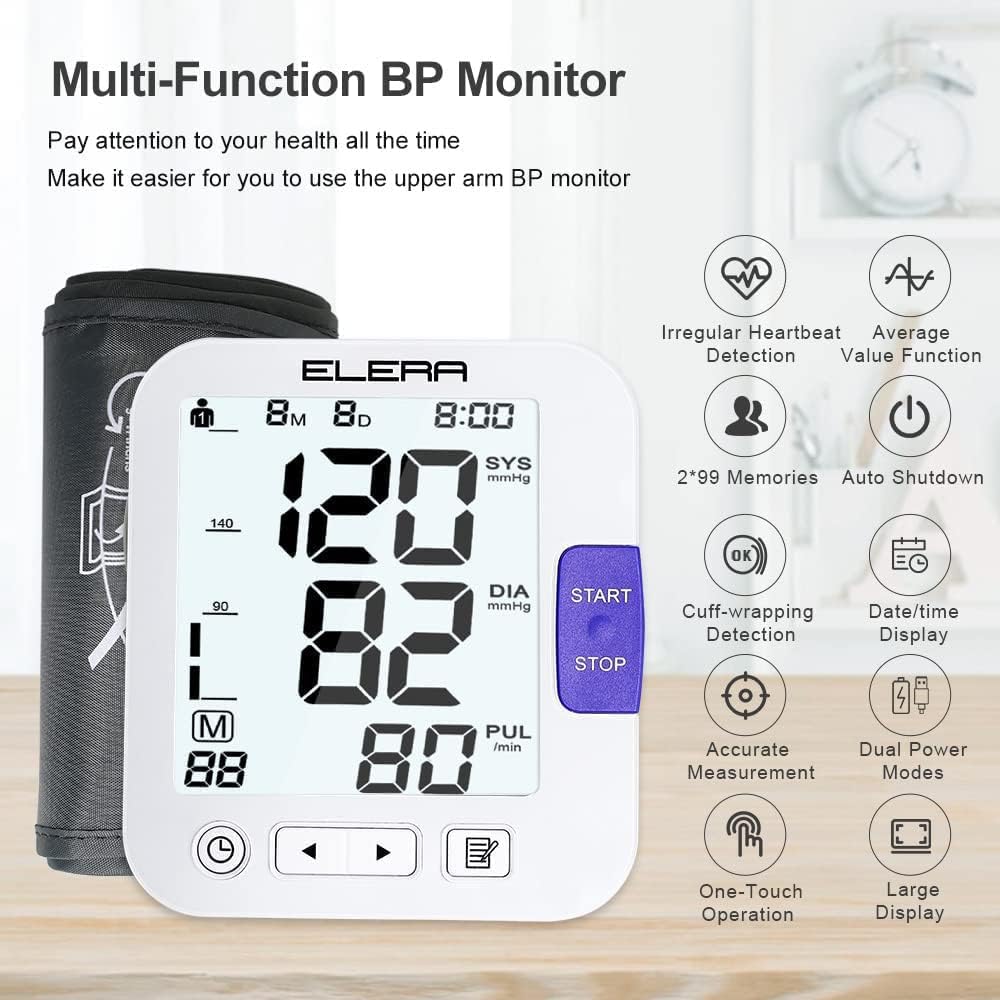
Image: An infographic highlighting the multi-function capabilities of the ELERA BP Monitor, including irregular heartbeat detection, average value function, 2x99 memories, auto shutdown, cuff-wrapping detection, date/time display, accurate measurement, dual power modes, one-touch operation, and large display.
5. Reviewing Historical Records
Press the Memory (M) button to view past measurements. Use the arrow buttons to navigate through the stored readings for each user.
Maintenance
- Cleaning: Wipe the monitor and cuff with a soft, dry cloth. Do not use abrasive cleaners or immerse the device in water.
- Storage: Store the device in its carrying bag in a cool, dry place, away from direct sunlight and extreme temperatures.
- Battery Replacement: Replace all 4 AAA batteries when the low battery indicator appears on the display.
Troubleshooting
| Problem | Possible Cause | Solution |
|---|---|---|
| Monitor does not turn on. | Batteries are dead or incorrectly inserted; USB cable not connected. | Check battery polarity, replace batteries, or ensure USB cable is securely connected. |
| Inaccurate readings. | Improper cuff placement; movement or talking during measurement; not resting before measurement. | Ensure cuff is correctly applied and at heart level. Remain still and quiet. Rest for 5-10 minutes before measuring. |
| Cuff does not inflate or inflates too little/much. | Air plug not securely connected; cuff leakage; cuff size mismatch. | Check air plug connection. Inspect cuff for damage. Ensure cuff size is appropriate for arm circumference. |
| Irregular Heartbeat symbol appears frequently. | Actual irregular heartbeat; movement during measurement. | Repeat measurement after resting. If it persists, consult a medical professional. |
Specifications
- Model: U81E
- Product Dimensions: 6.1 x 4.53 x 3.35 inches
- Item Weight: 1.09 Pounds (494 Grams)
- Cuff Size: Extra Large, suitable for arm circumference 13-21 inches (32-52 cm)
- Power Source: 4 x AAA batteries (included) or USB Type-C (cable included)
- Display Type: LCD with Backlight
- Memory: 2 users, 99 records per user
- Measurement Method: Oscillometric
- Measurement Range:
- Pressure: 0-299 mmHg
- Pulse: 40-199 beats/minute
- Accuracy:
- Pressure: ±3 mmHg
- Pulse: ±5% of reading
- Manufacturer: Shenzhen Urion Technology Co.,Ltd
- Date First Available: July 4, 2023
Warranty and Support
For warranty information and customer support, please refer to the contact details provided by the manufacturer or your point of purchase. Keep your purchase receipt as proof of purchase.