1. Introduction
This manual provides detailed instructions for the setup, operation, and maintenance of your JRHC HC-201D 2D Bluetooth Upgraded Barcode Scanner. Please read this manual thoroughly before using the device to ensure proper functionality and to prevent damage.
2. Product Features
- 3-in-1 Connection Modes: Supports 2.4G wireless, Bluetooth, and USB wired connections for versatile use.
- TFT-LCD Display Screen: Provides real-time information including time, power level, and connection status.
- Hot Button Functionality: Allows quick switching between Bluetooth and 2.4G wireless modes.
- High Compatibility: Works with Windows XP/7/8/10, Mac OS, Linux, Windows Mobile, iOS, and Android devices.
- Long Battery Life: Equipped with an 1100mAh rechargeable battery, offering up to 8 hours of continuous operation and 720 hours of standby time after a 3.5-hour charge.
- Advanced Decoding: 640 x 480 pixel CMOS sensor supports both digital and printed 1D and 2D barcode symbologies, including QR, PDF417, Data Matrix, Aztec code, Maxi Code, Codabar, Code 11, Code93, MSI, Code 128, UCC/EAN-128, Code 39, EAN-8, EAN-13, UPC-A, ISBN, Industrial 25, Interleaved 25, Standard 25, and 2/5 Matrix.
- Multiple Configuration Options: Supports instant upload and storage modes, adjustable sound and vibration, custom prefix/suffix digits, character deletion, and addition of keyboard keys (TAB, CR&LF).
3. Package Contents
Please check the package for the following items:
- JRHC HC-201D Barcode Scanner
- USB Charging Cable
- 2.4G Wireless Dongle
- User Manual
4. Setup and Connection
4.1 Charging the Scanner
Before first use, fully charge the scanner. Connect the USB charging cable to the scanner's charging port and to a power source (e.g., computer USB port or USB wall adapter). The display will indicate charging status. A full charge takes approximately 3.5 hours.

Image: The scanner's display showing battery level and an illustration of its 1100mAh battery, 8 hours working time, 720 hours standby time, and 3.5 hours charging time.
4.2 Connection Modes
The scanner supports three connection methods: 2.4G Wireless, Bluetooth, and USB Wired. You can switch between modes using the 'M' (Mode Switch) button on the scanner.

Image: Diagram illustrating the three connection modes: 2.4G wireless connection via a dongle, USB wired connection, and Bluetooth connection, compatible with PC, smartphone, tablet, and POS systems.
4.2.1 2.4G Wireless Connection
- Insert the 2.4G wireless dongle into a USB port on your computer or device.
- Turn on the scanner by pressing the power button.
- Press the 'M' button to switch to 2.4G wireless mode. The display will show the 2.4G icon.
- The scanner will automatically connect to the dongle.
4.2.2 Bluetooth Connection
- Turn on the scanner by pressing the power button.
- Press the 'M' button to switch to Bluetooth mode. The display will show the Bluetooth icon.
- On your host device (smartphone, tablet, computer), enable Bluetooth and search for available devices.
- Select "Barcode Scanner HD" or a similar name from the list of devices to pair.
- Once paired, the scanner is ready for use.
4.2.3 USB Wired Connection
- Connect the scanner directly to your computer or device using the provided USB cable.
- The scanner will automatically enter USB wired mode and function as a keyboard input device.

Image: Visual representation of the scanner's transmission range: up to 100m/328ft in open environments for 2.4G wireless mode and 50m/164ft for Bluetooth mode.
5. Operating Instructions
5.1 Scanner Controls and Display
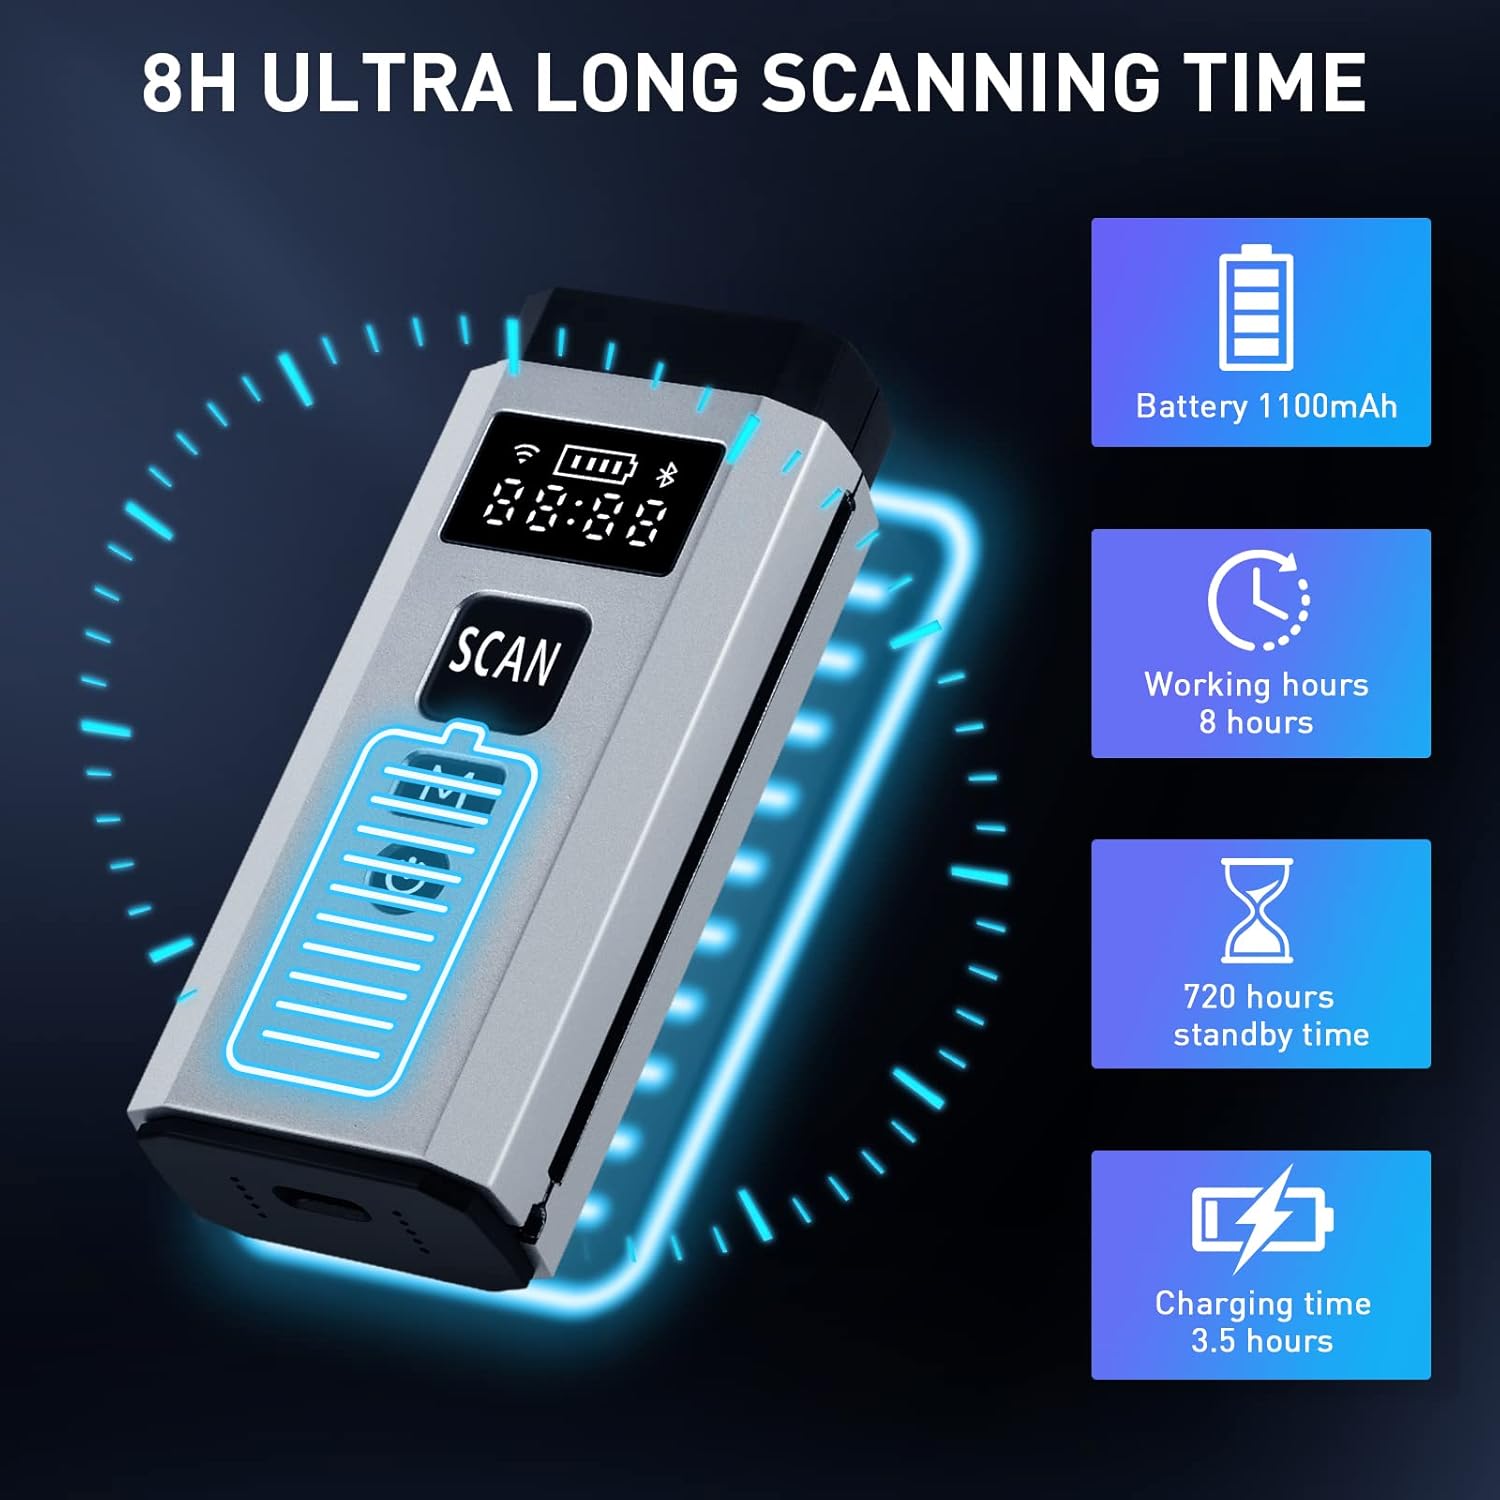
Image: Close-up of the scanner's display and buttons, indicating the 2.4G wireless mode indicator, electricity (battery) level, connection method indicator, time display, 'Scancode key' (SCAN button), 'Mode switch key' (M button), and 'ON/Off key' (Power button).
- SCAN Button: Press to activate the scanning beam and read barcodes.
- M Button (Mode Switch Key): Press to cycle through connection modes (2.4G, Bluetooth, USB).
- Power Button: Press and hold to turn the scanner ON/OFF.
- TFT-LCD Display: Shows current time, battery level, and active connection mode.
5.2 Scanning Barcodes
Point the scanner's window at the barcode and press the SCAN button. A successful scan will typically result in a beep and/or vibration, and the data will be transmitted to your connected device.

Image: Illustration of the scanner's auto-induction scanning capability, where it automatically detects and scans barcodes within its field of view.
5.3 Decoding Capabilities
The scanner is capable of reading various 1D and 2D barcode types, including those that are reflective, colorful, damaged, distorted, or blurred.

Image: Examples of various 1D and 2D barcodes (reflective, colorful, damaged, distorted, QR Code, 1D Code, blurred, EAN) that the scanner can decode.
5.4 Upload Modes
The scanner supports two primary upload modes:
- Instant Upload Mode: Barcode data is transmitted immediately to the connected device after each scan.
- Storage Mode: Barcode data is stored in the scanner's internal memory and can be uploaded later. This is useful when out of range of the host device.

Image: Icons representing the two upload modes: Instant Upload Mode (arrow pointing up) and Storage Mode (floppy disk icon).
5.5 Configuration Options
The scanner offers various configuration options, typically set by scanning specific configuration barcodes found in the full user manual (not provided here).
- Add Prefix/Suffix: Add custom characters before or after scanned data.
- Hide Front/End Characters: Remove a specified number of characters from the beginning or end of scanned data.
- Sound and Vibration: Enable or disable audible beeps and tactile vibrations upon successful scans.
- Add Keyboard Keys: Insert special characters like TAB or Carriage Return/Line Feed (CR&LF) after scanned data.

Image: Examples of barcode data manipulation: adding a prefix (ABC), adding a suffix (ABC), and hiding front/end characters (12345685ABC with 123456 crossed out).

Image: Visual representation of the scanner's vibration alert feature, with icons for sound on/off and vibration on/off.
6. Maintenance
- Keep the scanner clean. Use a soft, dry cloth to wipe the exterior. For the scanning window, use a lens cleaning cloth to avoid scratches.
- Avoid exposing the scanner to extreme temperatures, humidity, or direct sunlight.
- Do not drop or subject the scanner to strong impacts.
- Store the scanner in a safe place when not in use.
7. Troubleshooting
| Problem | Possible Cause | Solution |
|---|---|---|
| Scanner does not turn on. | Low battery. | Charge the scanner for at least 30 minutes. |
| Scanner does not connect via Bluetooth. | Not in Bluetooth pairing mode; device Bluetooth off; out of range. | Ensure scanner is in Bluetooth mode (M button). Turn on Bluetooth on host device. Move scanner closer to host device. Re-pair if necessary. |
| Scanner does not read barcodes. | Barcode damaged/unreadable; scanner window dirty; incorrect barcode type. | Ensure barcode is clear. Clean scanner window. Verify barcode type is supported. |
| Scanned data is incorrect or incomplete. | Incorrect configuration settings (prefix/suffix, character hiding). | Refer to the full configuration guide (usually a separate barcode sheet) to reset or adjust settings. |
| No data transmitted in 2.4G wireless mode. | Dongle not connected; scanner not in 2.4G mode; out of range. | Ensure dongle is securely plugged in. Switch scanner to 2.4G mode. Move closer to dongle. |
8. Specifications
- Model: HC-201D
- Product Dimensions: 3.86 x 1.6 x 0.95 inches
- Item Weight: 8.4 ounces
- Battery: 1100mAh Lithium Polymer (included)
- Connectivity Technology: 2.4G Wireless, Bluetooth, USB Cable
- Decoding Capability: 1D (Codabar, Code 11, Code93, MSI, Code 128, UCC/EAN-128, Code 39, EAN-8, EAN-13, UPC-A, ISBN, Industrial 25, Interleaved 25, Standard 25, 2/5 Matrix), 2D (QR, PDF417, Data Matrix, Aztec code, Maxi Code)
- Operating Systems: Windows XP/7/8/10, Mac OS, Linux, Windows Mobile, iOS, Android
- Manufacturer: JRHC
9. Warranty and Support
For warranty information or technical support, please refer to the documentation included with your purchase or contact JRHC customer service directly. Contact details can typically be found on the manufacturer's website or product packaging.


