
Iduontis B09PRJDBSN
Iduontis Magnetic Screen Door User Manual
Model: B09PRJDBSN
Brand: Iduontis
Introduction
This manual provides comprehensive instructions for the installation, operation, and maintenance of your Iduontis Magnetic Screen Door. Designed to allow fresh air circulation while keeping insects out, this screen door offers a convenient, hands-free entry and exit solution for various doorways.
Safety Information
- Ensure the door frame is clean and dry before installation to ensure proper adhesion.
- Use caution when using push pins, ensuring they are securely placed and out of reach of small children.
- Regularly inspect the screen for any damage or loose attachments to maintain effectiveness and prevent tripping hazards.
- While pet-friendly, supervise pets and children to prevent excessive pulling or chewing on the mesh, which could cause damage.
Package Contents
- 1 x Magnetic Screen Door (Polyester-Black, 38"x83" actual measurement, fits door size 36"x82")
- 1 x Roll of Hook & Loop Adhesive Strip
- 1 x Pack of Push Pins
Specifications
| Feature | Detail |
|---|---|
| Brand | Iduontis |
| Model | B09PRJDBSN |
| Color | Polyester-Black |
| Material | Polyester Mesh |
| Screen Door Actual Measurement | 38" (Width) x 83" (Height) |
| Fits Door Size | 36" (Width) x 82" (Height) or less |
| Magnetic Closure | 36 high-performance magnets |
| Installation Type | Hook & Loop (Velcro) with optional Push Pins |
| Item Weight | 10.6 Ounces |
Setup and Installation
Follow these steps for a quick and easy installation:
Step 1: Measure Your Door
Before installation, accurately measure your door frame. The screen door is designed to fit door openings 36 inches or less in width and 82 inches or less in height. The actual screen measurement is 38"x83".
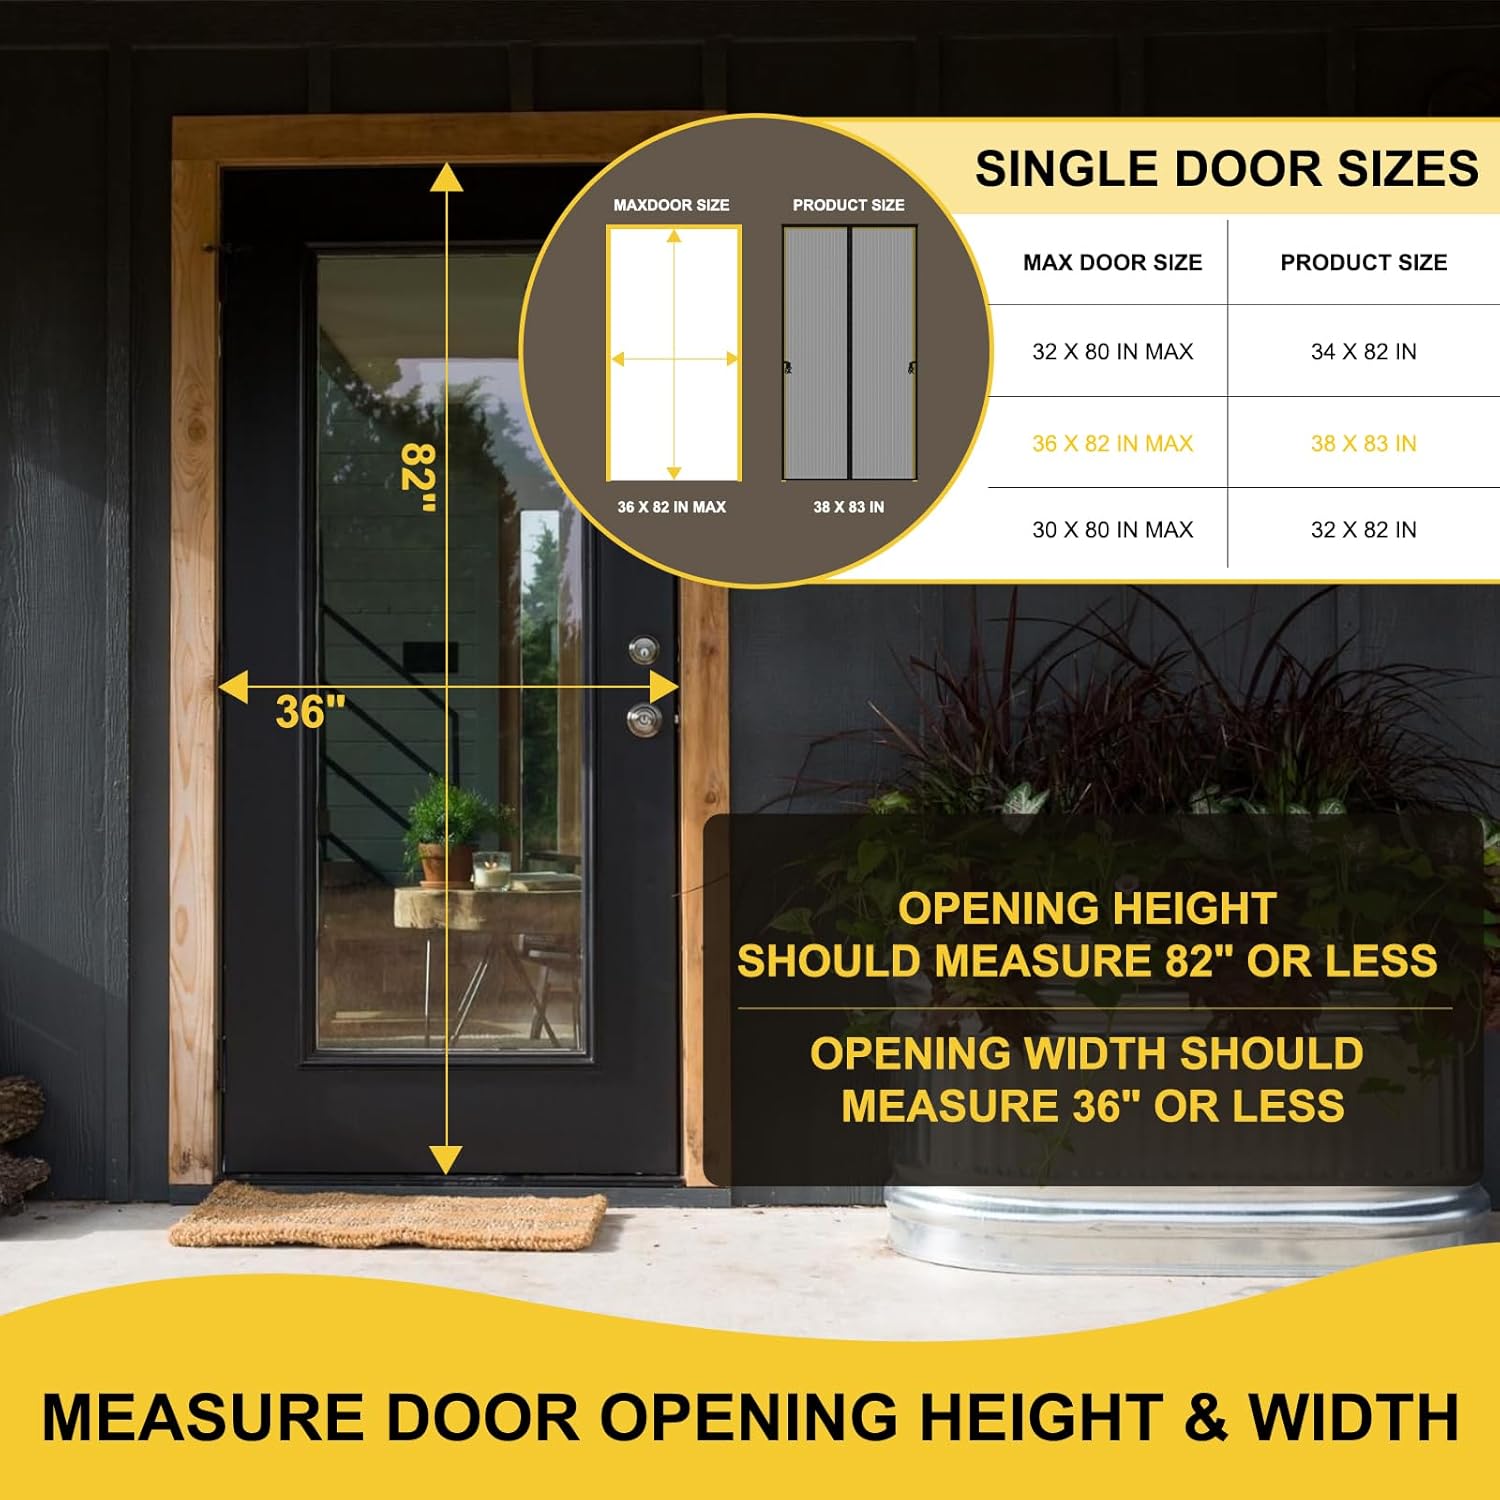
Image: Guide on measuring your door opening.
Step 2: Prepare the Door Frame
Clean the door frame thoroughly with a damp cloth and ensure it is completely dry before proceeding. This ensures optimal adhesion of the hook & loop strip.

Image: Cleaning the door frame.
Step 3: Attach Hook & Loop Strip to Screen
Lay the magnetic screen door flat on the floor. Locate the hook & loop tape on the screen's edges. Remove the protective backing from the adhesive side of the hook & loop strip and attach it firmly to the screen door's perimeter.
Image: Preparing the screen door with adhesive strips.
Step 4: Install Screen Door to Frame
Carefully align the top center of the screen door with the center of your door frame. It is crucial that the center point of the screen is slightly higher than both sides to ensure proper magnetic closure. Press the hook & loop strip firmly onto the door frame, working your way down both sides.

Image: Proper alignment for seamless closure.
Image: Attaching the screen to the door frame.
Step 5: Secure with Push Pins (Optional but Recommended)
For added security and durability, especially in high-traffic areas or windy conditions, use the provided push pins to further secure the hook & loop strip to the door frame. Place pins along the top and sides as needed.

Image: Using push pins for enhanced stability.
Installation Video Guide
Video: A detailed guide on installing the magnetic screen door, demonstrating the process from start to finish.
Operating Instructions
Hands-Free Entry and Exit
The Iduontis Magnetic Screen Door features a middle seam lined with 36 high-performance magnets. This design allows for hands-free entry and exit. Simply walk through the screen, and the magnets will automatically snap back together, ensuring a seamless closure behind you.

Image: Hands-free operation with automatic magnetic closure.

Image: Detail of the magnetic closure.
Pet and Kid Friendly Design
The flexible mesh and strong magnetic closure make this screen door ideal for households with pets and children. They can easily push through the screen without assistance, and it will close securely behind them, preventing insects from entering.

Image: Screen door designed for easy passage by pets and children.
Video: Demonstrating the screen door's pet and kid-friendly features.
Stay Open Feature
For extended periods of high traffic or when you need the screen to remain open, the screen door can be held open using the integrated buckle storage on both sides. This is convenient for moving large items or during social gatherings.

Image: Utilizing the stay-open feature for convenience.
Maintenance
- Cleaning: Wipe the mesh with a damp cloth and mild soap as needed. Avoid harsh chemicals or abrasive cleaners.
- Storage: The screen door is detachable and can be rolled up for temporary storage during colder months or when not in use. Ensure it is clean and dry before storing to prevent mold or mildew.
- Inspection: Periodically check the hook & loop adhesive and push pins for wear or looseness. Reapply or replace as necessary to maintain secure installation.

Image: Durable mesh for long-lasting use.
Troubleshooting
| Problem | Possible Cause | Solution |
|---|---|---|
| Screen does not close completely. | Top center is not higher than sides; adhesive is loose; magnets are misaligned. | Re-adjust the top center to be slightly higher. Re-press adhesive firmly. Check magnet alignment and adjust if necessary. |
| Screen falls off the door frame. | Insufficient adhesion; dirty door frame; not enough push pins. | Clean and dry the door frame thoroughly before re-applying adhesive. Use more push pins for stronger hold. |
| Bugs are still getting in. | Gaps in installation; screen not fully closing. | Ensure the screen is installed without gaps around the frame. Verify magnets are closing completely. Check for tears in the mesh. |
Warranty and Support
Specific warranty details are not provided in the product information. For any product support, inquiries, or warranty claims, please contact the manufacturer, Iduontis, directly through their official channels or the retailer where the product was purchased.
Ask a question about this manual
Ask about setup, troubleshooting, compatibility, parts, safety, or missing instructions. Manuals+ will review the question and use this page’s manual context to help answer it.