1. Introduction
This manual provides detailed instructions for the safe and efficient operation of your DROK AC 110/220V to DC 0-24V 20A 480W Adjustable Switching Power Supply. Please read this manual thoroughly before use and retain it for future reference.
The DROK switching power supply is designed to convert AC input voltage (110V or 220V) to a stable and adjustable DC output voltage ranging from 0-24V, with a maximum current output of 20A and a total power of 480W. It features an LED display for real-time voltage and current monitoring, a cooling fan for temperature management, and built-in protection mechanisms.
2. Safety Precautions
WARNING: Improper use can lead to electric shock, fire, or damage to the device and connected equipment. Always follow these safety guidelines.
- Ensure the input voltage switch (110V/220V) is set correctly according to your local power supply before connecting the unit to AC power. The default setting is 220V.
- Do not exceed the maximum output current of 20A. Ensure connected devices require less than 20A.
- This device is for indoor use only. Avoid exposure to moisture, high temperatures, or corrosive environments.
- Ensure proper ventilation. Do not block the cooling fan or vents.
- Disconnect power before making any connections or adjustments to the wiring.
- Only qualified personnel should perform installation and maintenance.
- The power supply is equipped with overload, overvoltage, and short-circuit protection. However, these are not substitutes for careful operation.
3. Product Specifications
| Feature | Specification |
|---|---|
| Brand | DROK |
| Model | DC 0-24V 20A 480W |
| Input Voltage | AC 110V / 220V (Switchable) |
| Output Voltage Range | DC 0-24V (Adjustable) |
| Output Current | Max 20A (Load Dependent) |
| Output Power | Max 480W |
| Voltage Accuracy | 0.1V |
| Display | LED for Voltage and Current |
| Cooling Method | Built-in Cooling Fan, Heatsink |
| Protection Features | Overload Protection, Overvoltage Protection, Short Circuit Protection |
| Dimensions | Approximately 215mm x 113mm x 50mm (8.46in x 4.45in x 1.97in) |
| Weight | Approximately 890g |
4. Setup Instructions
Follow these steps to set up your DROK switching power supply:
4.1 Unpacking and Inspection
Carefully remove the power supply from its packaging. Inspect the unit for any signs of physical damage. If damage is found, do not proceed with installation and contact customer support.
4.2 Input Voltage Selection
Before connecting to AC power, verify the input voltage switch on the side of the unit. The switch allows selection between 110V and 220V. The default setting is 220V. Adjust this switch to match your local mains voltage to prevent damage to the power supply.
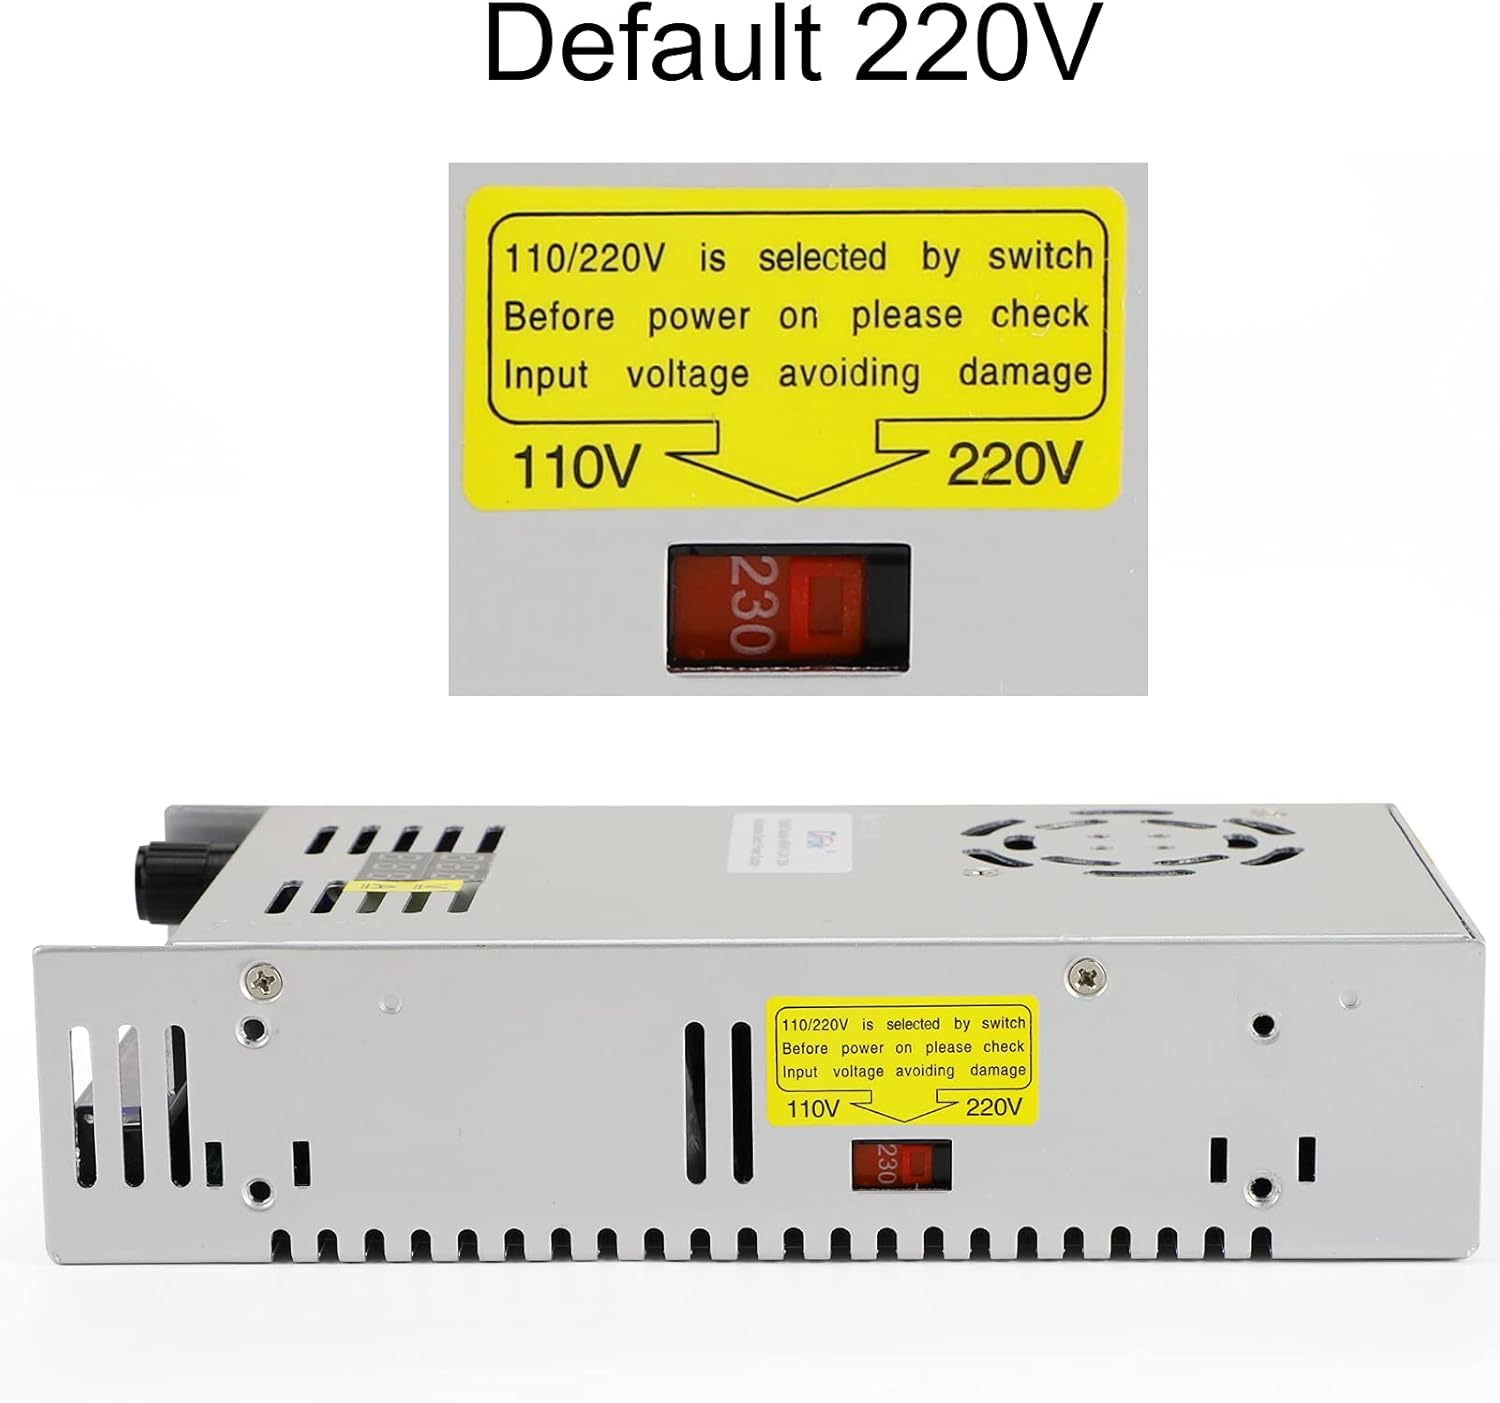
Image: Input voltage selection switch. Ensure this is set correctly for your region.
4.3 Wiring Connections
The power supply features a terminal block for input and output connections. Refer to the diagram below for correct wiring. Ensure all connections are secure and properly insulated.
- AC Input: Connect your AC mains power to the 'N' (Neutral) and 'L' (Live) terminals. The '⏚' (Ground) terminal should be connected to earth ground for safety.
- DC Output: Connect your DC load to the '+V' (Positive) and '-V' (Negative) terminals.

Image: Wiring terminal block and digital display. Connect AC input to N, L, and Ground. Connect DC output to +V and -V.
CAUTION: Incorrect wiring can cause severe damage to the power supply and connected devices, and poses a risk of electric shock.
5. Operating Instructions
Once the power supply is correctly wired and the input voltage is selected, you can begin operation.
5.1 Power On
Connect the AC power cord to the mains supply. The LED display will illuminate, showing the current output voltage and current.

Image: LED display showing voltage and current. This display provides real-time output readings.
5.2 Adjusting Output Voltage
The output voltage can be adjusted using the potentiometer knob located on the front panel. Rotate the knob clockwise to increase the voltage and counter-clockwise to decrease it. The LED display will show the adjusted voltage in real-time.

Image: Potentiometer knob for voltage adjustment. Turn to set desired output voltage.
NOTE: The output current is load-dependent and cannot be directly adjusted by a knob. The maximum output current is 20A. Ensure your load does not draw more than 20A.
5.3 Cooling Fan Operation
The built-in cooling fan operates automatically when the internal temperature reaches a certain threshold, ensuring the power supply remains within a safe operating temperature range. The fan is designed to operate quietly.

Image: Cooling fan grill on top of the unit. The fan activates automatically to maintain optimal temperature.
6. Maintenance
Regular maintenance ensures the longevity and reliable operation of your power supply.
- Cleaning: Periodically clean the exterior of the unit with a soft, dry cloth. Ensure the ventilation openings and fan are free from dust and debris. Do not use liquid cleaners or solvents.
- Ventilation: Ensure the power supply is always placed in a well-ventilated area. Do not obstruct the airflow around the unit.
- Connections: Periodically check all wiring connections to ensure they are secure. Loose connections can lead to poor performance or safety hazards.
- Storage: When not in use for extended periods, store the power supply in a cool, dry place, away from direct sunlight and moisture.
WARNING: Do not attempt to open the casing of the power supply. There are no user-serviceable parts inside, and doing so will void the warranty and expose you to dangerous voltages.
7. Troubleshooting
If you encounter issues with your DROK switching power supply, refer to the following table for common problems and solutions.
| Problem | Possible Cause | Solution |
|---|---|---|
| No power / LED display off |
|
|
| Output voltage unstable or incorrect |
|
|
| No output current / Low current reading |
|
|
| Cooling fan not operating |
|
|
If the problem persists after attempting these solutions, please contact DROK customer support.
8. Warranty & Support
This DROK power supply comes with a one-year warranty from the date of purchase. During this period, DROK will provide prompt support for any product issues or defects under normal use conditions.
The warranty does not cover damage caused by:
- Improper installation or wiring.
- Exceeding specified input/output parameters.
- Unauthorized modifications or repairs.
- Physical damage, misuse, or neglect.
- Natural disasters or other external causes.
For warranty claims or technical support, please contact DROK customer service through the retailer where you purchased the product or visit the official DROK website for contact information.


