1. Introduction
Thank you for choosing the KEPEAK XHP50 LED Flashlight. This high-lumen tactical flashlight is designed for versatility and durability, featuring a powerful XHP50 LED chip, multiple lighting modes, adjustable focus, and a rechargeable battery. It is suitable for various activities including emergency use, camping, hiking, and everyday tasks. Please read this manual thoroughly to ensure proper use and maintenance of your flashlight.

Image 1.1: KEPEAK XHP50 LED Flashlight and its retail packaging.
2. Safety Information
- Eye Safety: Do not shine the flashlight directly into eyes or at reflective surfaces. The high lumen output can cause temporary vision impairment or permanent eye damage.
- Battery Safety:
- Use only the specified rechargeable battery or AAA batteries with the provided holder.
- Do not mix old and new batteries, or different types of batteries.
- Do not attempt to disassemble, puncture, or short-circuit the battery.
- Keep batteries away from fire or extreme heat.
- If the battery leaks, avoid contact with skin and eyes. Rinse thoroughly with water if contact occurs and seek medical attention.
- Children: Keep the flashlight and its components out of reach of children.
- Water Resistance: While water-resistant, this flashlight is not designed for submersion. Do not immerse in water. Ensure the Type-C charging port cover is securely closed when not charging to maintain water resistance.
- Heat: The flashlight may become warm during prolonged use, especially on high settings. This is normal.
3. What's in the Box
Upon opening your KEPEAK XHP50 LED Flashlight package, you should find the following items:
- 1 x KEPEAK XHP50 High Lumen Flashlight
- 1 x Rechargeable Battery
- 1 x Type-C Charging Cable
- 1 x Lanyard
- 1 x Battery Tube (for rechargeable battery)
- 1 x AAA Battery Holder (for optional AAA battery use)
- 1 x English User Manual

Image 3.1: All components included in the KEPEAK XHP50 LED Flashlight package.
4. Setup
4.1 Battery Installation
The KEPEAK XHP50 Flashlight can be powered by the included rechargeable lithium-ion battery or by 3 AAA batteries (not included) using the provided AAA battery holder.
- Unscrew the tail cap of the flashlight by turning it counter-clockwise.
- For Rechargeable Battery: Insert the rechargeable battery into the flashlight with the positive (+) end facing towards the head of the flashlight. Ensure it is placed inside the white battery tube if provided.
- For AAA Batteries: Place 3 AAA batteries into the AAA battery holder, observing the correct polarity (+/-). Insert the loaded battery holder into the flashlight with the positive (+) end facing towards the head.
- Screw the tail cap back on clockwise until it is securely tightened.
4.2 Initial Charging
Before first use, it is recommended to fully charge the rechargeable battery.
- Locate the Type-C charging port on the flashlight body. It is typically covered by a rubber flap for water resistance.
- Gently open the rubber flap to expose the Type-C port.
- Connect the included Type-C charging cable to the flashlight's port.
- Connect the other end of the USB cable to a compatible USB power source (e.g., USB wall adapter, power bank, computer USB port, car charger).
- The power indicator LEDs on the flashlight body will illuminate to show charging status. When fully charged, all indicator LEDs will be solid.
- Once charging is complete, disconnect the cable and securely close the rubber flap to maintain water resistance.

Image 4.1: Charging the KEPEAK XHP50 LED Flashlight and observing the power indicator.

Image 4.2: The hidden Type-C charging port and compatible power sources.
5. Operating Instructions
5.1 Power On/Off and Mode Selection
The flashlight features a single button control for power and mode cycling.
- To Turn On: Short press the power button. The flashlight will turn on in the last used mode (memory function).
- To Cycle Modes: While the flashlight is on, short press the power button repeatedly to cycle through the 5 lighting modes: High > Medium > Low > Strobe > SOS.
- To Turn Off Quickly: Long press the power button for 2 seconds in any mode to turn the flashlight off directly, without cycling through all modes.

Image 5.1: The 5 lighting modes and single switch control.
5.2 Adjustable Focus (Zoom Function)
The flashlight features a telescopic zoom function to adjust the beam from a wide floodlight to a narrow spotlight.
- To Zoom In (Spotlight): Gently pull the head of the flashlight outwards from the body. This will narrow the beam for long-distance observation.
- To Zoom Out (Floodlight): Push the head of the flashlight inwards towards the body. This will widen the beam for large-area illumination.

Image 5.2: Telescopic zoom feature for adjustable focus.
5.3 Power Indicator
The flashlight is equipped with 4 power indicator lamps to show the remaining battery level.
- Each illuminated LED represents approximately 25% of the battery capacity.
- 4 LEDs: 75-100% charge
- 3 LEDs: 50-75% charge
- 2 LEDs: 25-50% charge
- 1 LED: Below 25% charge, indicating it's time to recharge.
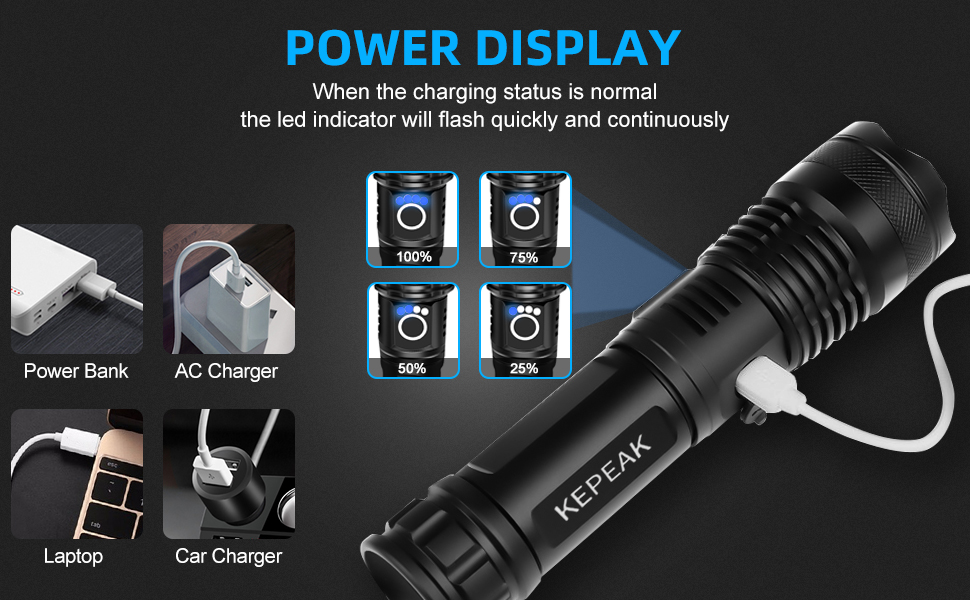
Image 5.3: Power indicator display showing battery charge levels.
6. Maintenance
- Cleaning: Wipe the flashlight body with a soft, damp cloth. Do not use abrasive cleaners or solvents.
- Lubrication: Periodically apply a thin layer of silicone grease to the O-rings (visible when tail cap is removed) to maintain water resistance and smooth operation.
- Storage: Store the flashlight in a cool, dry place away from direct sunlight and extreme temperatures. If storing for extended periods, remove the battery to prevent leakage and discharge.
- Battery Care: Recharge the battery regularly, even if not in use, to prolong its lifespan. Avoid fully discharging the battery frequently.
7. Troubleshooting
| Problem | Possible Cause | Solution |
|---|---|---|
| Flashlight does not turn on. | Battery is dead or low. Battery inserted incorrectly. Tail cap is loose. | Recharge the battery. Check battery polarity. Tighten the tail cap securely. |
| Light is dim or flickers. | Low battery charge. Loose connections. | Recharge the battery. Ensure tail cap is tight and battery is seated correctly. |
| Charging indicator not working. | Battery completely drained. Charging cable or adapter issue. | Allow 30 minutes for indicator to light up if battery is completely drained. Try a different Type-C cable or USB power source. |
| Water ingress. | Charging port cover not sealed. Damaged O-rings. | Ensure the Type-C port cover is fully closed. Inspect O-rings for damage and replace if necessary. |
8. Specifications
| Feature | Detail |
|---|---|
| Brand | KEPEAK |
| Model Number | XHP50 |
| Light Source Type | LED (XHP50) |
| White Brightness | Up to 5000 Lumens |
| Max Illuminating Distance | Approx. 2000 feet |
| Lighting Modes | High, Medium, Low, Strobe, SOS (5 modes) |
| Power Source | Battery Powered |
| Battery Type | Rechargeable Lithium Ion (included), or 3x AAA (not included) |
| Charging Port | Type-C (built-in) |
| Runtime (Low Mode) | 8-12 hours |
| Material | Durable Aluminum Alloy |
| Water Resistance Level | Water Resistant |
| Special Features | Adjustable Focus (Zoomable), Power Display, Non-Slip Grip |
| Product Dimensions | Approx. 1"D x 1"W x 1"H (compacted) |
| Item Weight | Approx. 10.5 ounces (0.3 Kilograms) |

Image 8.1: Exploded view of the KEPEAK XHP50 LED Flashlight components.
9. Warranty and Support
KEPEAK is committed to providing high-quality products and excellent customer service. While specific warranty details are not provided in this manual, we stand behind the quality of our products.
If you encounter any issues, have questions about your flashlight, or require assistance, please do not hesitate to contact our customer support team. We aim to provide the best solution within 24 hours.
For support, please refer to the contact information provided on the product packaging or the retailer's website where you purchased the item.

Image 9.1: KEPEAK Official Logo.