Introduction
Thank you for choosing the SUNPOW Professional Metal Detector. This device is designed for both adults and children, offering an engaging way to explore and discover metallic objects. Equipped with advanced features such as a powerful DSP chip, a large LCD with adjustable backlight, and multiple operating modes, it provides an efficient and user-friendly metal detection experience. This manual will guide you through the setup, operation, and maintenance of your new metal detector to ensure optimal performance and longevity.

Image: The SUNPOW Metal Detector with its packaging, headphones, shovel, and batteries, showcasing the complete product package.
Package Contents
- 1 x SUNPOW Electric Metal Detector
- 1 x Shovel
- 1 x Handbag
- 1 x User Manual
- 1 x Headphone
- 2 x 9V Batteries
Setup and Assembly
Follow these steps to assemble your metal detector and prepare it for use.
- Attach the Search Coil: Securely connect the 10-inch waterproof search coil to the lower stem. Ensure the cable is properly routed and protected.
- Assemble the Stem: Connect the lower, middle, and upper stems. The stem is adjustable from 36.2 inches to 47.2 inches to accommodate users of different heights, including children and adults. Adjust the length to a comfortable position for your arm.
- Mount the Control Box: Attach the control box to the upper stem. Ensure it is firmly secured.
- Install Batteries: Open the battery compartment on the control box and insert the two 9V batteries, observing the correct polarity. Close the compartment securely.
- Connect Headphones: If desired, plug the included headphones into the earphone jack on the control box.

Image: A diagram illustrating the main components of the metal detector, including the 10-inch waterproof search coil, adjustable stem, control box, sturdy material, and ergonomic design.

Image: An adult and a child using the SUNPOW Metal Detector, demonstrating the adjustable stem feature that allows comfortable use for various heights.
Operating Instructions
Your SUNPOW Metal Detector features an intuitive LCD display and multiple operating modes for effective metal detection.
Control Panel Overview
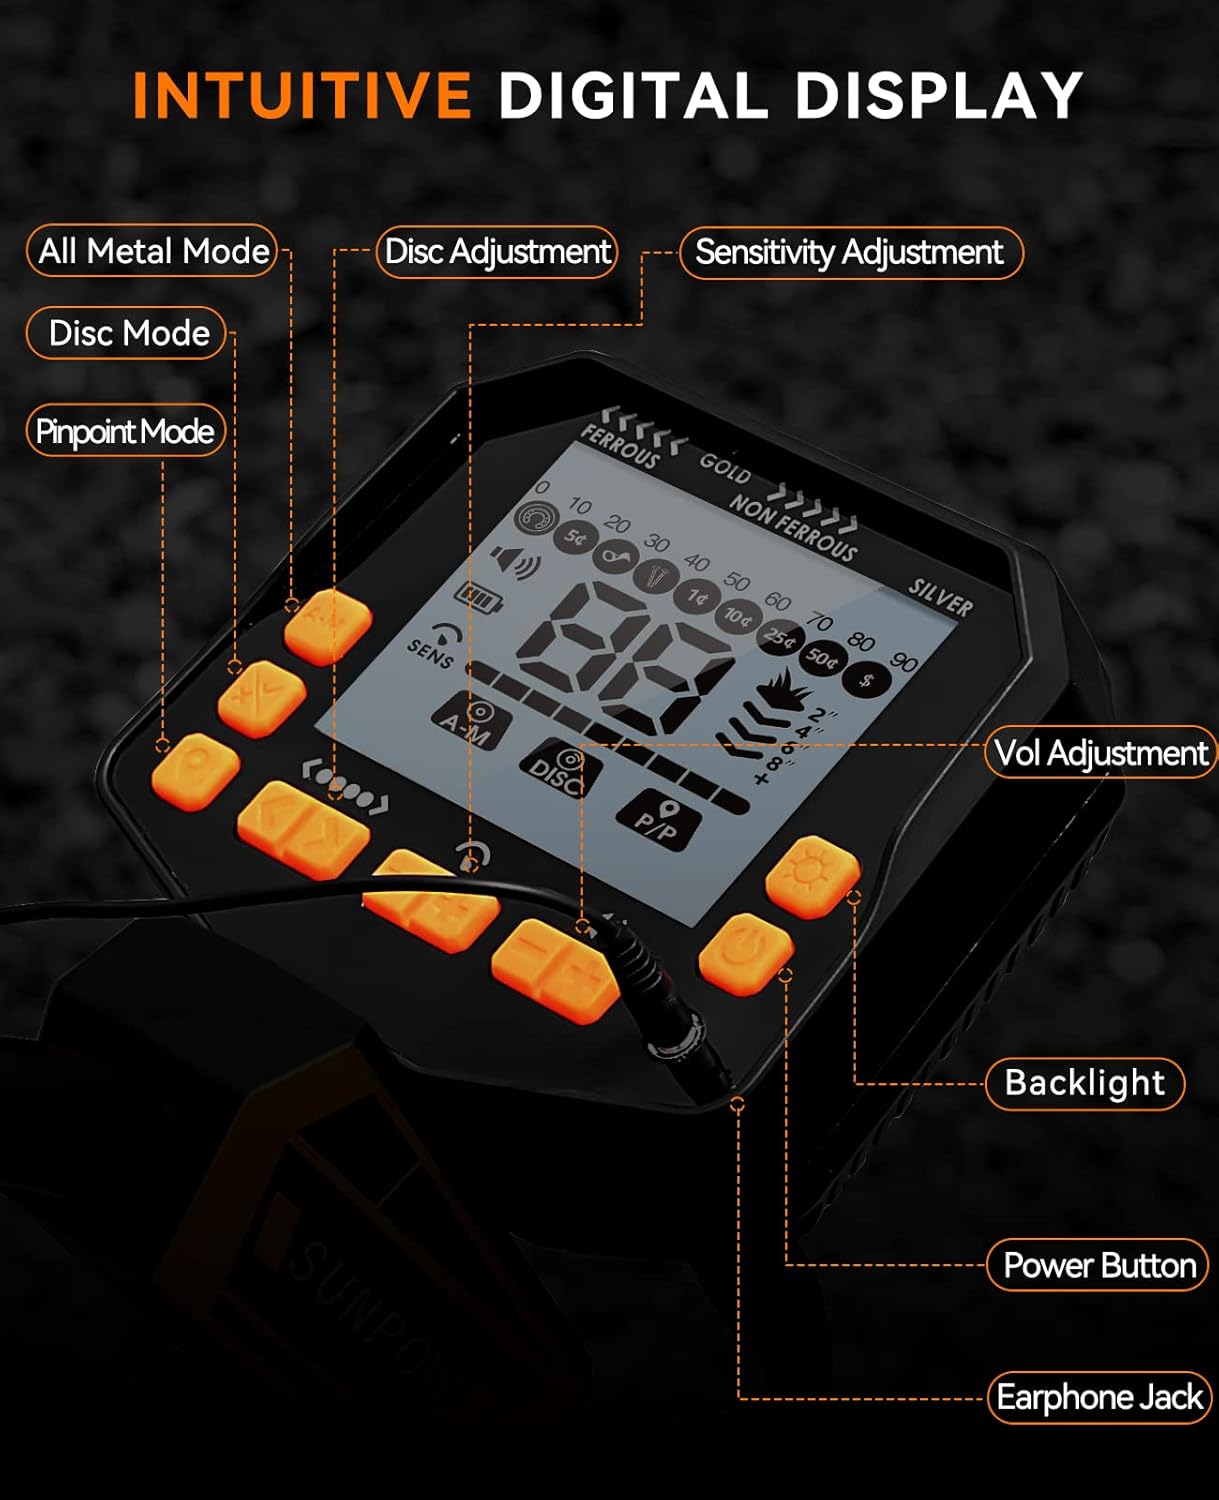
Image: A detailed view of the metal detector's control panel, highlighting the All Metal Mode, Disc Adjustment, Sensitivity Adjustment, Disc Mode, Pinpoint Mode, Volume Adjustment, Backlight, Power Button, and Earphone Jack.
- Power Button: Turns the detector on/off.
- LCD Display: Shows target type, depth, sensitivity level, battery status, and volume level.
- Backlight Button: Activates the display backlight for use in low-light conditions. The backlight automatically dims in standby to conserve power.
- Sensitivity (SENS) Adjustment: Adjusts the detector's sensitivity to detect objects at different depths.
- Volume Adjustment: Controls the audio output level.
- Earphone Jack: For connecting headphones.
Operating Modes
The detector offers three distinct operating modes:
- All-Metal Mode (A-M):
In this mode, the detector will signal the presence of all types of metals, including gold and silver. This mode also includes a positioning function to help locate targets. It is ideal for general searching when you want to find any metallic object.
- Discrimination Mode (DISC):
The DISC mode allows you to eliminate unwanted metal targets. There are 9 types of non-metal indicator signs. You can selectively ignore certain types of metals, such as iron, to focus on more valuable targets. Use the DISC adjustment buttons to set your preferences.
- Pinpoint Mode (P-P):
After detecting a target in A-M or DISC mode, press the P-P button to switch to Pinpoint mode. This mode helps you precisely locate the exact position of the detected target, making excavation easier and more accurate.

Image: A visual guide explaining the three operating modes (All Metal, Disc, Pinpoint) and the memory function, showing how the detector identifies different metal samples.
Memory Function
The detector features a memory function that automatically saves your user-defined settings from the DISC mode after each use. This means you do not need to reconfigure your preferences every time you power on the device, providing convenience for subsequent uses.
Target Indication and Depth
The LCD display provides visual cues for detected targets:
- Target ID: Icons and numerical values indicate the probable type of metal detected (e.g., iron, copper, silver, gold).
- Depth Indicator: Shows the approximate depth of the target. The maximum detection depth is 23 cm in All-Metal mode.
- Battery Indicator: Displays the current battery level.

Image: The metal detector's display showing various target indication values, including numerical ranges for different types of metals like iron nails, pull-tabs, S-caps, and various coin denominations.

Image: The metal detector's control panel with its backlight activated, demonstrating its visibility in low-light conditions.
Maintenance and Care
Proper maintenance ensures the longevity and optimal performance of your metal detector.
- Cleaning: After each use, especially in sandy or muddy environments, wipe down the search coil and stem with a damp cloth. Avoid using harsh chemicals.
- Water Resistance: The 10-inch search coil and stem are waterproof, allowing for detection in shallow water. However, the control box is NOT waterproof. Do not submerge the control box in water.
- Storage: Store the detector in a dry, cool place away from direct sunlight and extreme temperatures. If storing for an extended period, remove the batteries to prevent leakage.
- Battery Replacement: Replace batteries when the low battery indicator appears on the LCD.

Image: The 10-inch waterproof search coil of the metal detector partially submerged in water, demonstrating its water-resistant capability for detecting in wet environments. Note: The control box is not waterproof.
Troubleshooting
If you encounter issues with your metal detector, refer to the following common problems and solutions:
| Problem | Possible Cause | Solution |
|---|---|---|
| No power/Display off | Dead or incorrectly installed batteries. | Check battery polarity; replace with fresh 9V batteries. |
| No detection or weak signal | Low sensitivity setting; deep target; highly mineralized ground. | Increase sensitivity; sweep slower; try a different location. |
| False signals/Chattering | High sensitivity; electromagnetic interference; highly mineralized ground. | Reduce sensitivity; move away from power lines or other electronics; use DISC mode. |
| Inaccurate pinpointing | Incorrect technique; large target. | Sweep in an 'X' pattern over the target; ensure the coil is centered. |
Specifications
| Feature | Detail |
|---|---|
| Model Number | OT-MD06 |
| Dimensions (L x W x H) | 57.5 x 28 x 14 cm |
| Weight | 1 Kilogram |
| Power Source | 2 x 9V AA Batteries (included) |
| Material | Metal |
| Search Coil | 10-inch Waterproof |
| Display Type | LCD with Backlight |
| Operating Modes | All-Metal (A-M), Discrimination (DISC), Pinpoint (P-P) |
| Max Detection Depth | 23 cm (in All-Metal mode) |
| Adjustable Length | Yes |
| Recommended Use | Metal Detection |
Warranty and Support
SUNPOW is committed to providing 100% satisfaction with our products. If you have any questions, concerns, or require assistance with your metal detector, please do not hesitate to contact our customer support team. We are dedicated to helping you resolve any issues in a timely manner.
For support, please refer to the contact information provided with your purchase or visit the official SUNPOW website.
Note: Information regarding spare parts availability is currently unavailable.