Introduction
This instruction manual provides comprehensive guidance for the assembly, operation, and maintenance of your SmallRig A7 IV Cage with Top Handle and HDMI Cable Clamp. This basic kit is designed to enhance the functionality and protection of your Sony Alpha 7R V, Alpha 7 IV, and Alpha 7 S III cameras.
Please read this manual thoroughly before use to ensure proper installation and to maximize the benefits of your new camera accessory.
What's in the Box

The SmallRig 3668 Basic Kit includes the following components:
- 1 x Camera Cage
- 2 x Locking Side Plate
- 1 x Clamp for HDMI Cable 3000
- 1 x Locating Handle for ARRI 2165
- 1 x Hex Spanner (for installation)
The image above illustrates the components included in the package, along with the product parameters.
Key Product Features
- Compatibility: Designed for Sony Alpha 7R V, Alpha 7 IV, and Alpha 7 S III cameras. The kit includes a cage, an HDMI cable clamp, and a top handle for low-angle shots and camera protection.
- Two-point Locking: Securely mounts the camera with an integrated 1/4"-20 screw and two side locking plates (one for Sony Alpha7S III/Alpha 1, one for Alpha 7 IV) to prevent twisting. Note: The camera strap eyelet is occupied when using the side locking plate.
- All-round Protection: Constructed from aviation aluminum with a formfitting design for security and durability. Built-in protective pads prevent camera scratches. Maintains access to camera controls and hot shoe.
- Multiple Mounting Points: Features an integrated shoe mount, multiple 1/4"-20 threads, and 3/8"-16 locating holes for ARRI accessories. Includes a built-in NATO rail and strap slots. A magnetic flat-head screwdriver & Allen wrench are stored on the bottom of the cage.
- Ergonomic Top Handle: Provides a comfortable grip for easy carrying and low-angle shooting. Features 1/4"-20 threaded holes, 3/8"-16 locating for ARRI holes, and built-in cold shoes for accessories like monitor mounts.
- HDMI Cable Clamp: Mounts to the left side of the cage via a 1/4"-20 screw and two locating pins. Prevents cable deflection and secures cables with a thumbscrew, protecting interfaces and ensuring stable signal transmission. Note: Not compatible with Sony Alpha 1. Interferes with the synchroterminal interface on Alpha 7R V.

Figure 1: Three-Point Locking Mechanism
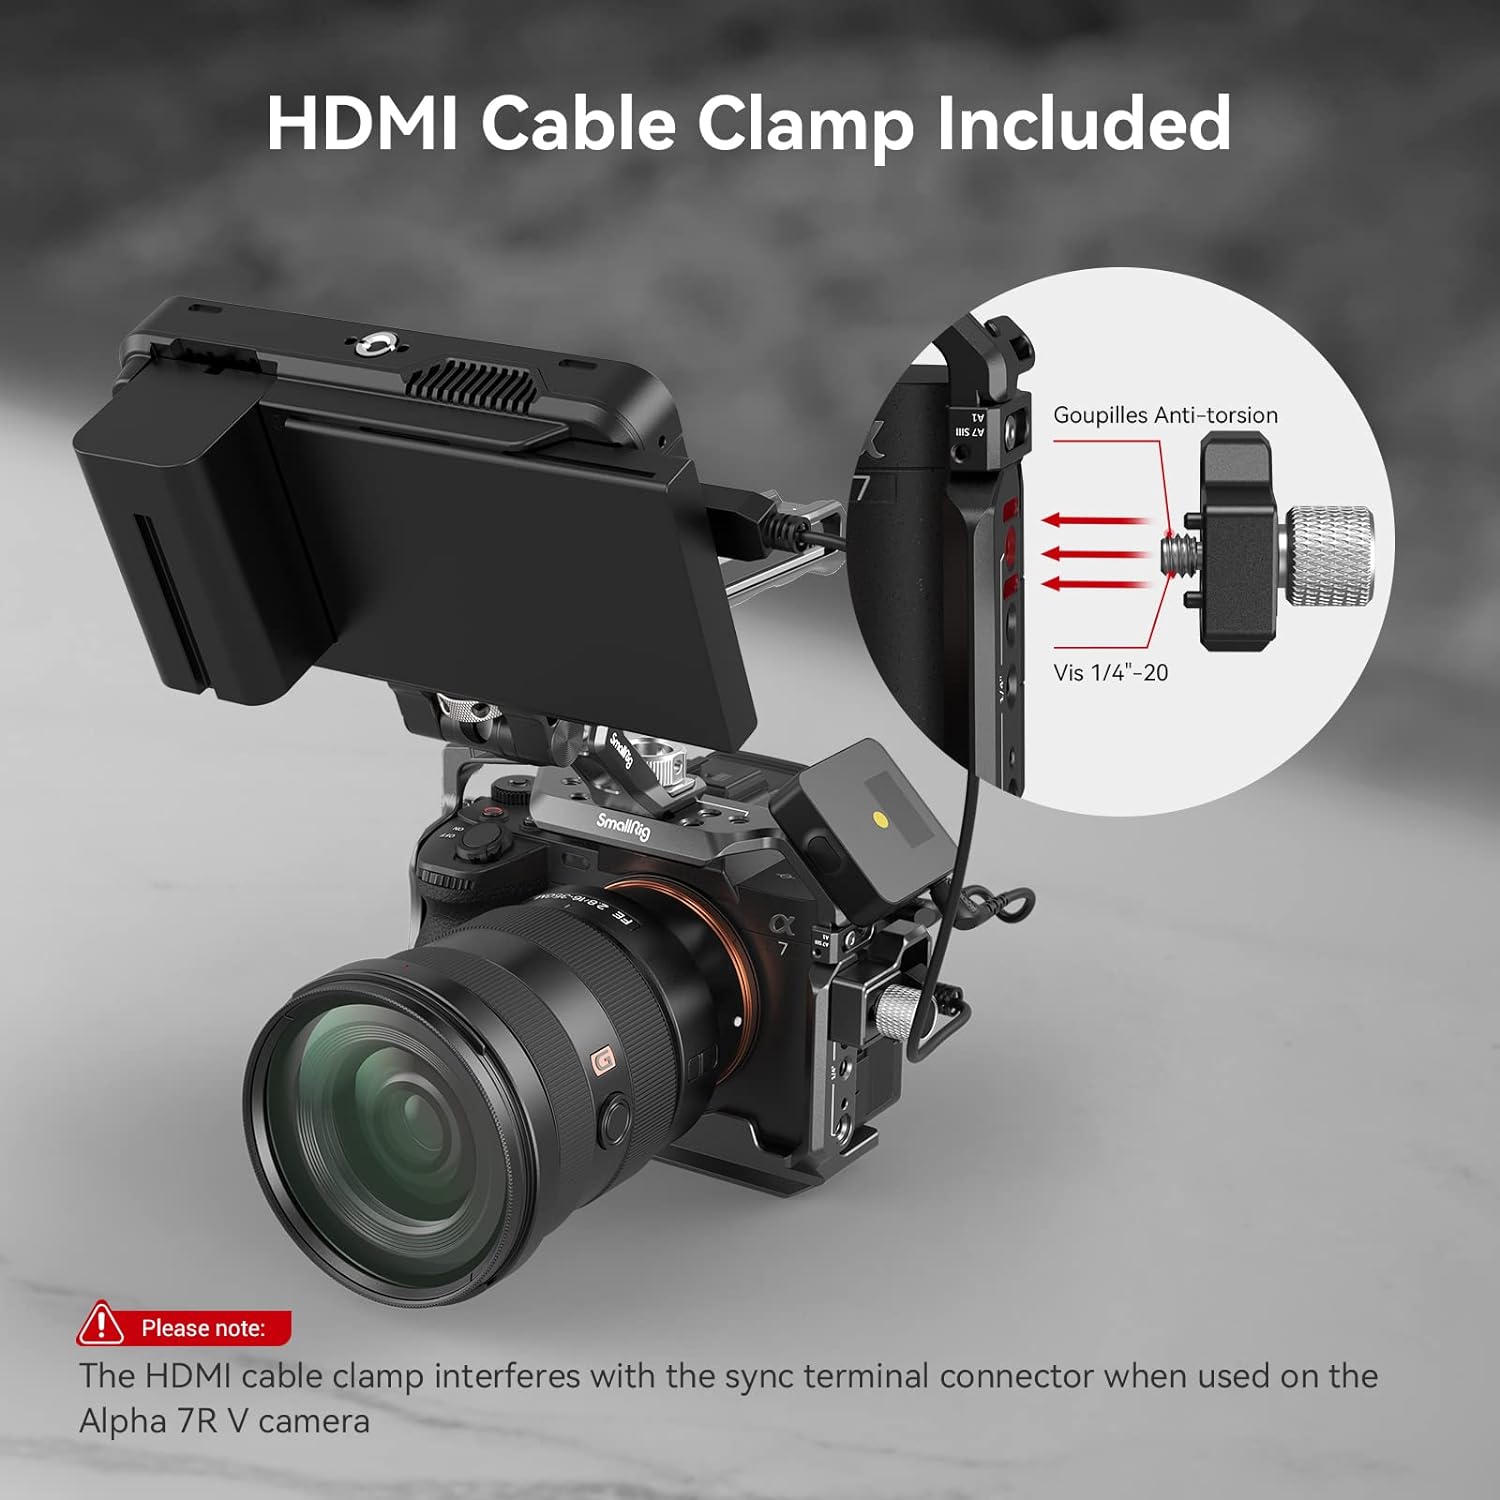
Figure 2: HDMI Cable Clamp Detail
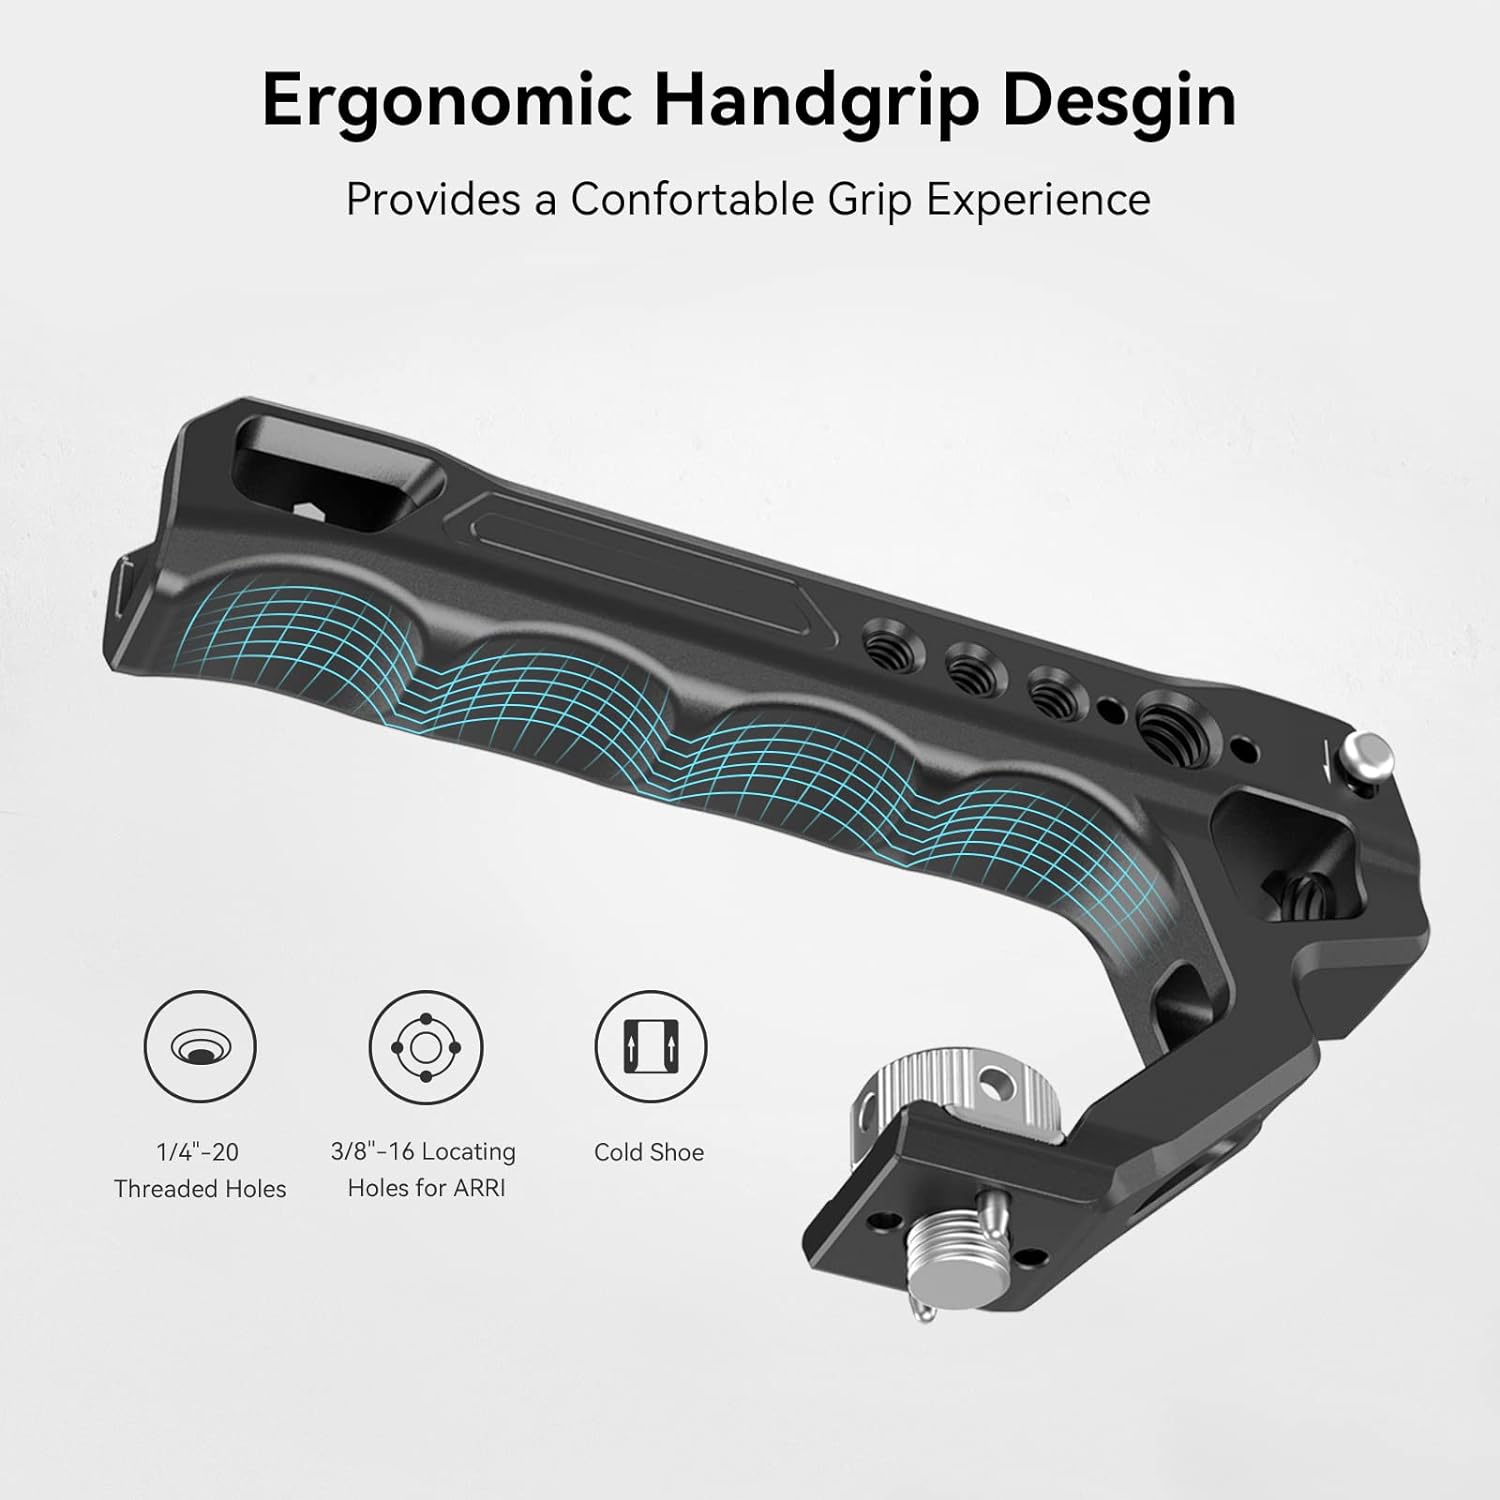
Figure 3: Ergonomic Top Handle

Figure 4: Multiple Mounting Points
Setup and Installation
Follow these steps to properly install your camera into the SmallRig cage:
- Prepare the Camera: Ensure your camera's lens is removed or is a small enough lens that can pass through the cage opening.

Figure 5: Camera prepared for cage installation.
- Remove Side Locking Pin: Locate the small screw/pin on the side of the cage. Depending on your camera model (Alpha 7 IV or Alpha 7S III/Alpha 1), you may need to switch the position of this pin. Remove it for now.
Figure 6: Detaching the side locking pin from the cage.
- Insert Camera into Cage: Carefully slide your camera into the cage.
- Secure Bottom Screw: Use the integrated 1/4"-20 screw at the bottom of the cage to secure the camera. Tighten it firmly using the magnetic flat-head screwdriver/Allen wrench stored on the bottom of the cage.
- Install Side Locking Plate: Re-insert the small pin (removed in step 2) into the camera's strap eyelet on the left side. This pin, along with the side locking plate, prevents the camera from twisting within the cage. Tighten the corresponding screw on the cage to secure it.
Note: The camera strap eyelet will be occupied when this side locking plate is in use.
- Verify Battery Access: Ensure that the battery compartment door can still be opened and closed freely with the cage installed. The cage is designed to allow full access.
- Attach Top Handle: Align the top handle with the mounting points on the top of the cage and secure it using the provided screws.
Figure 7: Fully assembled cage with top handle.
- Attach HDMI Cable Clamp: If desired, attach the HDMI cable clamp to the left side of the cage using the 1/4"-20 screw and two locating pins. This helps prevent accidental disconnections and protects the HDMI port.
Note: This cable clamp is not compatible with Sony Alpha 1 and interferes with the synchroterminal interface when used on the Alpha 7R V camera.
Figure 8: HDMI Cable Clamp installation.
Operating Instructions
The SmallRig camera cage provides numerous options for expanding your camera setup:
- Utilizing Mounting Points: Attach external monitors, microphones, LED lights, or other accessories to the various 1/4"-20 threaded holes, 3/8"-16 ARRI locating holes, and cold shoes located around the cage.
- NATO Rail: The built-in NATO rail on the side allows for quick attachment and detachment of NATO-compatible accessories, such as side handles.
- Top Handle Use: The ergonomic top handle is ideal for stable low-angle shooting and provides a secure grip for carrying your camera rig.
- Quick Release Plate: The integrated Arca-Swiss quick release plate on the bottom allows for rapid transitions between tripods, stabilizers, and handheld shooting.

Figure 9: Quick Release Plate for versatile mounting.
Maintenance
To ensure the longevity and optimal performance of your SmallRig camera cage, follow these maintenance guidelines:
- Cleaning: Wipe the cage regularly with a soft, dry cloth to remove dust and fingerprints. For stubborn dirt, a slightly damp cloth can be used, followed by immediate drying. Avoid abrasive cleaners or solvents.
- Screw Tightness: Periodically check all screws and connections to ensure they remain tight. Re-tighten as necessary using the provided hex spanner or a suitable screwdriver.
- Storage: When not in use, store the cage in a clean, dry environment, away from extreme temperatures and humidity.
- Inspection: Regularly inspect the cage for any signs of wear, damage, or deformation. If any issues are found, discontinue use and contact SmallRig support.
Troubleshooting
If you encounter any issues with your SmallRig camera cage, refer to the following common troubleshooting tips:
| Problem | Possible Cause | Solution |
|---|---|---|
| Camera is loose within the cage. | Bottom screw or side locking plate not tightened sufficiently. | Ensure the 1/4"-20 bottom screw is fully tightened. Verify the side locking plate is correctly positioned in the camera's strap eyelet and its screw is tight. |
| Battery door cannot open. | Camera not correctly seated or cage misaligned. | Re-seat the camera in the cage, ensuring it aligns perfectly with the cage's cutouts. Re-tighten the bottom screw. |
| HDMI cable clamp interferes with camera port. | Compatibility issue with specific camera model. | Note that the HDMI cable clamp is not compatible with Sony Alpha 1 and may interfere with the synchroterminal interface on Alpha 7R V. If interference occurs, remove the clamp. |
| Accessories do not mount securely. | Incorrect screw size or accessory type. | Ensure you are using the correct 1/4"-20 or 3/8"-16 screws for your accessories. Verify accessory compatibility with cold shoe or NATO rail. |
If the problem persists after attempting these solutions, please contact SmallRig customer support for further assistance.
Specifications
| Attribute | Detail |
|---|---|
| Product Model Number | 3668-SR |
| Compatible Cameras | Sony Alpha 7R V, Alpha 7 IV, Alpha 7 S III |
| Material | Aluminum Alloy, Stainless Steel, Silicone |
| Product Dimensions | 6.69 x 5.31 x 6.97 inches (170 x 176.5 x 135mm) |
| Item Weight | 12.7 ounces (361g ± 5g) |
| Package Dimensions | 165 x 155 x 85mm |
| Package Weight | 474g ± 5g |
Note: Specifications are subject to change without notice.
Warranty and Support
For warranty information, product support, or technical assistance, please visit the official SmallRig website or contact their customer service directly. Keep your purchase receipt as proof of purchase for any warranty claims.
SmallRig Official Store: Visit Store on Amazon


