1. Introduction
This instruction manual provides essential information for the assembly, operation, and maintenance of your Midzooparts Crux35HD 3.5-inch FPV Racing Drone Frame Kit. This kit is designed for enthusiasts building custom FPV racing drones, offering a lightweight and durable foundation for high-performance flight. Please read this manual thoroughly before beginning assembly to ensure proper setup and safe use.
2. Product Overview
The Crux35HD frame kit is engineered from 3K carbon fiber, providing a robust yet lightweight structure for 3.5-inch FPV racing drones. Its design accommodates various flight controller sizes, making it a versatile choice for custom builds.
Key Features:
- Material: High-strength 3K Carbon Fiber for durability and minimal weight.
- Wheelbase: 150mm, optimized for 3.5-inch propellers.
- Flight Controller Compatibility: Supports 25.5mmx25.5mm and 20mmx20mm FC mounting patterns with M2 holes.
- Camera Support: Designed for 14mm FPV cameras.
- Lightweight Design: Frame weighs approximately 26 grams.

Figure 2.1: Assembled Crux35HD FPV Drone Frame Kit. This image shows the complete frame from a top-down perspective, highlighting its carbon fiber construction and compact design.
3. Package Contents
Upon opening your package, please verify that all components listed below are present and undamaged. If any parts are missing or damaged, contact your retailer immediately.
- Crux35HD 3.5-inch FPV Racing Drone Frame (3K Carbon Fiber)
- Associated hardware (screws, standoffs, nuts) for frame assembly
- Camera mounts (typically 3D printed parts)
Note: The following recommended parts are not included in this frame kit and must be purchased separately to complete your drone build:
- Flight Controller (e.g., ELRS X1 or CrazyF411 Pro)
- Motors (e.g., 1404 KV3500)
- FPV Camera (14x14mm)
- Propellers (3.5 inches)
- Battery (4S 650mah~1100mah)
- Video Transmitter (VTX)
- Receiver (RX)
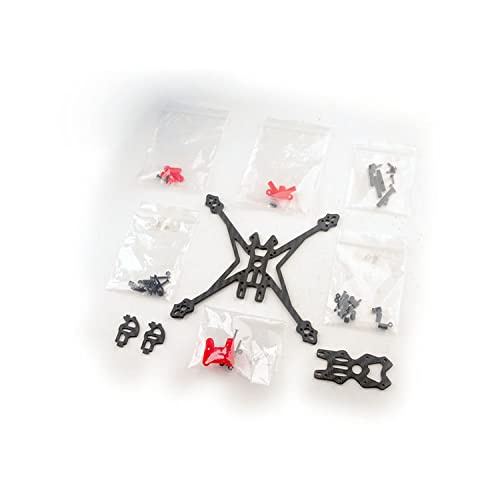
Figure 3.1: Crux35HD Frame Kit components. This image displays the individual carbon fiber plates, standoffs, and other hardware included in the kit, laid out before assembly.
4. Assembly and Setup
Assembling the Crux35HD frame requires careful attention to detail. It is recommended to have basic knowledge of FPV drone construction. Refer to the exploded view diagram (Figure 3.1) for component placement.
4.1 Frame Assembly
- Identify Components: Separate the bottom plate, top plate, arms, and any other carbon fiber pieces. Identify all screws, standoffs, and nuts.
- Attach Arms: Secure the four arms to the main bottom plate using the provided screws. Ensure all screws are tightened firmly but do not overtighten to avoid stripping threads or cracking carbon fiber.
- Install Standoffs: Mount the aluminum or plastic standoffs to the bottom plate. These will support the top plate and provide mounting points for your flight controller stack.
- Mount Camera: Install the FPV camera into the designated camera mounts. These mounts typically attach to the front standoffs.
- Secure Top Plate: Place the top plate onto the standoffs and secure it with the remaining screws.
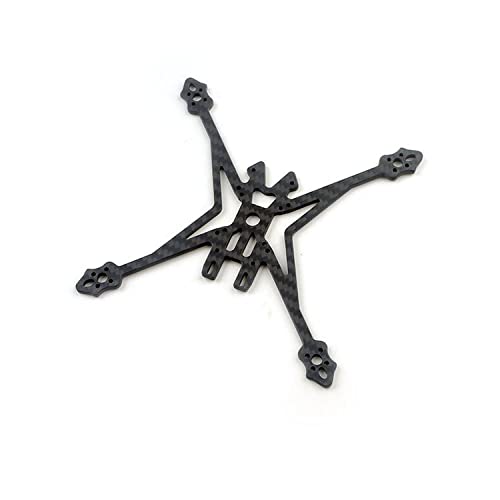
Figure 4.1: Crux35HD Bottom Plate. This image shows the main carbon fiber bottom plate, which forms the foundation of the drone frame, with cutouts for arms and flight controller mounting.
4.2 Flight Controller and Component Mounting
Once the frame is assembled, you can proceed with mounting your electronic components.
- Flight Controller (FC) / Electronic Speed Controller (ESC) Stack: Mount your FC and 4-in-1 ESC (if applicable) onto the central mounting holes (25.5mmx25.5mm or 20mmx20mm) using appropriate standoffs and screws. Ensure proper orientation as per your FC manual.
- Motors: Attach the motors to the end of each arm. Ensure the motor wires are routed cleanly and securely.
- Video Transmitter (VTX) & Receiver (RX): Mount these components securely within the frame, typically on the top plate or integrated into the FC stack. Ensure antennas are positioned for optimal signal.
- Battery Strap: Secure a battery strap to the bottom plate for holding your battery.
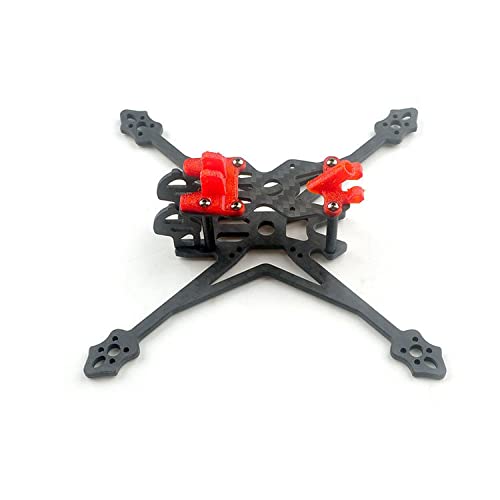
Figure 4.2: Assembled Crux35HD Frame. This side view illustrates the frame's profile and the space available for mounting electronic components within the central stack.
5. Operating Considerations
This section provides general considerations for operating an FPV drone built with the Crux35HD frame. For detailed flight instructions, refer to the manuals of your flight controller, radio transmitter, and FPV goggles.
- Pre-Flight Checks: Before each flight, inspect the frame for any loose screws, cracks, or damage. Ensure all components are securely fastened.
- Propeller Installation: Always install propellers correctly, ensuring they are balanced and tightened to the motors. Incorrect propeller direction or loose props can lead to instability or crashes.
- Battery Connection: Connect the battery securely. Ensure the battery strap is tight to prevent battery ejection during flight.
- Flight Environment: Operate your FPV drone in open areas, away from people, animals, and obstacles. Be aware of local regulations regarding drone flight.
- Post-Flight Inspection: After each flight, perform a quick inspection for any signs of stress or damage to the frame or components.
6. Maintenance
Regular maintenance will extend the lifespan of your Crux35HD frame and ensure consistent performance.
- Screw Tightness: Periodically check all screws for tightness. Vibrations during flight can cause screws to loosen over time. Apply a small amount of non-permanent threadlocker if screws repeatedly loosen.
- Carbon Fiber Inspection: Inspect the carbon fiber plates and arms for any signs of cracks, delamination, or stress marks, especially after hard landings or crashes. Replace damaged parts immediately.
- Cleaning: Clean the frame regularly to remove dirt, dust, and debris. Use a soft brush or compressed air. Avoid harsh chemicals that could damage the carbon fiber or other components.
- Component Security: Ensure all electronic components (FC, ESC, VTX, RX, camera) remain securely mounted and their wiring is intact and free from abrasion.
7. Troubleshooting
This section addresses common issues related to the frame kit itself. For issues related to flight performance or electronics, consult the manuals for those specific components.
| Problem | Possible Cause | Solution |
|---|---|---|
| Frame feels wobbly or unstable after assembly. | Loose screws or improperly seated components. | Inspect all screws and ensure they are tightened. Verify that all carbon fiber plates and standoffs are correctly aligned and seated. |
| Excessive vibration during flight (after electronics are installed). | Loose frame components, damaged carbon fiber, or unbalanced propellers (if installed). | Check all frame screws. Inspect carbon fiber for cracks. Ensure propellers are balanced and securely attached. |
| Camera mount is loose. | Screws not tightened or mount damaged. | Tighten camera mount screws. If the mount is 3D printed, it may need replacement if damaged. |
8. Specifications
Detailed technical specifications for the Midzooparts Crux35HD frame kit.
- Brand: Midzooparts
- Model Name: Crux35HD (Crux35)
- Material: 3K Carbon Fiber
- Frame Type: 3.5 inch
- Wheelbase: 150mm
- Bottom Plate Thickness: 3mm
- Weight: Approximately 26 grams
- Flight Control Installation Hole: 25.5mm x 25.5mm and 20mm x 20mm with M2 hole
- Supported Camera Size: 14mm
- Color: Black

Figure 8.1: Crux35HD Frame Weight. This image shows the frame kit placed on a digital scale, indicating its lightweight nature at approximately 25.81 grams.
9. Warranty and Support
Warranty information for the Midzooparts Crux35HD frame kit is not explicitly provided in the product details. For specific warranty terms, return policies, or technical support, please contact your original retailer or the manufacturer, Midzooparts, directly. It is advisable to retain your proof of purchase for any warranty claims.
For general inquiries or further assistance, please refer to the contact information provided by your point of purchase.
