
1. Product Overview
The GODOX QT1200IIIM is a high-performance studio strobe flash light designed for professional photography. It features a powerful 1200W output, fast recycling times, high-speed sync capabilities up to 1/8000s, and a built-in 2.4G wireless system for remote control. The unit also includes a 40W LED modeling bulb and an LCD panel for intuitive operation across M, Multi, and HSS flash modes.

Image 1.1: The GODOX QT1200IIIM studio strobe flash light shown with its included accessories, including the light body, power cord, lamp tube, and glass protection cover.
Key Features:
- High Power Output: 1200W for versatile lighting scenarios.
- Ultra-Fast Flash Duration: Up to 1/29600s (t=0.1, for QT400IIIM; QT1200IIIM offers similar high-speed performance) for freezing fast-moving subjects.
- Rapid Recycling Time: 0.01-0.9 seconds, allowing for continuous shooting at up to 20 frames per second.
- High-Speed Sync (HSS): Supports shutter speeds up to 1/8000s.
- Built-in 2.4G Wireless System: Compatible with Godox X1, X2, or XPRO triggers for remote control with a 50m operation range.
- 40W LED Modeling Lamp: Adjustable from 0-100% for accurate light preview.
- Multiple Flash Modes: Manual (M), Multi (Stroboscopic), and High-Speed Sync (HSS).
- Stable Color Temperature Mode: Ensures consistent color output.
2. Setup Guide
2.1 Unpacking and Inspection
Carefully remove all components from the packaging. Verify that all items listed in the "What's in the Box" section are present and undamaged. If any items are missing or damaged, contact your retailer immediately.

Image 2.1: The main components of the GODOX QT1200IIIM package, showing the strobe unit, power cable, flash tube, and protective glass dome.
2.2 Installing the Lamp Tube and Glass Protection Cover
- Ensure the flash unit is powered off and unplugged from the mains.
- Carefully insert the lamp tube into its socket on the front of the flash head. Handle the lamp tube by its base to avoid touching the glass.
- Align the glass protection cover with the mounting points on the flash head and secure it in place.

Image 2.2: Close-up view of the GODOX QT1200IIIM's front, highlighting the installed flash tube and the 40W LED modeling lamp.
2.3 Mounting the Flash Unit
Attach the flash unit to a sturdy light stand using the integrated mounting bracket. Ensure the bracket is securely tightened to prevent accidental movement or falling.
2.4 Power Connection
Connect the power cord to the flash unit's power input and then plug it into a suitable AC power outlet (100-240V, 50/60Hz). Ensure the power switch on the unit is in the OFF position before connecting to power.
3. Operating Instructions
3.1 Control Panel Overview
The GODOX QT1200IIIM features an intuitive LCD panel and control buttons for easy adjustment of settings.
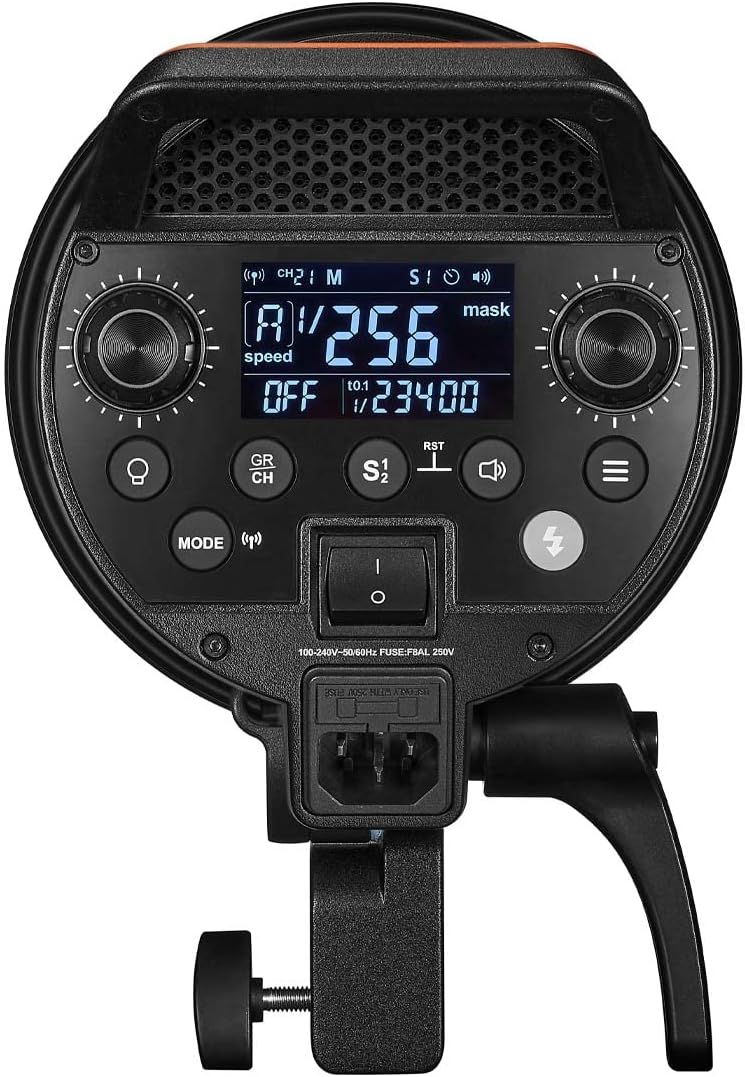
Image 3.1: Detailed view of the GODOX QT1200IIIM's rear control panel, showing the LCD display, power switch, and various control buttons for mode selection, group/channel, and power adjustments.
3.2 Powering On/Off
Flip the main power switch located on the rear panel to the 'ON' position to power on the unit. Flip it to 'OFF' to power down.
3.3 Flash Modes (M/Multi/HSS)
- Manual (M) Mode: Adjust flash power output from 1/256 to 1/1. Use the dial to increase or decrease power.
- Multi (Stroboscopic) Mode: Allows for a series of rapid flashes within a single exposure. Set the number of flashes and frequency.
- High-Speed Sync (HSS) Mode: Enables flash synchronization with shutter speeds faster than the camera's native sync speed (up to 1/8000s). This mode is typically activated via a compatible Godox X-series trigger.
3.4 Adjusting Modeling Lamp
The 40W LED modeling lamp can be adjusted from 0% to 100% brightness. Use the dedicated modeling lamp button and adjustment dial to set the desired intensity. This helps in visualizing the light's effect before firing the flash.
3.5 Wireless Control (2.4G System)
The QT1200IIIM features a built-in 2.4G wireless system. To use remote control:
- Ensure your Godox X1, X2, or XPRO trigger is set to the same channel and group as the flash unit.
- Press the GR/CH button on the flash unit to cycle through group and channel settings, adjusting with the dial.
- Once synchronized, you can remotely adjust flash power, modeling lamp, and trigger the flash from your camera.
3.6 Sync Triggering
- Wireless Trigger: Use a compatible Godox X-series trigger mounted on your camera's hot shoe.
- Sync Cord: Connect a PC sync cord (not included) from your camera's PC sync port to the flash unit's sync port.
- Optical Slave (S1/S2): The flash can be triggered by another flash. S1 mode triggers on the first flash, S2 mode ignores the pre-flash of a TTL system.
4. Maintenance
4.1 Cleaning
- Always power off and unplug the unit before cleaning.
- Use a soft, dry cloth to wipe the exterior of the flash unit.
- For the flash tube and modeling lamp, use a lens cleaning cloth and a small amount of lens cleaning solution if necessary. Avoid touching the glass surfaces with bare hands as oils can affect performance and lifespan.
- Do not use abrasive cleaners, solvents, or strong detergents.
4.2 Storage
When not in use, store the flash unit in a cool, dry place, away from direct sunlight and excessive humidity. It is recommended to use the original packaging or a padded case for protection during storage and transport.
4.3 Lamp Tube Replacement
The flash lamp tube is a consumable item and will eventually need replacement. Refer to the "Setup Guide" for instructions on safely handling and installing the lamp tube. Use only genuine GODOX replacement lamp tubes for optimal performance and safety.
5. Troubleshooting
| Problem | Possible Cause | Solution |
|---|---|---|
| Flash does not fire. |
|
|
| Inconsistent flash output. |
|
|
| Modeling lamp not working. |
|
|
| Wireless trigger not connecting. |
|
|
6. Specifications
| Feature | Detail |
|---|---|
| Model | QT1200IIIM |
| Max Power | 1200Ws |
| Guide Number (GN) | GN105 (ISO 100, with standard reflector) |
| Flash Duration (t=0.1) | Up to 1/29600s (for QT400IIIM, QT1200IIIM offers similar high-speed performance) |
| Recycling Time | 0.01-0.9s |
| Flash Modes | M (Manual), Multi (Stroboscopic), HSS (High-Speed Sync) |
| Power Output Adjustment | 1/256 to 1/1 (8 stops) |
| Modeling Lamp | 40W LED, 0-100% adjustable brightness |
| Color Temperature | 5600K ± 200K (Stable Color Temperature Mode) |
| Wireless Control | Built-in 2.4G Godox X System (50m range) |
| Sync Triggering | Sync Cord, Optical Slave (S1/S2), Wireless Control Port |
| Dimensions | 21.65 x 6.93 x 5.63 inches (approx.) |
| Weight | 9.39 pounds (approx.) |
| Power Supply | AC100-240V~50/60Hz |
7. Warranty and Support
7.1 Warranty Information
GODOX products are typically covered by a limited warranty against defects in materials and workmanship for a specified period from the date of purchase. The exact warranty period may vary by region and product type. Please retain your proof of purchase for warranty claims.
This warranty does not cover damage caused by misuse, unauthorized modifications, accidents, or normal wear and tear. Consumable parts such as flash tubes and modeling lamps are generally not covered under the standard warranty unless defective upon receipt.
For detailed warranty terms and conditions, please refer to the warranty card included with your product or visit the official GODOX website.
7.2 Customer Support
If you encounter any issues or have questions regarding your GODOX QT1200IIIM Studio Strobe Flash Light that are not addressed in this manual, please contact GODOX customer support or your authorized dealer.
You can often find support contact information, FAQs, and additional resources on the official GODOX website: www.godox.com