
Tukzer TZ-ML-02
Tukzer 19-Inch Monitor Screen Light Bar User Manual
Model: TZ-ML-02
1. Introduction
This manual provides detailed instructions for the installation, operation, and maintenance of your Tukzer 19-Inch Monitor Screen Light Bar. Please read this manual thoroughly before use to ensure proper functionality and to extend the product's lifespan. Keep it for future reference.

Image 1.1: Front and rear view of the Tukzer Monitor Screen Light Bar.
2. Product Features
- No Screen Glare: Asymmetrical optical design illuminates the desktop and keyboard without reflecting glare on the screen, reducing eye strain.
- Smart Touch Sensor Controls: Intuitive touch controls for power and settings adjustments.
- Power-Off Memory: Automatically resumes the last used brightness and color temperature settings upon restart.
- Stepless Dimming: Adjustable brightness from -5 to +45 levels for personalized illumination.
- Three Color Temperature Modes:
- Warm Light (3000K): Ideal for reading and relaxation.
- Warm-White Light (4500K): Balanced light for comfortable viewing.
- White Light (6500K): Bright, clear light for efficient work.
- USB Powered: Convenient 5W LED operation via any standard USB port (1A~5V Min).
- Space-Saving Design: C-clamp mounting system saves desk space.
- High Color Rendering Index (Ra >80): Ensures accurate color representation.

Image 2.1: Key features of the Tukzer Monitor Screen Light Bar.
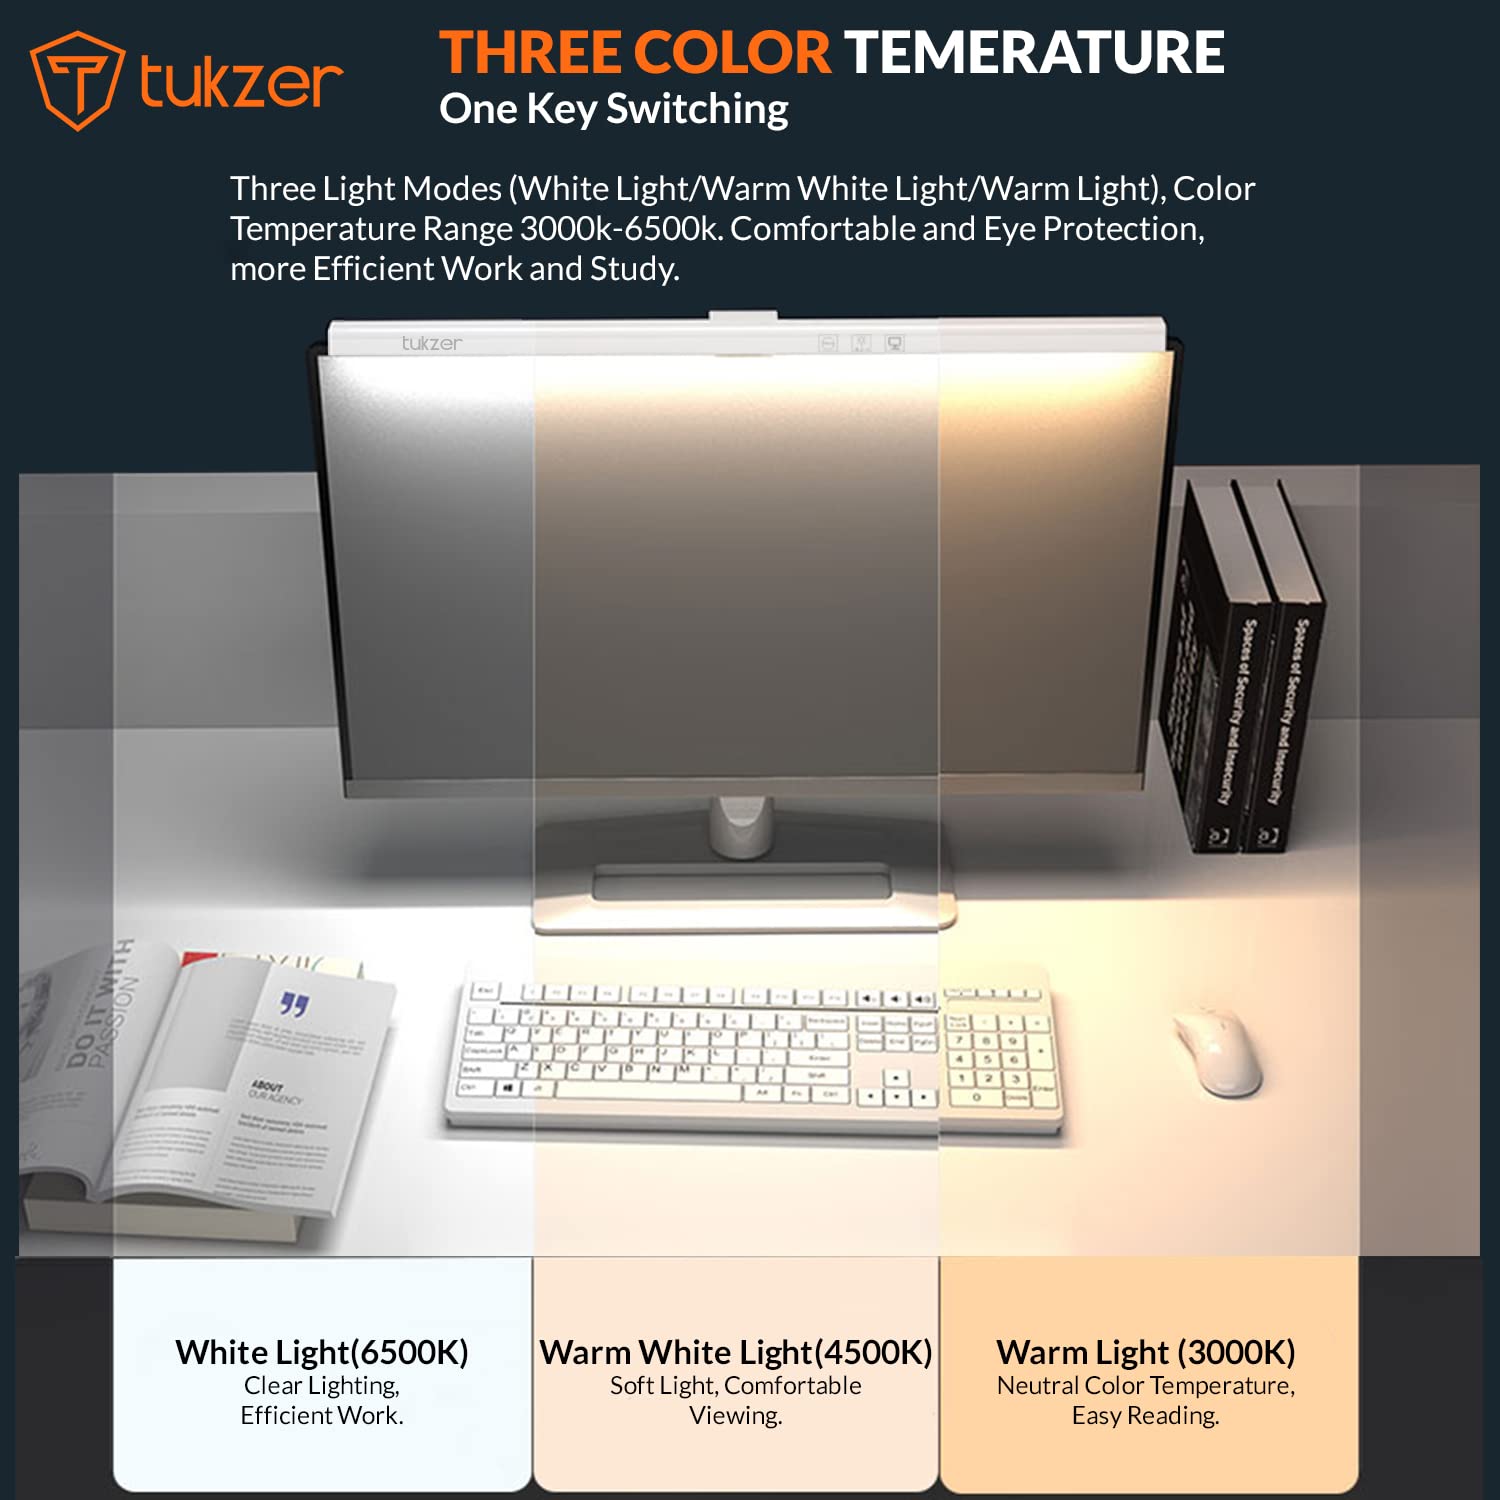
Image 2.2: Visual representation of the three adjustable color temperature modes.

Image 2.3: Asymmetric light source design for glare-free illumination.
3. Setup and Installation
Follow these steps to properly install your monitor screen light bar:
- Prepare the Monitor: Ensure the top surface of your monitor is clean and dry.
- Attach Silicone Pad: If your monitor's back is not flat, or for added stability, peel off the protection paper from the provided silicone pad and stick it onto the monitor's top edge where the light bar will rest.
- Position the Light Bar: Place the light bar's C-clamp mechanism over the top edge of your monitor.
- Secure the Suction Cup: Press the suction cup firmly onto the monitor's back to secure the light bar in place.
- Connect USB Power: Connect the USB power cable from the light bar to any available USB port (e.g., computer, monitor, phone charger, power bank) with a minimum output of 1A at 5V.
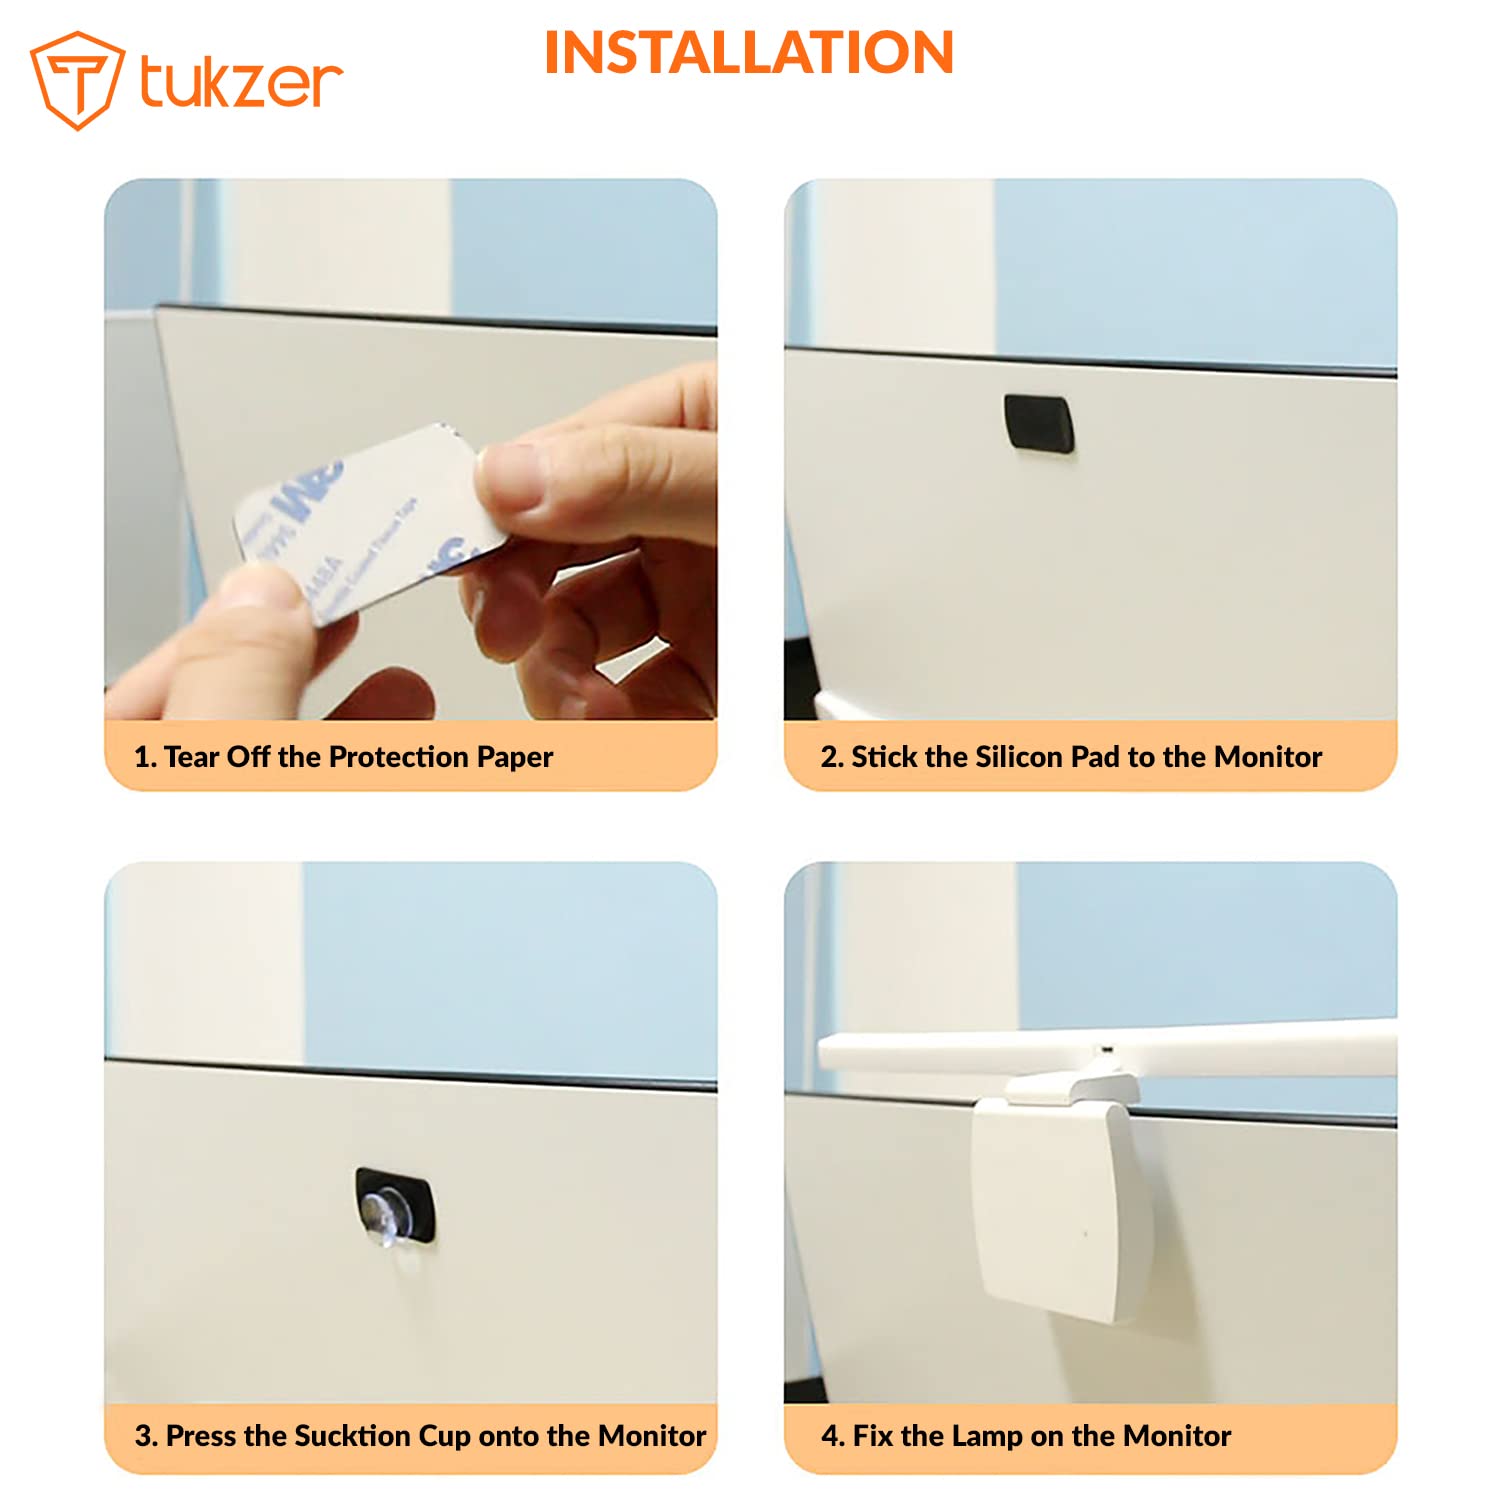
Image 3.1: Step-by-step installation process.

Image 3.2: Product parts and hanging angle adjustment range.
4. Operating Instructions
The Tukzer Monitor Screen Light Bar features smart touch sensor controls for easy operation.
- Power On/Off: Lightly touch the power icon once to turn the light bar on or off.
- Adjust Brightness (Stepless Dimming): Press and hold the brightness adjustment icon to smoothly increase or decrease the light intensity. Release when the desired brightness is reached.
- Change Color Temperature: Tap the color temperature icon to cycle through the three modes: Warm Light (3000K), Warm-White Light (4500K), and White Light (6500K).
- 60-Minute Timer: Tap the timer icon once to activate the 60-minute timer. The light will automatically turn off after 60 minutes.
- Power-Off Memory: The light bar will remember your last brightness and color temperature settings when turned off and on again.

Image 4.1: Smart touch sensor controls for operation.
5. Maintenance and Care
To ensure the longevity and optimal performance of your light bar, follow these maintenance guidelines:
- Cleaning: Use a soft, dry cloth to gently wipe the surface of the light bar. Avoid using abrasive cleaners, solvents, or sprays that could damage the finish or electronic components.
- Storage: When not in use for extended periods, store the light bar in a cool, dry place, away from direct sunlight and extreme temperatures.
- Handling: Handle the light bar with care. Avoid dropping it or subjecting it to strong impacts.
- Disassembly: Do not attempt to disassemble or modify the product. This will void the warranty and may cause damage or injury.
6. Troubleshooting
If you encounter any issues with your Tukzer Monitor Screen Light Bar, please refer to the following common problems and solutions:
| Problem | Possible Cause | Solution |
|---|---|---|
| Light bar does not turn on. |
|
|
| Light flickers or is unstable. |
|
|
| Touch controls are unresponsive. |
|
|
| Light bar is not stable on the monitor. |
|
|
If the problem persists after trying these solutions, please contact customer support.
7. Specifications
| Feature | Detail |
|---|---|
| Model Number | TZ-ML-02 |
| Product Material | Acrylonitrile Butadiene Styrene (ABS) |
| Rated Voltage | 5V |
| Product Power | 5W MAX (78x0.2W/LED Module) |
| Rated Current | 1A |
| Light Source | LED |
| Color Rendering Index (CRI) | >80 Ra |
| Operating Temperature | -5°C to +45°C |
| Color Temperature Modes | Warm Light (3000K), Warm-White Light (4500K), White Light (6500K) |
| Luminous Flux | >90 LM |
| Product Weight | 170 Grams |
| Product Dimensions | 50 cm (Length) x 10.4 cm (Width) x 6.5 cm (Depth) |
| USB Power Cable Length | 1.2 meters |
| Control Method | Touch Sensor |
| Mounting Type | Screen Mount (C-clamp with suction cup) |
| Included Components | Monitor Screen Light Bar |

Image 7.1: Product dimensions and detailed specifications.
8. Warranty and Support
8.1. Warranty Information
The Tukzer Monitor Screen Light Bar comes with a 06 Months warranty from the date of purchase. This warranty covers manufacturing defects and malfunctions under normal use. It does not cover damage caused by misuse, accidents, unauthorized modifications, or improper installation.
Please retain your purchase receipt as proof of purchase for warranty claims.
8.2. Customer Support
For technical assistance, warranty claims, or any other inquiries, please contact Tukzer customer support. Refer to the official Tukzer website or your purchase documentation for contact details.
When contacting support, please provide your product model number (TZ-ML-02) and a detailed description of the issue.
9. Important Notes
- This product is designed for indoor use only.
- Do not expose the product to water or high humidity. It is not water resistant.
- Keep out of reach of children.
- The light source of this product is not replaceable. When the light source reaches the end of its life, the entire lamp should be replaced.
- Use only with a 5V/1A USB power supply.
Ask a question about this manual
Ask about setup, troubleshooting, compatibility, parts, safety, or missing instructions. Manuals+ will review the question and use this page’s manual context to help answer it.