1. Introduction
The MSI PRO B660M-A DDR4 Motherboard is designed to provide a stable and efficient platform for your computing needs. This manual provides essential information for setting up, operating, maintaining, and troubleshooting your motherboard to ensure optimal performance and longevity.

Figure 1: MSI PRO B660M-A DDR4 Motherboard and Retail Box
2. Setup Guide
Before beginning installation, ensure you have a clean, static-free workspace. It is recommended to wear an anti-static wrist strap.
2.1. Package Contents
Verify all components are present in the box:
- MSI PRO B660M-A DDR4 Motherboard
- I/O Shield
- 2 x SATA Cables
- 2 x M.2 Screws
- M.2 Clip
- Quick Installation Guide
- Driver DVD

Figure 2: Motherboard and Included Accessories
2.2. Motherboard Layout Overview
Familiarize yourself with the key components and connectors on the motherboard.
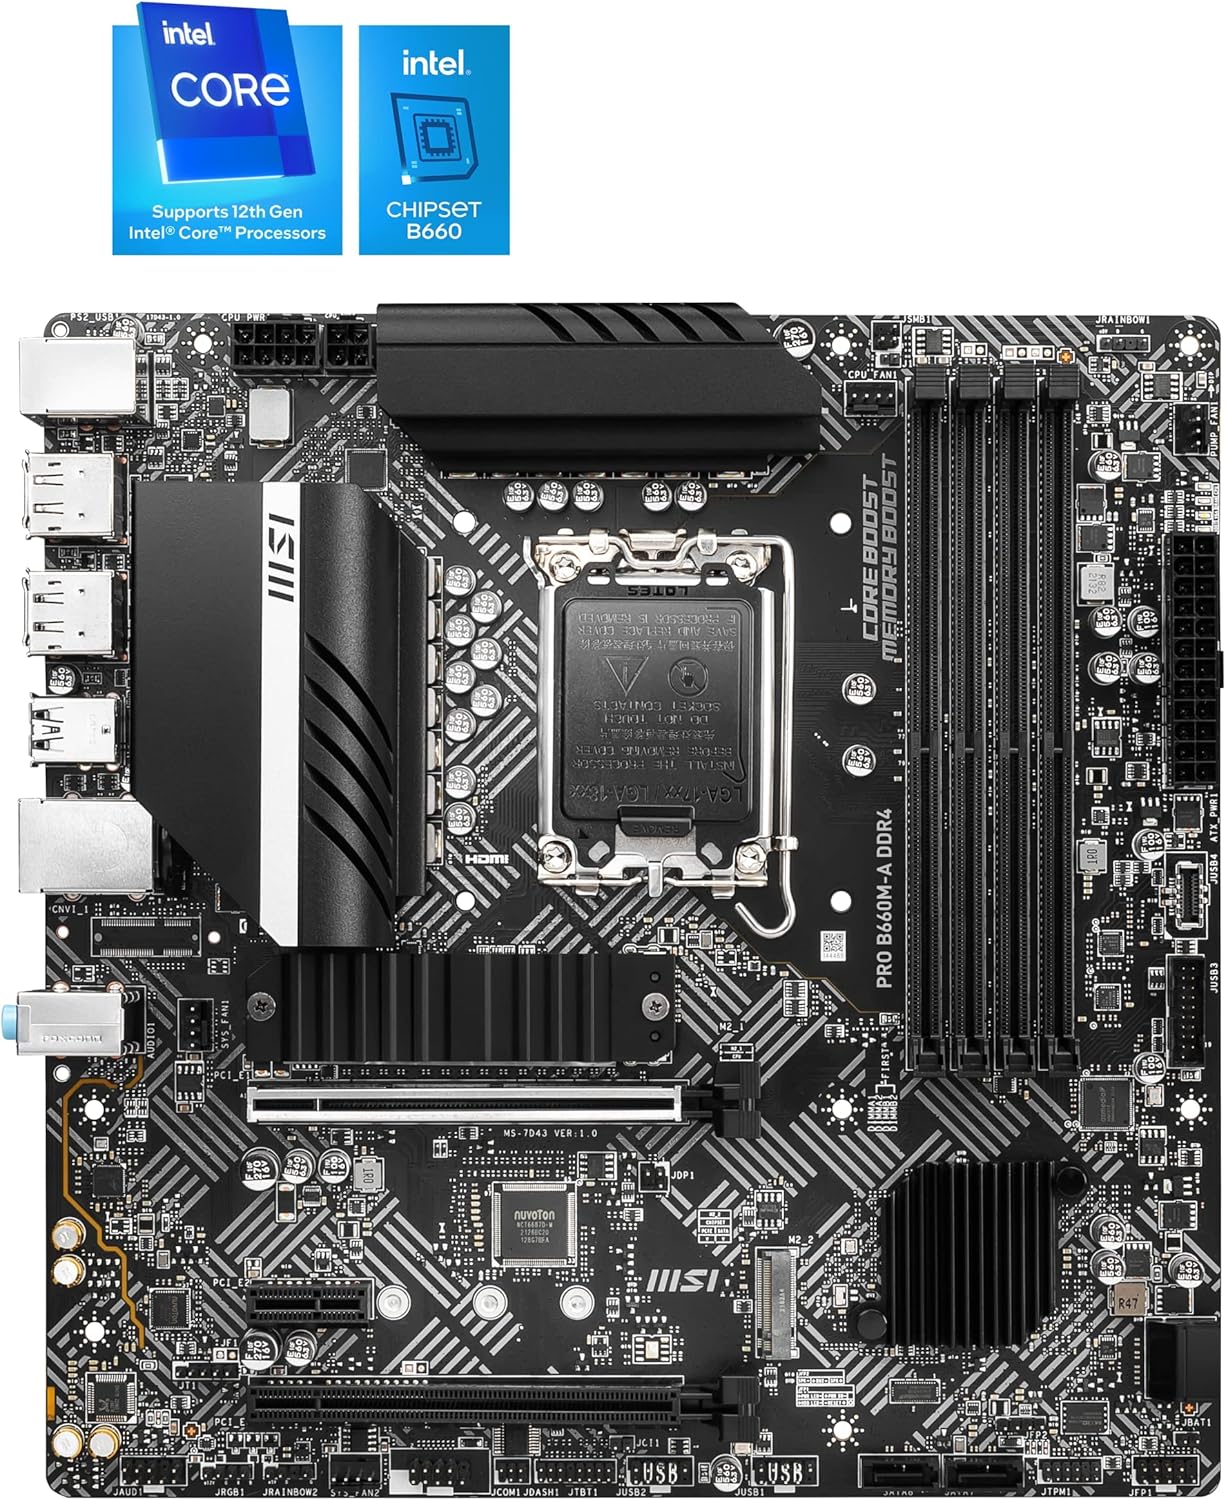
Figure 3: Motherboard Component Layout
2.3. Component Installation
- CPU Installation: Carefully open the LGA 1700 socket lever. Align the triangular mark on your 12th Gen Intel Core processor with the mark on the socket, then gently place the CPU into the socket. Close the lever to secure the CPU.
- RAM Installation: Locate the four DDR4 DIMM slots. Open the clips on both ends of the slots. Align the notch on the DDR4 memory module with the key in the DIMM slot, then press firmly until the clips snap into place.
- Storage Installation: The motherboard supports M.2 NVMe SSDs and SATA drives. Install M.2 SSDs into the Lightning Gen4 x4 M.2 slots, securing them with the provided screws/clip. Connect SATA drives to the available SATA 6Gbps ports using SATA cables.
- Graphics Card Installation: Insert your PCIe 4.0 graphics card into the primary PCIe 4.0 x16 slot until it clicks into place. Secure it with a case screw.
- Power Connections: Connect the 24-pin ATX power connector and the 8-pin CPU power connector from your power supply to the corresponding ports on the motherboard.
- Front Panel Connections: Connect the power switch, reset switch, HDD LED, and USB/audio headers from your PC case to the appropriate pins on the motherboard's front panel header.
- Rear I/O Connections: Install the I/O shield into your PC case. Connect your peripherals (monitor, keyboard, mouse, network cable) to the rear I/O ports.

Figure 4: Rear I/O Panel Overview
3. Operating Instructions
3.1. First Boot and BIOS Setup
After assembling your system, connect a monitor, keyboard, and mouse. Power on the system. Press the 'Delete' key repeatedly during startup to enter the BIOS/UEFI setup utility. Here you can configure system settings, boot order, and monitor hardware status.
3.2. Operating System Installation
Insert your operating system installation media (USB drive or DVD). Set the boot priority in BIOS to your installation media. Follow the on-screen prompts to install your preferred operating system (Windows 10 or Windows 11 recommended).
4. Maintenance
Regular maintenance helps ensure the longevity and stable operation of your motherboard and system.
- Dust Removal: Periodically clean dust from inside your PC case, especially around the motherboard, CPU cooler, and GPU. Use compressed air for best results.
- Cable Management: Ensure all cables are neatly routed and not obstructing airflow.
- BIOS Updates: Check the MSI website for the latest BIOS updates. BIOS updates can improve compatibility, stability, and performance. Refer to the official MSI guide for proper BIOS update procedures.
- Driver Updates: Keep your motherboard drivers (chipset, LAN, audio, etc.) updated by downloading the latest versions from the MSI support website.
5. Troubleshooting
If you encounter issues, refer to the following common troubleshooting steps:
- No Power/No Boot:
- Check all power connections (24-pin ATX, 8-pin CPU, GPU).
- Ensure the power supply is switched on.
- Verify the front panel power switch is correctly connected.
- No Display:
- Ensure the monitor is connected to the correct display output (motherboard or graphics card).
- Reseat the graphics card and RAM modules.
- If using a 13th Gen Intel CPU, be aware that some early BIOS versions for B660 motherboards may not support it out of the box. A 12th Gen CPU might be required to update the BIOS before a 13th Gen CPU can be used.
- Component Not Detected:
- Reseat the component (RAM, SSD, GPU).
- Check cable connections for SATA drives.
- Verify the component is properly seated in its slot.
- System Instability/Crashes:
- Check CPU and GPU temperatures.
- Ensure all drivers are installed and up to date.
- Run memory diagnostic tools to check for RAM issues.
6. Specifications
| Feature | Detail |
|---|---|
| Processor Support | 12th Gen Intel Core, Pentium, Celeron processors for LGA 1700 socket |
| Chipset | Intel B660 |
| Memory | DDR4, 2 DIMM slots, Dual Channel DDR4-4600+ MHz (OC) |
| Expansion Slots | 1x PCIe 4.0 x16, 1x PCIe 3.0 x1 |
| Storage | 1x M.2 Gen3 x4 32Gbps slot, 4x SATA 6Gbps ports |
| LAN | Intel I219-V 1G LAN |
| Audio | 8-Channel (7.1) HD Audio with Audio Boost |
| USB Ports | 4x USB 3.2 Gen 1 5Gbps (Type-A), 6x USB 2.0 |
| Display Interface | HDMI (Supports 4K@60Hz), VGA (Requires Processor Graphics) |
| Form Factor | mATX |
| Dimensions | 9.6 x 9.6 x 2.5 inches |
| Weight | 2.2 pounds |
7. Warranty and Support
For warranty information, product registration, and technical support, please visit the official MSI website or refer to the documentation included with your product. Registering your product can provide faster customer service and access to community forums.
Official MSI Product Registration: https://register.msi.com
MSI Store: MSI Official Store on Amazon


