
1. Introduction
This manual provides detailed instructions for the assembly, operation, and maintenance of your Marada Racing Sim Cockpit Stand with Seat. Please read this manual thoroughly before assembly and use to ensure proper function and longevity of the product. This product is designed to provide a stable and adjustable platform for various racing simulation peripherals.

Image 1.1: The Marada Racing Sim Cockpit Stand with Seat, shown without racing peripherals.
2. Setup and Assembly
The Marada Racing Sim Cockpit Stand with Seat is shipped in two separate packages: one for the stand components and one for the racing seat. Ensure you have received both packages before beginning assembly.

Image 2.1: The product is delivered in two distinct packages, one for the cockpit stand and one for the racing seat.
2.1 Unpacking and Component Check
- Carefully unpack all components from both boxes.
- Verify that all parts listed in the included parts list are present and undamaged. Contact customer support if any parts are missing or damaged.
- Keep all packaging materials until assembly is complete, in case return or exchange is necessary.
2.2 Assembly Instructions
Assembly is straightforward. While basic tools are provided, using your own tools may enhance the assembly process. It is recommended to finger-tighten all mainframe tube flanges initially, then fully tighten once the entire mainframe is assembled to ensure proper alignment.
- Frame Assembly: Connect the main tubular frame sections using the provided bolts and nuts. The frame features a 50x50mm large round tube design with a 4-hole flange structure for stability.
- Seat Assembly: Attach the seat base to the seat mounts. Then secure the seat mounts to the cockpit frame. The seat is designed with a dual-slide mechanism.
- Peripheral Mounts: Install the steering wheel platform, pedal platform, and shift lever platform onto the main frame. These platforms are designed for adjustability.

Image 2.2: Illustration of the cockpit's robust alloy steel frame with 50mm round tubes and flange structure, designed for stability and a maximum load capacity of 500 pounds.
2.3 Initial Adjustments
After assembly, perform initial adjustments to fit your preferences. Refer to the 'Operating' section for detailed adjustment procedures.

Image 2.3: Dimensional overview of the Marada Racing Sim Cockpit Stand and Seat, including package sizes and key measurements for the assembled unit.
3. Operating and Adjustments
The Marada Racing Sim Cockpit Stand offers extensive adjustability to accommodate various user preferences and racing peripherals.

Image 3.1: Overview of the multi-adjustment capabilities, including wheel platform angle and height, shift lever platform position, and pedal platform angle and fore/aft adjustment.
3.1 Steering Wheel Platform Adjustment
The steering wheel platform features a two-stage adjustment mechanism for both height and angle. Loosen the adjustment knobs, position the platform to your desired height and angle, then securely tighten the knobs.

Image 3.2: The steering wheel mount allows for dual-stage adjustment of both height and angle to optimize driving position.
3.2 Pedal Platform Adjustment
The pedal platform offers unrestricted front and rear adjustment, along with a 3-hole angle adjustment from 0 to 30 degrees. Adjust the pedal position and angle for optimal comfort and control.

Image 3.3: The pedal platform can be adjusted front and rear, and its angle can be set between 0 and 30 degrees using three adjustment holes.
3.3 Shift Lever Platform Adjustment
The shift lever platform features a double bayonet fixing system and is interchangeable for left or right-hand side mounting. It also allows for front-rear adjustment to suit your preferred shifter position.

Image 3.4: The shift lever platform offers left-right interchangeability and front-rear adjustment for ergonomic placement.
3.4 Seat Adjustment
The racing seat is designed for comfort and adjustability. The backrest angle can be adjusted from 90 to 180 degrees, and the seat slides forward and backward by up to 7.8 inches (20 cm) on its dual tracks. It includes neck and lumbar pillows for enhanced support.
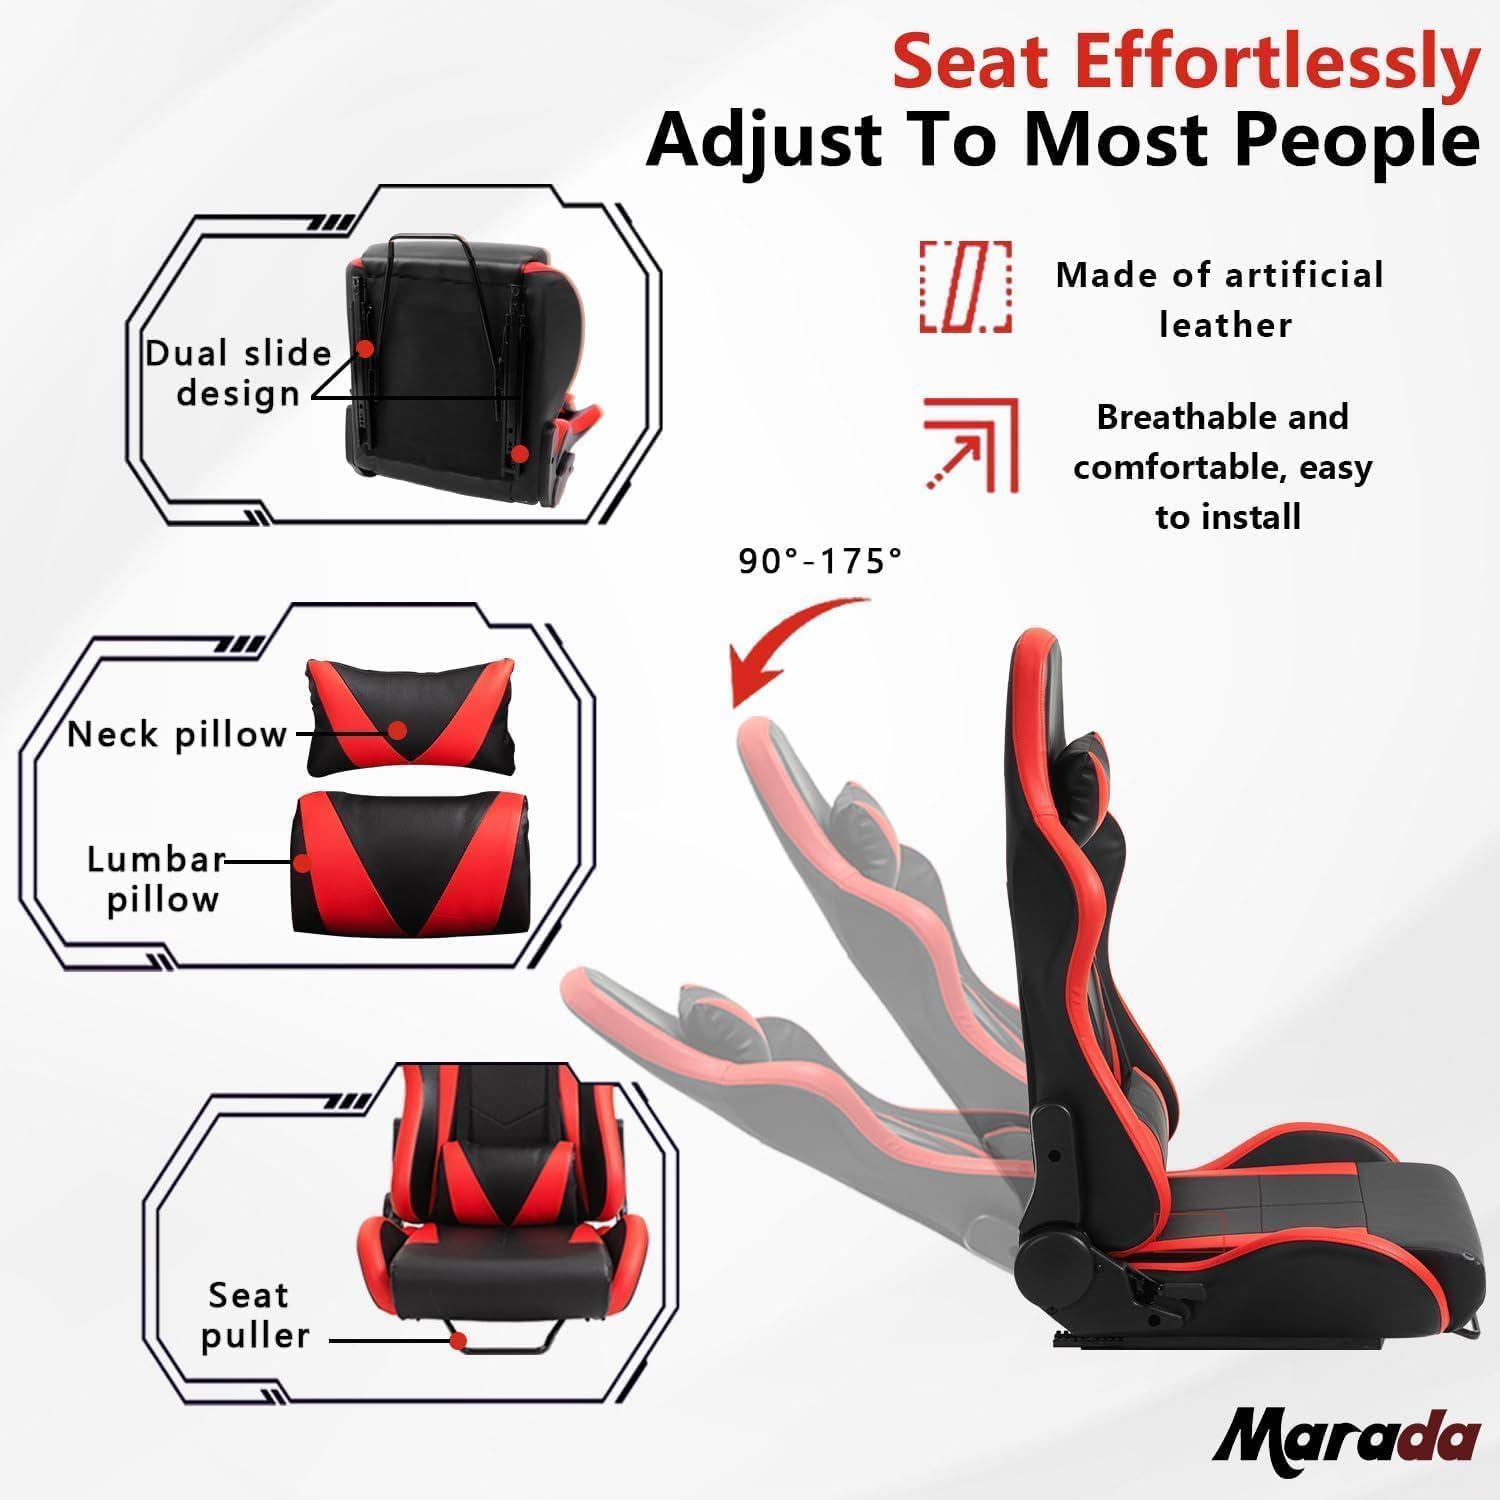
Image 3.5: The racing seat features a dual-slide design, neck and lumbar pillows, and a backrest adjustable from 90 to 175 degrees for optimal comfort.

Image 3.6: The seat backrest angle can be adjusted from 90-180 degrees, and the seat slides forward and backward by 7.8 inches for personalized positioning.
3.5 Peripheral Compatibility
The cockpit is designed for high compatibility with various racing steering wheels, pedals, and gear shifters from major brands. It supports direct drive steering wheels and TV bracket mounting, with provisions for DIY drilling if needed.
- Logitech: Compatible with G25, G27, G29, G320, G920, G923 series.
- Fanatec: Compatible with CSL, GT, PodiumWB-DD1, DD2, CSP-V3, ClubSport Shifter SQ series.
- Thrustmaster: Compatible with T-GT, T248, T300RS GT, TSPC, TXRW series, and Thrustmaster HOTAS Warthog Flight Stick.

Image 3.7: Visual representation of compatibility with Logitech, Thrustmaster, and Fanatec racing peripherals. Note that steering wheel, shifter, handbrake, and pedals are not included with the cockpit.
4. Maintenance
Regular maintenance ensures the longevity and optimal performance of your racing sim cockpit.
4.1 Cleaning
- The frame features a double black spray paint surface, which is easy to clean. Use a soft, damp cloth to wipe down the metal frame. Avoid abrasive cleaners.
- For the artificial leather seat, use a mild soap solution and a soft cloth. Do not use harsh chemicals or solvents.
4.2 Fastener Checks
- Periodically check all bolts, nuts, and connection points for tightness. Over time, vibrations from use can cause fasteners to loosen.
- Tighten any loose fasteners to maintain the structural integrity and stability of the cockpit.
5. Troubleshooting
This section addresses common issues you might encounter with your racing sim cockpit.
5.1 Instability or Wobbling
- Issue: The cockpit feels unstable or wobbles during use.
- Solution: Ensure all assembly bolts and nuts are securely tightened. Refer to Section 4.2 for fastener checks. Verify that the cockpit is placed on a flat, level surface.
5.2 Difficulty with Adjustments
- Issue: Adjustment mechanisms (e.g., steering wheel, pedals, seat) are stiff or difficult to move.
- Solution: Loosen the adjustment knobs or levers sufficiently before attempting to reposition. Ensure no debris is obstructing the sliding or pivoting parts. A small amount of silicone-based lubricant can be applied to sliding mechanisms if necessary, avoiding contact with the seat fabric.
5.3 Peripherals Not Mounting Correctly
- Issue: Racing wheel, pedals, or shifter do not align with mounting holes.
- Solution: The cockpit is designed for wide compatibility. Check the mounting plates for multiple pre-drilled holes. If your peripheral requires a specific mounting pattern not present, DIY drilling is supported on the mounting plates. Ensure you use appropriate hardware for your specific peripheral.
6. Specifications
| Feature | Detail |
|---|---|
| Model Number | racing simulator cockpit with seat |
| Product Dimensions (Stand) | 23.6 x 23.6 x 7.5 inches (approximate package size) |
| Product Dimensions (Seat) | 32.6 x 22.8 x 11 inches (approximate package size) |
| Item Weight (Stand) | 45.2 lbs (approximate) |
| Item Weight (Seat) | 31.96 lbs (approximate) |
| Frame Material | Alloy Steel, 50x50mm round tube, 4-hole flange structure |
| Seat Material | Artificial leather, breathable |
| Maximum Load Capacity | 500 pounds |
| Steering Wheel Platform Adjustment | Dual-stage height and angle adjustment |
| Pedal Platform Adjustment | Front/rear unrestricted adjustment, 3-hole angle adjustment (0-30°) |
| Shift Lever Platform Adjustment | Double bayonet fixing, left/right interchangeable, front/rear adjustment |
| Seat Backrest Adjustment | 90-180 degrees tilt |
| Seat Slide Adjustment | 7.8 inches (20 cm) forward and backward |
| Included Accessories | Neck pillow, lumbar pillow |
| Compatibility | Logitech, Fanatec, Thrustmaster racing peripherals (wheel, pedal, shifter) |
7. Warranty Information
Specific warranty details for the Marada Racing Sim Cockpit Stand with Seat are not provided within this manual. For information regarding product warranty, please refer to the official Marada website or contact the retailer from whom the product was purchased. Please retain your proof of purchase for any warranty claims.
8. Customer Support
If you require assistance with assembly, operation, or troubleshooting that is not covered in this manual, please contact Marada customer support. Contact information can typically be found on the official Marada website or through your product retailer. When contacting support, please have your product model number and purchase details ready.


