
Akai Professional MPKMINIPLAYMK3
Akai Professional MPK Mini Play MK3 User Manual
Model: MPKMINIPLAYMK3
Brand: Akai Professional
1. Introduction
The Akai Professional MPK Mini Play MK3 is a compact yet powerful standalone MIDI keyboard controller designed for beatmakers, songwriters, and musicians. It features an integrated speaker and over 128 built-in instruments and drum kits, allowing for music creation anywhere, anytime, without the need for external devices.
This manual provides detailed instructions on setting up, operating, and maintaining your MPK Mini Play MK3 to ensure optimal performance and longevity.

Figure 1.1: Akai Professional MPK Mini Play MK3 Overview
2. Key Features
- Standalone Operation: Play music anywhere with over 14 hours of battery life (batteries not included) and an enhanced integrated speaker.
- Extensive Sound Library: Access over 128 built-in instruments and drum kits, including acoustic and electric pianos, synth leads, pads, and more.
- Dynamic Keyboard: Features a new Gen 2 dynamic 25-key keyboard for expressive and precise velocity response.
- Authentic MPC Pads: Equipped with 8 velocity-sensitive MPC drum pads for accurate drumming and melodic sample playback.
- Versatile Control: Four assignable rotary knobs provide flexible control over MIDI parameters for precise editing.
- MIDI Controller Functionality: Functions as a powerful plug-and-play MIDI controller for seamless integration with your Digital Audio Workstation (DAW).
- Native Kontrol Standard (NKS) Integration: Full NKS support allows browsing and controlling Native Instruments presets and sound libraries directly from your MPK.
- Comprehensive Software Suite: Includes MPC Beats, MPC Expansion Packs, Hype, AIR Essential Keyboards, and Electric by AIR Music Tech for unlimited creativity.
- Learning Tools: Comes with 60 free Melodics lessons and a 30-day Splice Creator plan.
- Headphone Output: A 1/8" headphone output allows for silent practice or songwriting.

Figure 2.1: Velocity-sensitive MPC Pads and Assignable Knobs
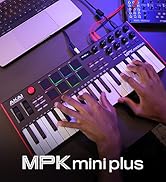
Figure 2.2: Integrated Speaker, Headphone Output, and Battery Compartment
3. Setup
3.1 What's in the Box
- MPK Mini Play MK3 Unit
- USB Cable
- Software Download Card
- User Guide
- Safety and Warranty Information
3.2 Powering the Device
The MPK Mini Play MK3 can be powered in two ways:
- USB Power: Connect the included USB cable from the MPK Mini Play MK3's USB port to an available USB port on your computer or a USB power adapter (not included). This method also enables MIDI communication with your computer.
- Battery Power: For standalone use, insert 4 AA batteries (not included) into the battery compartment on the underside of the unit. Ensure the power switch on the rear panel is set to the 'BAT' position.

Figure 3.1: Rear Panel with USB Port and Power Switch
3.3 Software Installation
Your MPK Mini Play MK3 comes with a comprehensive software package. To access and install the software:
- Register Your Product: Visit the Akai Professional website and register your MPK Mini Play MK3 using the serial number found on the bottom of the unit.
- Download InMusic Software Center: Follow the instructions to download and install the InMusic Software Center. This application manages your software downloads and authorizations.
- Install Included Software: Use the Software Download Card to redeem your included software titles, such as MPC Beats, Hype, AIR Essential Keyboards, and Electric.
- Native Instruments Integration: If you plan to use NKS features, download Native Access and install Komplete Kontrol to configure your MPK for Native Instruments products. Choose one of the three Komplete 15 Select bundles (Beats, Band, or Electronic) provided with your purchase.
- Melodics and Splice: Follow the instructions on the software download card to access your 60 free Melodics lessons and 30-day Splice Creator plan.

Figure 3.2: Software Download and Installation Process
4. Operating Instructions
4.1 Basic Operation
Once powered on, the MPK Mini Play MK3 is ready for use. The OLED display will show the currently selected instrument or setting.
- Playing Sounds: Use the 25 mini-keys to play the internal sounds. The keys are velocity-sensitive, meaning the sound's volume or intensity will vary based on how hard you press them.
- Using MPC Pads: The 8 MPC pads are also velocity-sensitive and can be used to trigger drum sounds, samples, or notes.
- Selecting Sounds: Use the dedicated buttons or the data encoder to browse and select from the 128+ internal sounds and 10 drum kits.
- Volume Control: Adjust the master volume using the dedicated volume knob.

Figure 4.1: OLED Display and Main Controls
4.2 Advanced Features
- Arpeggiator: Activate the arpeggiator to automatically play sequences of notes from held keys. Adjust tempo using the Tap Tempo button and sync to external MIDI clock.
- Note Repeat: Hold down the Note Repeat button and strike a pad to automatically repeat the note at a set tempo.
- Assignable Knobs: The four rotary knobs can be assigned to control various parameters of the internal sounds or external MIDI devices. Refer to the full user manual for detailed MIDI mapping instructions.
- Sustain Pedal Input: Connect an optional sustain pedal (not included) to the 1/4" sustain input jack for expressive piano-style playing.
- Headphone Use: Plug headphones into the 1/8" headphone jack for private practice. The internal speaker will automatically mute when headphones are connected.

Figure 4.2: Sustain Pedal Connection

Figure 4.3: Using Headphones for Private Practice
5. Maintenance
Proper care and maintenance will extend the life of your MPK Mini Play MK3.
- Cleaning: Use a soft, dry cloth to clean the surface of the unit. Do not use abrasive cleaners, waxes, or solvents.
- Storage: When not in use, store the unit in a cool, dry place away from direct sunlight and extreme temperatures. If storing for an extended period, remove batteries to prevent leakage.
- Handling: Avoid dropping the unit or subjecting it to strong impacts. Do not place heavy objects on top of it.
- Liquid Exposure: Keep the unit away from liquids. If liquid enters the unit, disconnect power immediately and contact Akai Professional support.
6. Troubleshooting
| Problem | Possible Cause | Solution |
|---|---|---|
| No sound from internal speaker. | Volume knob is turned down; headphones are plugged in; unit is off. | Increase volume; unplug headphones; ensure unit is powered on. |
| Unit not recognized by computer. | USB cable is loose or faulty; incorrect USB port; driver issues. | Ensure USB cable is securely connected; try a different USB port; reinstall drivers if necessary. |
| Pads or keys not responding. | Unit is in an incorrect mode; sensitivity settings. | Check the mode settings on the unit; adjust velocity sensitivity if available in settings or software. |
| Battery life is short. | Low quality batteries; high volume usage. | Use high-quality alkaline batteries; reduce volume when not necessary. |
7. Specifications
| Feature | Detail |
|---|---|
| Model Name | MPK MINI PLAY MK3 |
| Dimensions (L x W x H) | 18.03 x 31.75 x 4.83 cm (7.1 x 12.5 x 1.9 inches) |
| Weight | 816.47 grams (1.8 lbs) |
| Number of Keys | 25 (Gen 2 Dynamic Mini-Keys) |
| Pads | 8 Velocity-Sensitive MPC Pads (backlit) |
| Knobs | 4 Assignable Rotary Knobs |
| Display | OLED Display (1 inch) |
| Connectivity | USB, 1/8" Headphone Output, 1/4" Sustain Pedal Input |
| Power | USB Bus Power or 4 AA Batteries |
| Included Software | MPC Beats, Hype, AIR Essential Keyboards, Electric, Melodics (60 lessons), Splice (30-day Creator plan) |
| Compatibility | PC, Laptop (USB MIDI Controller) |
8. Warranty and Support
8.1 Warranty Information
Akai Professional products are covered by a limited warranty. Please refer to the "Safety and Warranty Information" card included in your product box for specific terms and conditions. Keep your proof of purchase for warranty claims.
For returns or replacements, please adhere to the retailer's return policy. For purchases made on Amazon, a 30-day refund/replacement policy is typically offered by Amazon.
8.2 Technical Support
For technical assistance, software activation issues, or further inquiries, please visit the official Akai Professional support website:
You can also find FAQs, driver downloads, and additional resources on their website.
Ask a question about this manual
Ask about setup, troubleshooting, compatibility, parts, safety, or missing instructions. Manuals+ will review the question and use this page’s manual context to help answer it.