1. Introduction
This manual provides comprehensive instructions for the setup, operation, and maintenance of your Emporia KFT20 Analog Telephone. Please read this manual carefully to ensure proper use and to maximize the benefits of your device.
Key Features:
- Large, easy-to-read LCD display (75 x 30 mm).
- Hearing aid compatible (M4/T4) with adjustable extra volume (+30 dB).
- Three programmable speed dial keys with photo slots for quick and intuitive calling.
- Caller ID display.
- Dedicated SOS button for emergency calls.
2. Safety Information
Please observe the following safety precautions to prevent damage to your device or injury to yourself:
- Do not expose the telephone to moisture, extreme temperatures, or direct sunlight.
- Use only the provided power adapter.
- Do not attempt to open or repair the device yourself. Refer all servicing to qualified personnel.
- Keep the telephone away from medical devices such as pacemakers, as it may cause interference.
- Clean the telephone with a soft, dry cloth. Do not use liquid or aerosol cleaners.
3. Package Contents
Ensure all items are present in the package:
- Emporia KFT20 Analog Telephone
- Power Adapter
- Telephone Line Cord
- User Manual (this document)
4. Setup
4.1. Connecting the Telephone
- Connect the Handset: Plug the coiled cord from the handset into the designated port on the left side of the telephone base.
- Connect the Telephone Line: Plug one end of the telephone line cord into the "LINE" port on the back of the telephone base and the other end into your wall telephone jack.
- Connect the Power Adapter: Plug the power adapter into the "DC IN" port on the back of the telephone base, then plug the adapter into a standard electrical outlet.
- Initial Power On: The display should illuminate, and the telephone will perform a self-check.
4.2. Setting Date and Time
Refer to the on-screen prompts or the "SET" button for initial date and time configuration. Specific steps may vary slightly.
4.3. Programming Photo Speed Dial Keys
The Emporia KFT20 features three dedicated speed dial keys (labeled 1, 2, 3) where you can insert photos of frequently called contacts.
- Prepare Photos: Print small photos of your contacts to fit the designated slots above keys 1, 2, and 3.
- Insert Photos: Carefully lift the clear plastic cover on each speed dial key and insert the corresponding photo. Replace the cover securely.
- Store Number: Press the STORE button.
- Enter Number: Dial the telephone number you wish to assign to the speed dial key.
- Select Key: Press the desired speed dial key (1, 2, or 3) to save the number.
- Confirm: The display will confirm the number has been saved.
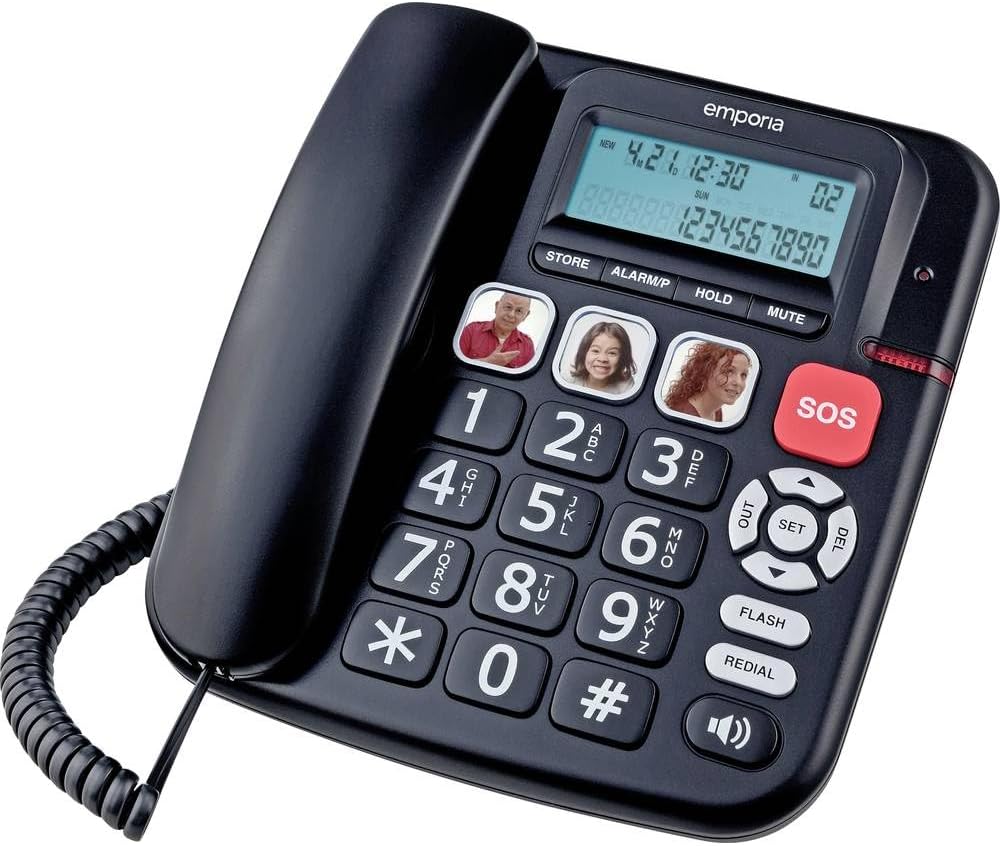
Figure 1: Emporia KFT20 Analog Telephone showing the handset, large keypad, display, and three photo speed dial keys.
5. Operating Instructions
5.1. Making a Call
- Standard Dialing: Lift the handset, wait for the dial tone, then dial the desired number using the keypad.
- Speed Dial: Lift the handset, then press the desired photo speed dial key (1, 2, or 3). The stored number will be dialed automatically.
- Redial: Lift the handset, then press the REDIAL button to call the last dialed number.
5.2. Answering a Call
When the telephone rings, simply lift the handset to answer the call.
5.3. Adjusting Volume
- Handset Volume: During a call, use the volume buttons (up/down arrows) located near the "SET" button to adjust the handset listening volume.
- Ringer Volume: The ringer volume can typically be adjusted via a switch on the side or back of the phone, or through the menu settings.
- Boost Function: For an extra loud listening experience, press the BOOST button (if available, often integrated with volume control) during a call.
5.4. Using the SOS Button
The red SOS button is designed for emergency situations. It can be programmed to dial a pre-set emergency number.
- Programming SOS: Follow a similar procedure to programming speed dial keys, but assign the emergency number to the SOS button. Consult the quick start guide or manufacturer's website for specific programming steps for the SOS button.
- Activating SOS: In an emergency, press and hold the SOS button. The telephone will automatically dial the programmed emergency number.
5.5. Caller ID Display
When an incoming call is received, the caller's number (and name, if available and subscribed to caller ID service) will be displayed on the LCD screen.
5.6. Other Functions
- HOLD: Press the HOLD button to put an active call on hold. Press again to resume.
- MUTE: Press the MUTE button to temporarily silence your microphone during a call. The other party will not hear you. Press again to unmute.
- FLASH: Used for certain telephone network services (e.g., call waiting, transferring calls). Consult your telephone service provider for details.
6. Maintenance
- Cleaning: Wipe the telephone with a soft, dry, lint-free cloth. Do not use abrasive cleaners, waxes, or solvents.
- Storage: If storing the telephone for an extended period, disconnect it from the power outlet and telephone line. Store in a cool, dry place.
7. Troubleshooting
| Problem | Possible Cause | Solution |
|---|---|---|
| No dial tone | Telephone line not connected properly or service issue. | Check telephone line connection. Test with another phone if possible. Contact your service provider. |
| Display is blank | Power adapter not connected or power outage. | Ensure power adapter is securely plugged in. Check power outlet. |
| Cannot hear caller / Caller cannot hear me | Volume too low, MUTE activated, or faulty connection. | Adjust handset volume. Check if MUTE button is active. Re-seat handset cord. |
| Speed dial not working | Number not programmed correctly. | Re-program the speed dial key following the instructions in Section 4.3. |
8. Specifications
| Feature | Detail |
|---|---|
| Model Number | KFT20 |
| Type | Corded Analog Telephone |
| Display | LCD, 75 x 30 mm |
| Caller ID | Yes |
| Speed Dial Keys | 3 with photo slots |
| SOS Button | Yes |
| Hearing Aid Compatibility | M4/T4 |
| Extra Volume | +30 dB |
| Power Source | Electric Corded |
| Material | Plastic |
| Item Weight | 933 g |
| Package Dimensions | 25 x 19 x 5 cm |
| Color | White (Note: Product images may show a black variant.) |
9. Warranty and Support
For warranty information and technical support, please refer to the documentation included with your product packaging or visit the official Emporia website. Keep your proof of purchase for warranty claims.


