
1. Introduction
This manual provides detailed instructions for the setup, operation, maintenance, and troubleshooting of your SCULPFUN Laser Rotary Roller R1. This device is designed to enable your laser engraver to engrave cylindrical objects such as cups, bottles, pens, and rings. Please read this manual thoroughly before use to ensure proper and safe operation.

Figure 1: SCULPFUN Laser Rotary Roller R1 and its components, including booster feet and connection cables.
2. Safety Information
Always observe the following safety precautions when operating the laser rotary roller in conjunction with a laser engraver:
- Eye Protection: Always wear appropriate laser safety goggles when the laser engraver is in operation.
- Ventilation: Ensure adequate ventilation in the work area to dissipate fumes and smoke produced during engraving.
- Flammable Materials: Keep flammable materials away from the engraving area.
- Supervision: Never leave the laser engraver and rotary roller unattended during operation.
- Power Off: Disconnect power to both the laser engraver and rotary roller before performing any maintenance or adjustments.
- Children and Pets: Keep children and pets away from the operating equipment.
3. Package Contents
Verify that all items listed below are included in your package:
- SCULPFUN Laser Rotary Roller R1
- 4 x 150mm Metal Booster Feet
- Y-axis Connection Cable
- Hex Wrench
- Set of Screws and Nuts
- Measuring Tape

Figure 2: Overview of the rotary roller dimensions and included accessories.
4. Product Overview and Features
The SCULPFUN Laser Rotary Roller R1 is designed to expand the capabilities of your laser engraver for cylindrical objects. Key features include:
- Pre-installed Design: The unit comes fully assembled, ready for immediate use.
- Adjustable Engraving Space: Features a low-profile design and includes 150mm metal booster feet to accommodate cylindrical objects with diameters ranging from 6mm to 150mm.
- Sliding Adjustment Mechanism: Allows for quick and easy adjustment of the roller spacing by sliding and securing with a hand-twist knob.
- High-Precision Engraving: Utilizes high-friction 70A rubber shafts to prevent slippage and ensures accurate rotation for precise image reproduction.
- Wide Compatibility: Compatible with most laser engraving machines that use a 42 stepper motor and software such as LightBurn and LaserGRBL.

Figure 3: Key features of the SCULPFUN Laser Rotary Roller R1.
5. Setup Instructions
5.1 Unpacking and Initial Placement
- Carefully remove the rotary roller and all accessories from the packaging.
- Place the rotary roller on a stable, level surface within the working area of your laser engraver.
- If engraving larger diameter objects, attach the four 150mm metal booster feet to your laser engraver to raise its height, ensuring sufficient clearance for the object and rotary roller.
5.2 Connecting the Rotary Roller
- Locate the Y-axis motor cable on your laser engraving machine.
- Disconnect the Y-axis motor cable from the laser engraver's Y-axis motor.
- Connect the provided Y-axis connection cable from the rotary roller to the Y-axis port on your laser engraver.
- Connect the other end of the Y-axis connection cable to the rotary roller's motor.

Figure 4: Illustration of connecting the rotary roller to the laser engraver's Y-axis.
5.3 Software Compatibility
The SCULPFUN Laser Rotary Roller R1 is compatible with popular engraving software such as LightBurn and LaserGRBL. No additional software settings are typically required, as the roller's surface rotation speed is precisely calibrated to match the original Y-axis speed of your engraver.

Figure 5: The rotary roller is compatible with common laser engraving software.
6. Operation
6.1 Placing an Object for Engraving
- Ensure the laser engraver is powered off.
- Place the cylindrical object (e.g., cup, pen, bottle) onto the rollers. Ensure it rests securely and is centered.
- The rotary roller supports objects with diameters from 6mm to 150mm.

Figure 6: The rotary roller accommodates a wide range of cylindrical objects.
6.2 Adjusting Roller Spacing
To ensure stable rotation and accurate engraving, adjust the distance between the two main rollers to match the diameter of your object.
- Gently slide the movable roller assembly along the base to adjust the spacing.
- Once the object is stable and the rollers are in contact without excessive pressure, tighten the hand-twist knob to secure the position.

Figure 7: Adjusting the roller spacing for different object diameters.
6.3 Engraving Process
- Power on your laser engraver.
- In your engraving software (e.g., LightBurn, LaserGRBL), select the rotary engraving mode if available, or ensure the Y-axis movement is configured for rotary operation.
- Position the laser head over the desired starting point on your cylindrical object.
- Initiate the engraving process from your software. The rotary roller will rotate the object as the laser engraves.

Figure 8: Engraving a pen using the rotary roller.

Figure 9: Examples of cylindrical objects ready for engraving.
7. Maintenance
Regular maintenance ensures the longevity and optimal performance of your rotary roller.
- Cleaning: Periodically clean the rubber rollers and the base with a soft, dry cloth to remove dust and debris. Avoid using harsh chemicals that could damage the rubber or finish.
- Inspection: Regularly inspect the belts for wear and tear. Ensure all screws and connections are secure.
- Storage: When not in use, store the rotary roller in a clean, dry environment away from direct sunlight and extreme temperatures.

Figure 10: The high-friction rubber rollers require occasional cleaning.
8. Troubleshooting
If you encounter issues with your SCULPFUN Laser Rotary Roller R1, refer to the following common problems and solutions:
- Object Not Rotating or Slipping:
- Ensure the object is securely placed and the roller spacing is correctly adjusted for its diameter.
- Check if the rubber rollers are clean and free of debris that might reduce friction.
- Verify the Y-axis connection cable is properly seated at both ends.
- Engraving Appears Backwards or Mirrored:
- This often indicates the rotary roller needs to be rotated 180 degrees on your work surface, or a setting in your engraving software needs adjustment for direction. Consult your laser engraver's software manual for rotary axis direction settings.
- Inaccurate Engraving or Distortion:
- Confirm the object is perfectly cylindrical and stable on the rollers. Irregularly shaped objects may cause distortion.
- Ensure the roller spacing is tight enough to prevent wobble but not so tight as to impede rotation.
- Check for any loose belts or components on the rotary roller.
- Rotary Roller Not Detected by Software:
- Verify the Y-axis cable connection.
- Ensure your laser engraver's firmware and software are up to date.
- Restart both the laser engraver and your computer.
9. Specifications
| Feature | Specification |
|---|---|
| Model | R1 |
| Brand | SCULPFUN |
| Material | Stainless Steel |
| Product Dimensions | 10.63 x 8.66 x 1.97 inches (270 x 220 x 50 mm) |
| Item Weight | 3.21 pounds (1.46 kg) |
| Engraving Diameter Range | 6mm - 150mm |
| Roller Material | 70A Anti-slip Rubber |
| Compatibility | Most laser engravers with 42 stepper motors (e.g., SCULPFUN S6 Pro, S9, S10, S30 series, SF-A9 40W) |
| Software Support | LightBurn, LaserGRBL |
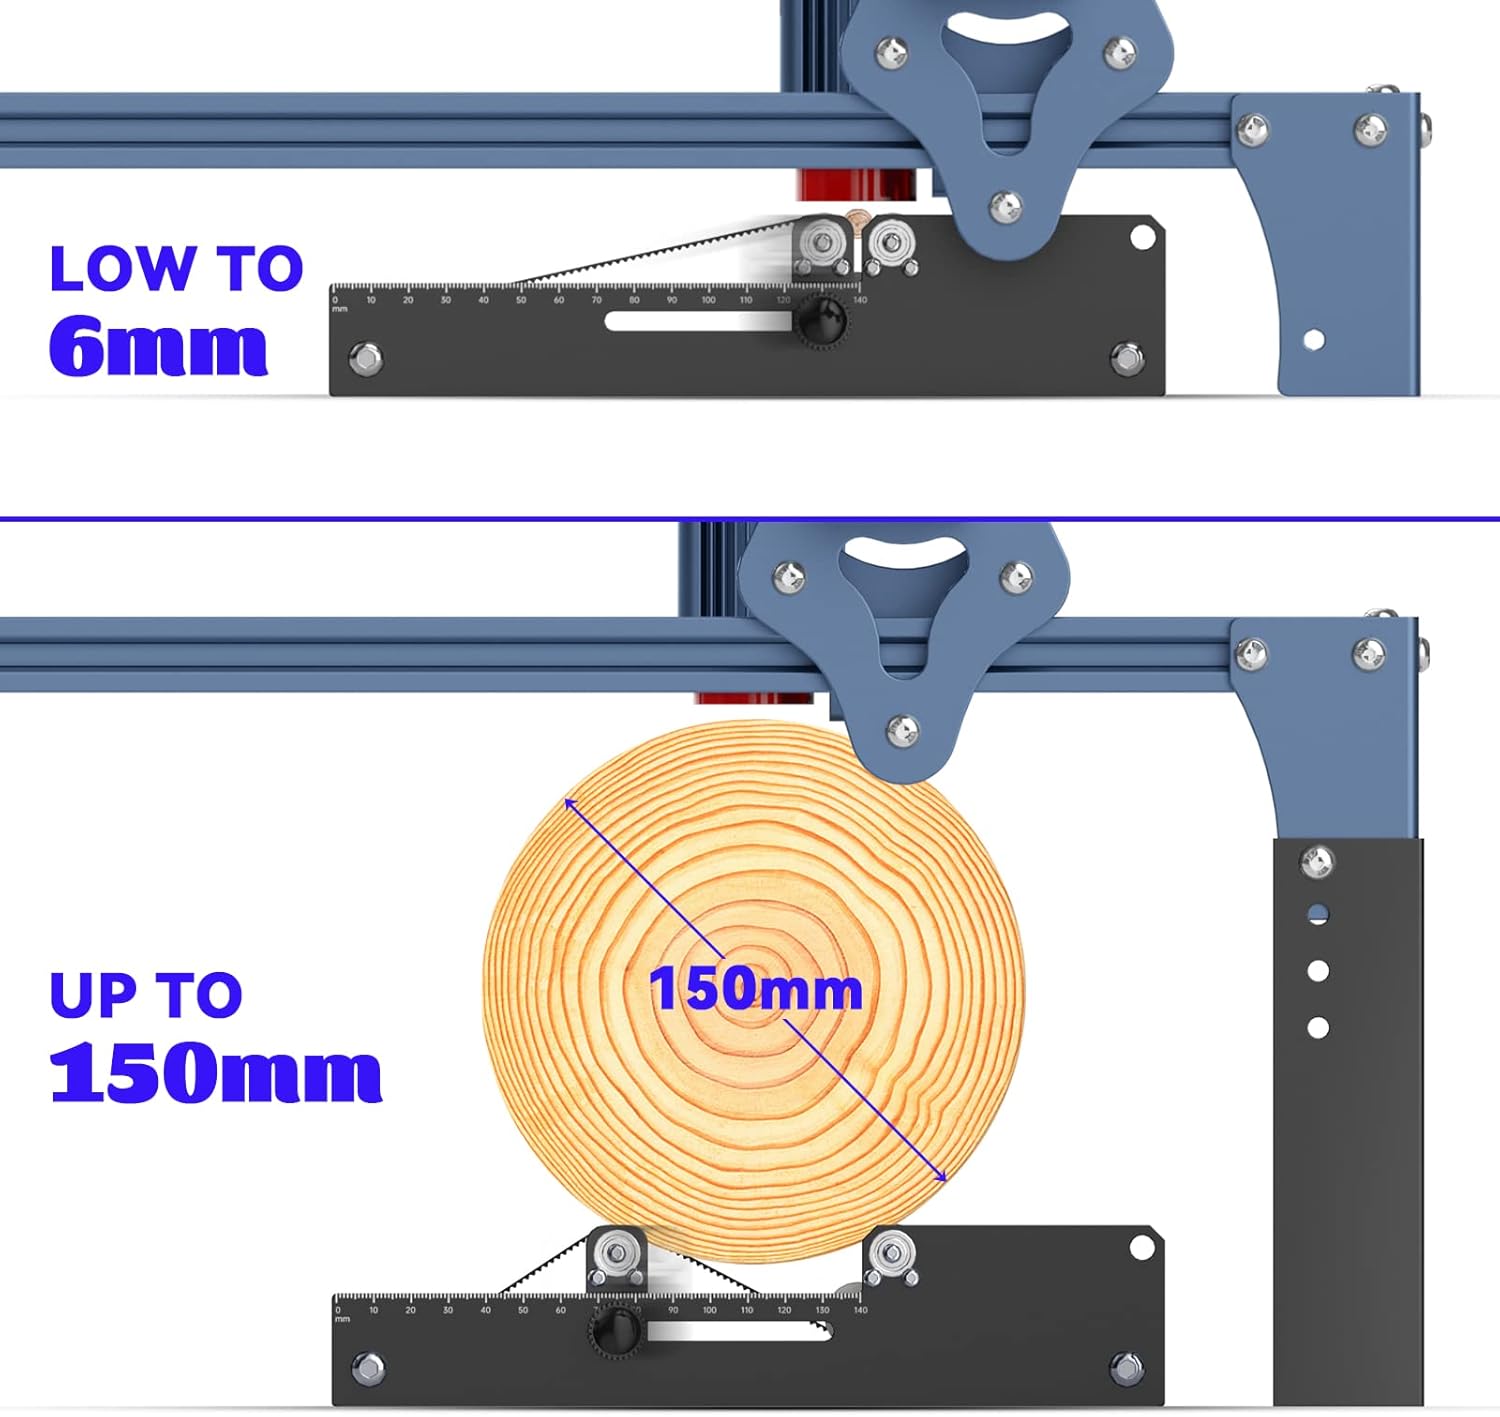
Figure 11: The rotary roller supports objects from 6mm to 150mm in diameter.
10. Warranty and Support
For information regarding warranty coverage, technical support, or service, please refer to the official SCULPFUN website or contact their customer service directly. Details are typically provided with your purchase documentation or on the manufacturer's product page.

