1. Introduction
Thank you for choosing the CREWORKS Commercial Ice Maker. This manual provides essential information for the safe and efficient operation, installation, and maintenance of your ice maker. Please read it thoroughly before use and retain it for future reference.
This commercial ice maker is designed for various environments, making it ideal for homes, pubs, bars, offices, restaurants, cafes, and more.

Image 1.1: CREWORKS Commercial Ice Maker producing ice cubes.
2. Safety Instructions
- Ensure the power supply matches the specifications of the ice maker (220 Volts, 480 Watts).
- Do not operate the appliance with a damaged cord or plug.
- Keep the ice maker away from heat sources and direct sunlight.
- Ensure proper ventilation around the unit. Maintain adequate clearance from walls and other appliances.
- Do not immerse the appliance, cord, or plug in water or other liquids.
- Unplug the ice maker before cleaning or performing any maintenance.
- This appliance is not intended for use by persons with reduced physical, sensory, or mental capabilities unless supervised.
- Use only potable water for ice production.
3. Product Overview
3.1 Components and Features
- Control Panel: Simple and clear LCD display for operation and settings.
- Ice Storage Bin: Integrated storage with a capacity of 10 kg.
- Ice Scoop: For hygienic ice retrieval.
- Water Inlets: Two options for water supply (bottled water or direct tap connection).
- Drain Outlet: For water drainage.
- Material: Constructed from food-grade, corrosion-resistant stainless steel for durability and hygiene.
- Cooling System: Efficient system for continuous ice production.
- Quiet Operation: Operates below 45 dB.

Image 3.1: Key features including control panel, cooling system, and stainless steel.

Image 3.2: Detailed view of the smart control panel.
4. Setup
4.1 Unpacking and Placement
- Carefully remove the ice maker from its packaging.
- Place the unit on a flat, stable surface capable of supporting its weight (approximately 23 kg).
- Ensure there is sufficient space around the ice maker for proper ventilation, especially at the back and sides where air vents are located.
- Avoid placing the unit near heat-generating appliances or in direct sunlight.
4.2 Water Supply Connection
The ice maker offers two options for water supply:
- Option 1: Direct Tap Connection: Connect the ice maker to a cold water tap using the provided water inlet pipe and filter. Ensure all connections are secure to prevent leaks.
- Option 2: Bottled Water Supply: Place a suitable bottled water dispenser on top of the unit, ensuring it is properly seated and sealed.
Ensure the water inlet temperature is below 5℃ for optimal ice production.

Image 4.1: Water supply connection options.
4.3 Power Connection
Plug the power cord into a grounded electrical outlet that meets the specified voltage and wattage requirements.
5. Operating Instructions
5.1 Initial Start-up
- After connecting the water and power, press the Power button on the control panel to turn on the unit.
- The unit will begin the ice-making cycle automatically.
- The first few batches of ice may be smaller or irregular. Discard these initial batches.
5.2 Ice Production
The ice maker produces 36 cubes per batch at a rate of 58 kg per day under optimal conditions (water temperature below 5℃).

Image 5.1: Ice production capacity and requirements.
5.3 Adjusting Ice Cube Thickness
The control panel allows for adjustment of ice cube thickness. Thicker cubes take longer to produce but melt slower.
- Small (S): 10-12 minutes
- Medium (M): 12-15 minutes
- Large (L): 15-20 minutes
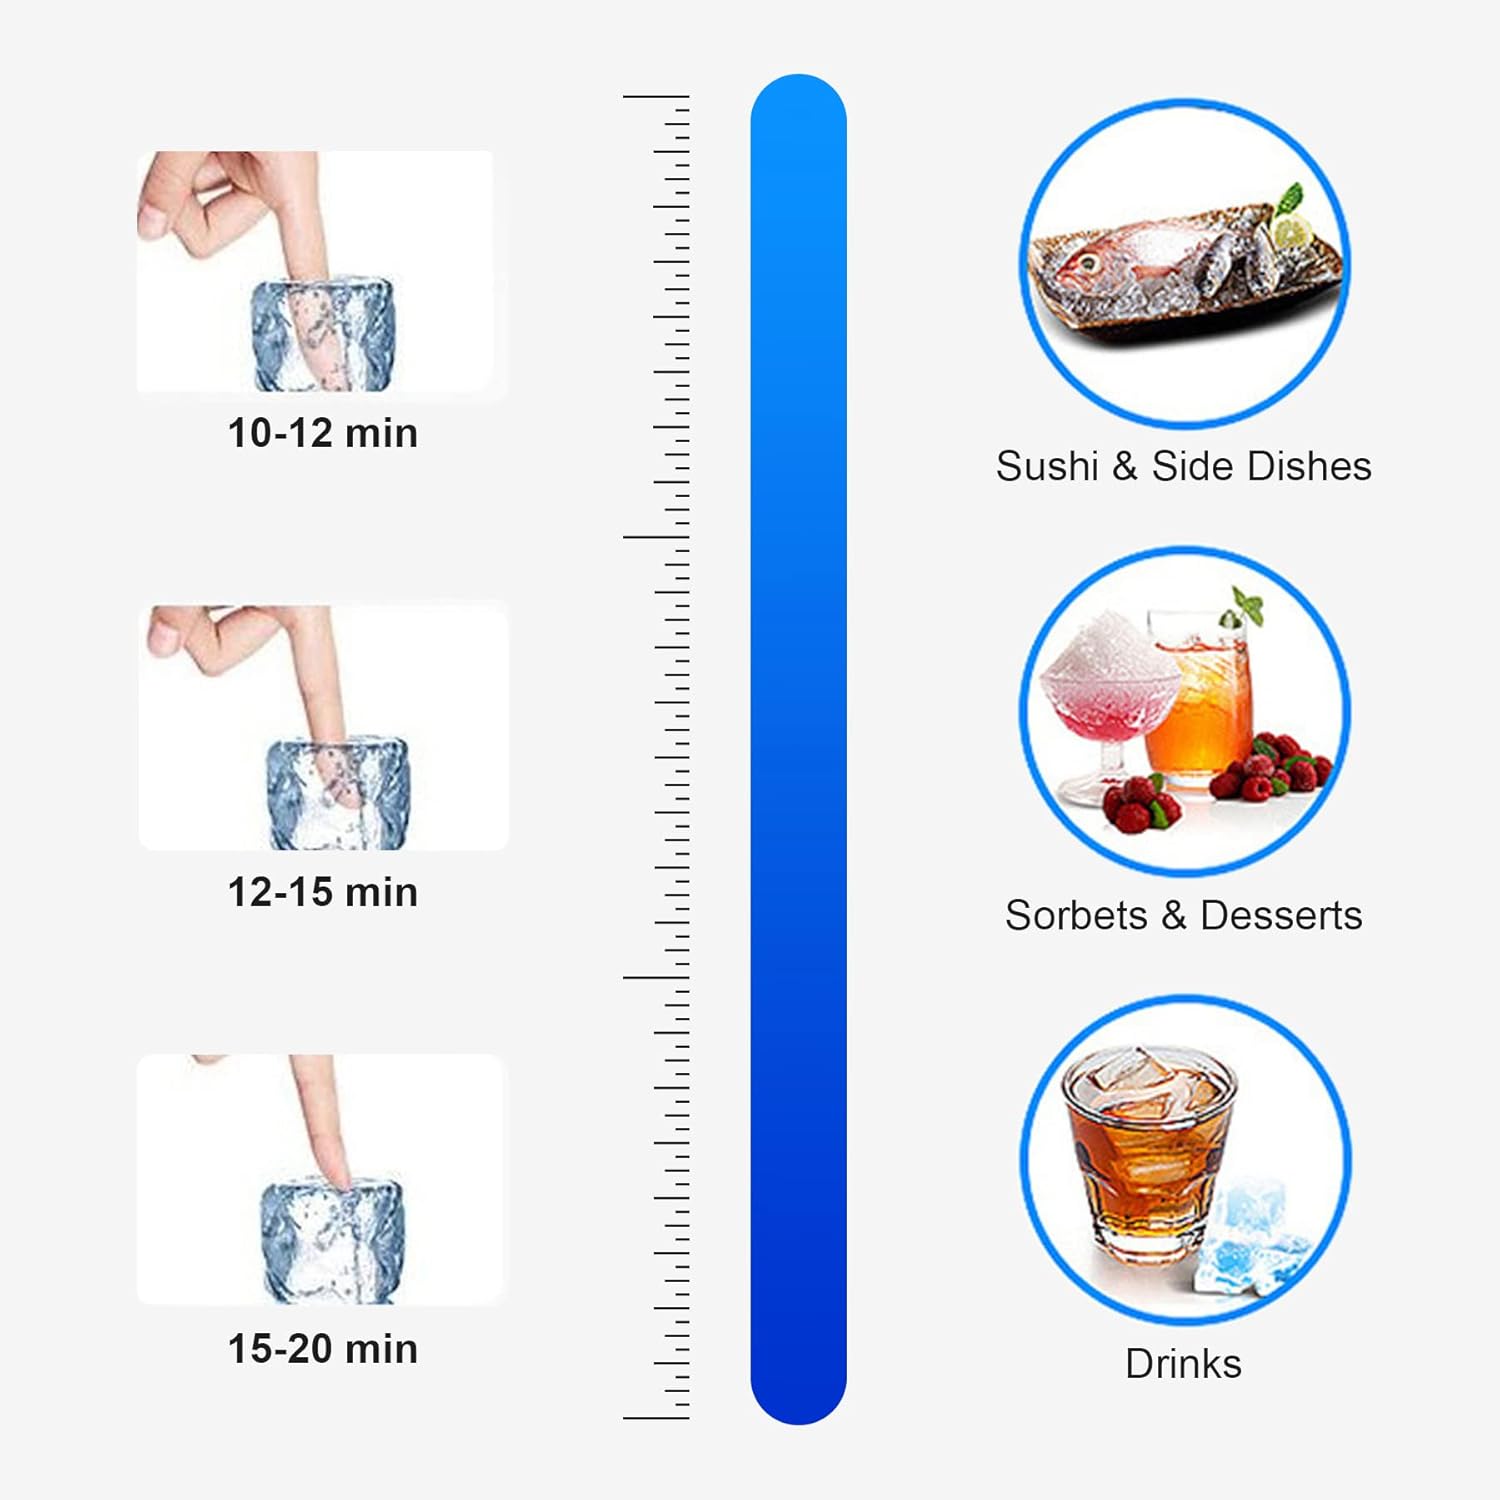
Image 5.2: Ice cube thickness options and applications.
5.4 Automatic Start/Stop
You can program the ice maker to start and stop automatically using the control panel, ensuring ice is available when needed.
6. Maintenance
6.1 Cleaning
The ice maker features a one-button self-cleaning function. Regular cleaning is essential for hygiene and optimal performance.
- Press the Cleaning button on the control panel to initiate the self-cleaning cycle.
- For thorough cleaning, periodically clean the interior surfaces, ice storage bin, and water reservoir with a mild detergent and warm water. Rinse thoroughly.
- Clean the exterior with a soft, damp cloth.
6.2 Descaling
Depending on water hardness, descaling may be required periodically to remove mineral buildup. Use a food-safe descaling solution according to the manufacturer's instructions.
6.3 Air Filter Cleaning
Regularly clean the air filter located on the side or back of the unit to ensure efficient cooling and prevent dust buildup.

Image 6.1: Rear view showing water inlet/outlet and ventilation.
7. Troubleshooting
| Problem | Possible Cause | Solution |
|---|---|---|
| No ice production | No water supply; power issue; ambient temperature too high. | Check water connection and supply; ensure unit is plugged in; move to a cooler location. |
| Ice cubes are too small | Water temperature too high; insufficient cooling. | Ensure water inlet temperature is below 5℃; clean air filter; ensure proper ventilation. |
| Water leakage | Loose water connections; clogged drain. | Tighten all water inlet/outlet connections; clear any blockages in the drain hose. |
| Unit not turning on | No power; faulty power cord/plug. | Check power outlet; inspect power cord for damage. |
| Error codes on display | Refer to specific error code in a more detailed manual (if available) or contact support. | Consult the full user manual or contact CREWORKS customer support. |
8. Specifications
- Brand: CREWORKS
- Model Name: CREWORKS (CIM-9036)
- Manufacturer Reference: CIM-9036
- Product Dimensions (L x W x H): 36 x 43 x 76 cm
- Weight: 23 kilograms
- Capacity (Ice Storage): 10 Kilograms
- Power: 480 Watts
- Voltage: 220 Volts
- Refrigerant: R600a
- Material: Stainless Steel
- Country of Origin: China

Image 8.1: Product dimensions and suitable applications.
9. Warranty and Support
For warranty information and customer support, please refer to the documentation provided with your purchase or contact CREWORKS customer service directly.
Spare Parts Availability: Information unavailable.


