Introduction
Thank you for choosing the BALDR Wireless Weather Station B-E0666. This device provides accurate indoor and outdoor temperature and humidity readings, along with weather forecasts, an alarm clock, and a calendar. Please read this manual carefully to ensure proper setup and operation.
Product Overview
Key Features:
- Indoor/Outdoor Temperature & Humidity: Monitors environmental conditions with a wireless outdoor sensor.
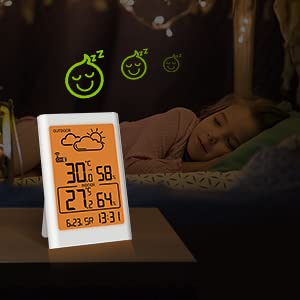
- Weather Forecast: Displays weather trends for the next 12-24 hours (Sunny, Partly Cloudy, Cloudy, Rainy, Snowy, Stormy).
- Warm Orange Backlight: 20-second automatic backlight for easy reading in low light conditions.
- Max/Min Records: Tracks highest and lowest temperature and humidity values.
- Alarm & Snooze Function: Integrated alarm clock with a snooze option.
- Calendar & Time Display: Displays current date and time in 12/24 hour format.
- Versatile Placement: Can be placed on a table stand or mounted on a wall.
Components:
- Main Weather Station Unit
- Wireless Outdoor Sensor

Setup
1. Battery Installation:
The weather station and outdoor sensor require batteries (not included).
- Main Unit: Open the battery compartment cover on the back of the main unit. Insert 2 x AAA batteries, observing the correct polarity (+/-). Close the cover.
- Outdoor Sensor: Open the battery compartment cover on the back of the outdoor sensor. Insert 2 x AAA batteries, observing the correct polarity (+/-). Close the cover.
Note: Always install batteries in the outdoor sensor first, then in the main unit, to ensure proper synchronization.
2. Sensor Placement:
Place the outdoor sensor in a shaded, dry location away from direct sunlight and precipitation. Ensure it is within the wireless range of the main unit (typically up to 30 meters/100 feet in open air). Avoid placing it near large metal objects or electronic devices that may interfere with the signal.
3. Initial Synchronization:
After battery installation, the main unit will automatically search for the outdoor sensor. This process may take a few minutes. Once connected, the outdoor temperature and humidity will appear on the main unit's display.
4. Time and Date Setting:
The time and date must be set manually.
- Locate the 'SET' button (usually on the back or side of the unit).
- Press and hold 'SET' to enter time/date setting mode.
- Use the '+' or '-' buttons to adjust values (e.g., hour, minute, year, month, day).
- Press 'SET' again to confirm each setting and move to the next.
- Once all settings are complete, the unit will return to normal display mode.

Operating Instructions
1. Display Information:
The LCD screen displays the following information:
- Outdoor Temperature & Humidity
- Indoor Temperature & Humidity
- Weather Forecast Icon
- Time (12/24 hour format)
- Date & Day of the Week
- Battery Low Indicator (for main unit and sensor)

2. Backlight Function:
Touch the top button of the main unit to activate the warm orange backlight. The backlight will automatically turn off after 20 seconds to conserve energy.
3. Max/Min Temperature & Humidity Records:
- Press the 'MAX/MIN' button once to view the maximum recorded temperature and humidity.
- Press 'MAX/MIN' again to view the minimum recorded temperature and humidity.
- To clear the records, press and hold the 'MAX/MIN' button while viewing the records.
4. Alarm and Snooze:
- Setting Alarm: Press the 'ALARM' button to enter alarm setting mode. Use '+' or '-' to adjust the alarm time. Press 'ALARM' again to confirm.
- Activating/Deactivating Alarm: Press 'ALARM' once to toggle the alarm on/off. An alarm icon will appear/disappear on the display.
- Snooze Function: When the alarm sounds, press the top button to activate snooze. The alarm will sound again after a few minutes. To stop the alarm, press any other button.
5. Temperature Unit Selection (°C/°F):
Press the '°C/°F' button (usually on the back) to switch between Celsius and Fahrenheit temperature units.
6. Outdoor Sensor Channel Selection:
If you have multiple outdoor sensors (up to 3 supported), press the 'CH' button to cycle through the channels (CH1, CH2, CH3) or to enable automatic cycling between channels.
Maintenance
- Battery Replacement: Replace batteries in both the main unit and outdoor sensor when the low battery indicator appears on the display. Always replace all batteries at the same time.
- Cleaning: Clean the device with a soft, damp cloth. Do not use abrasive cleaners or solvents.
- Environmental Considerations: Ensure the outdoor sensor is protected from extreme weather conditions to prolong its lifespan.
Troubleshooting
- No Outdoor Reading:
- Check if batteries are correctly installed in both units.
- Ensure the outdoor sensor is within range of the main unit.
- Press and hold the 'CH' button on the main unit to force a resynchronization.
- Try moving the sensor closer to the main unit or to a different location to avoid interference.
- Inaccurate Readings:
- Ensure the outdoor sensor is not in direct sunlight or near heat sources.
- Allow both units to stabilize for at least 30 minutes after setup.
- Display Not Working:
- Check battery levels and replace if necessary.
- Perform a hard reset by removing all batteries from both units for a few minutes, then reinserting them (sensor first).

Specifications
| Model Number | B-E0666 |
| Manufacturer | BALDR |
| Dimensions (Package) | 15.2 x 13.9 x 3.3 cm |
| Weight | 220 grams |
| Color | Ivory |
| Power Source | Battery Powered (AAA batteries, not included) |
| Display Type | LCD |
| Special Features | Alarm, Wireless |
Warranty and Support
For warranty information or technical support, please refer to the documentation included with your purchase or contact BALDR customer service directly. Keep your purchase receipt as proof of purchase.


