1. Introduction
The XTOOL D8W is an advanced wireless OBD2 diagnostic scanner designed for comprehensive vehicle analysis and maintenance. This device offers a wide range of functions including full system diagnostics, bidirectional controls, ECU coding, and numerous special service functions. It features a wireless VCI for stable and fast data transfer, supporting modern vehicle protocols like CANFD and DoIP, and includes FCA AutoAuth capabilities.
This manual provides detailed instructions for setting up, operating, maintaining, and troubleshooting your XTOOL D8W diagnostic tool to ensure optimal performance and accurate vehicle diagnostics.

Figure 1: XTOOL D8W Diagnostic Scanner and Components.
2. Setup
2.1 Package Contents
Verify that all components are present in the package:
- XTOOL D8W Tablet
- Wireless VCI (Vehicle Communication Interface)
- Charging Cable
- User Manual (this document)
- Carrying Case
2.2 Initial Power On and Charging
The XTOOL D8W tablet is equipped with a built-in Lithium Ion battery. Before first use, ensure the device is fully charged. Connect the charging cable to the tablet and a power source. The charging indicator will illuminate.
2.3 Connecting the Wireless VCI
The D8W utilizes a wireless VCI for communication with the vehicle. This VCI connects to the vehicle's OBD2 port and communicates with the tablet via Wi-Fi.
- Locate the vehicle's OBD2 port, typically under the dashboard on the driver's side.
- Plug the wireless VCI securely into the OBD2 port. The VCI's indicator light will show a successful connection.
- On the D8W tablet, ensure Wi-Fi is enabled. The tablet will automatically detect and connect to the VCI. This wireless connection offers a range of up to 66 feet and data transfer speeds up to 64 Mbps.

Figure 2: Wireless VCI connection process.
2.4 Software Updates
The XTOOL D8W includes 3 years of free software updates. Regular updates ensure compatibility with new vehicle models and access to the latest diagnostic functions.
- Connect the tablet to a stable internet connection (Wi-Fi).
- Navigate to the "Updates" section on the tablet's main menu.
- Follow the on-screen prompts to download and install available updates.
2.5 Language Settings
The device supports over 23 languages. To change the language:
- Go to "Settings" on the main menu.
- Select "Language" and choose your preferred language.
- If your desired language is not listed or requires activation, contact XTOOL support with your device's serial number.

Figure 3: Multilingual support interface.
3. Operating the XTOOL D8W
3.1 Vehicle Connection and Identification
After connecting the VCI to the vehicle's OBD2 port and ensuring a wireless connection to the tablet:
- Select "Diagnosis" from the main menu.
- The device supports AutoVIN for automatic vehicle identification and AutoScan to scan all available Electronic Control Units (ECUs).
- Alternatively, you can manually select the vehicle make, model, and year.
3.2 Full System Diagnostics
The D8W performs dealer-level diagnostics across all available vehicle systems, including Engine, ABS, SRS, Transmission, HVAC, TPMS, and more.
- Read DTCs: Retrieve diagnostic trouble codes from all systems.
- Clear DTCs: Erase stored trouble codes after repairs.
- Live Data: View real-time data streams from various sensors and components.
- Freeze Frame: Capture a snapshot of vehicle conditions when a DTC was set.
- ECU Information: Display detailed information about the vehicle's ECUs.
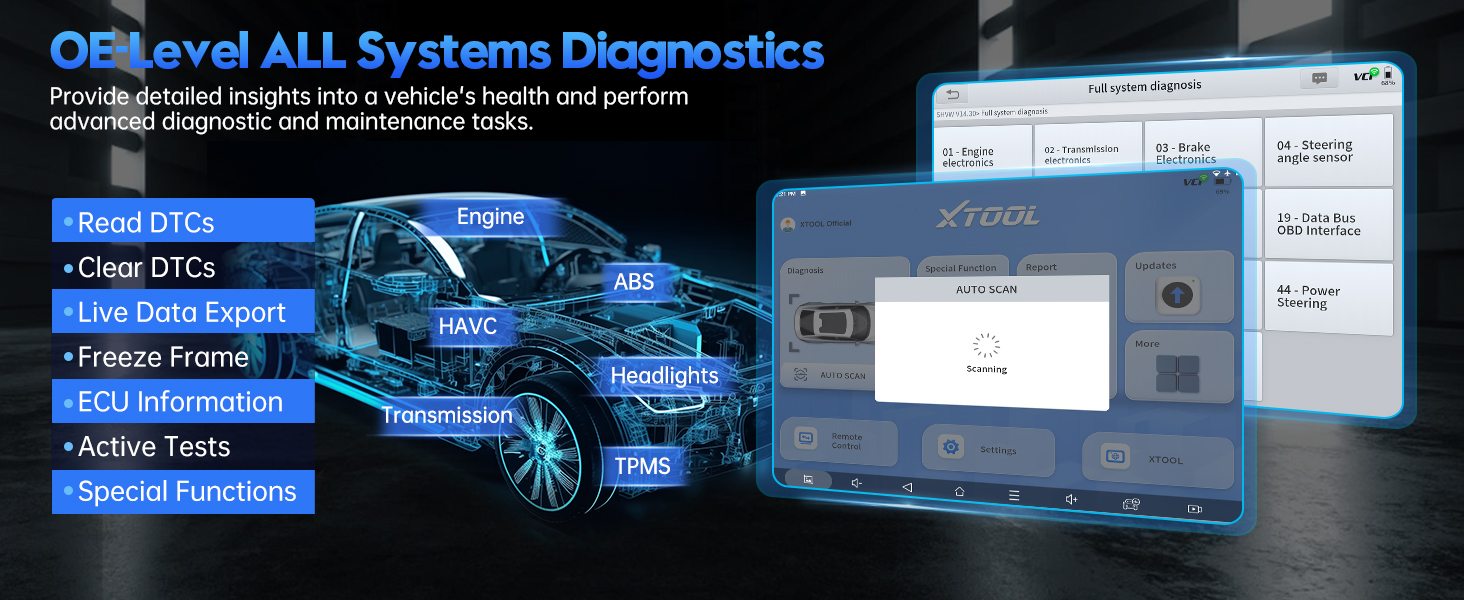
Figure 4: Overview of OE-level all systems diagnostics.
3.3 Topology Mapping
The Topology Mapping feature provides a visual representation of the vehicle's communication network, showing the status of each module and simplifying fault detection.
- Access Topology Mapping from the main diagnosis screen.
- Modules are displayed with color-coded indicators for their status (e.g., green for normal, red for fault).
- Click on a module to view specific details or DTCs.
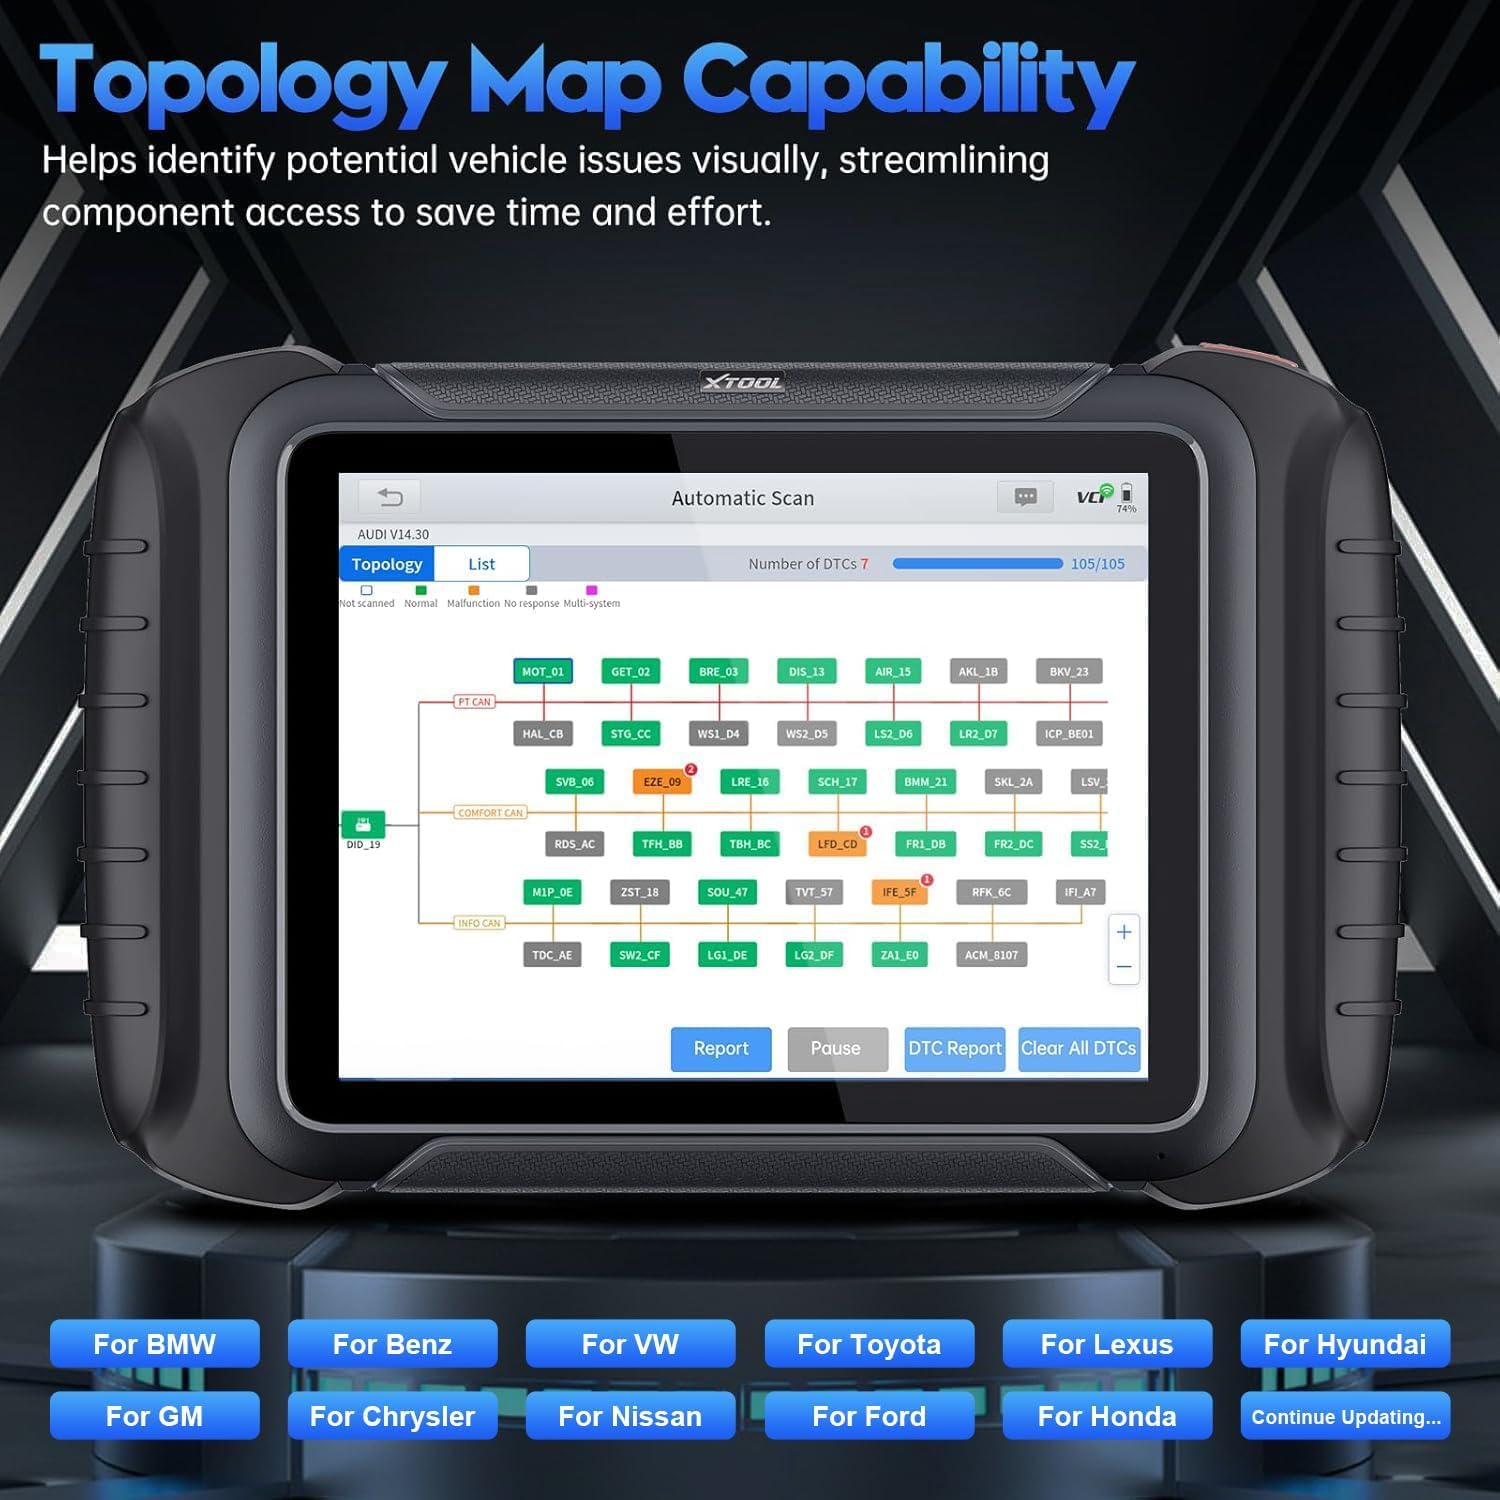
Figure 5: Topology Map capability for visual fault identification.
3.4 Bidirectional Controls (Active Tests)
Perform active tests to command vehicle components to perform specific functions, aiding in troubleshooting and component verification. The D8W supports over 4000 active tests.
- Examples include testing A/C clutch engagement, operating mirrors, wipers, sunroof, fuel pumps, and various valves.
- Navigate to "Active Tests" within the diagnostic menu for the relevant system.
- Follow on-screen instructions to perform tests safely.

Figure 6: Bidirectional controls interface for active component testing.
3.5 Special Functions (42+ Resets/Adaptations)
The D8W offers a wide array of special service functions for maintenance and repair tasks. These functions vary by vehicle make and model.
- Common functions include: Oil Light Reset, Throttle Relearn, Electronic Parking Brake (EPB) Reset, Steering Angle Sensor (SAS) Calibration, Gearbox Match, Battery Management System (BMS) Reset, Injector Coding, Diesel Particulate Filter (DPF) Regeneration, Crank Sensor Relearn, Tire Pressure Monitoring System (TPMS) Reset, Power Balance, Tire Size Reset, Air/Fuel (A/F) Reset, Headlight Adjustment, Coolant Bleeding, Suspension Calibration, Seat Match, ECU Configurations, ABS Bleeding, Stop/Start Reset, Language Change, Control Unit Reset, Rain/Light Sensor Calibration, A/C Relearn, HV Battery Diagnostics, VGT Relearn, FRM Reset, SRS (Airbag) Reset, Clutch Adaptation.
- Access these functions via the "Special Function" menu.
- Note: Compatibility for specific functions varies by vehicle. Always verify compatibility before proceeding.

Figure 7: Examples of advanced maintenance selections.
3.6 ECU Coding and Configuration
The D8W supports advanced ECU Coding for certain vehicle brands (e.g., Benz, BMW, Mitsubishi). This allows for customization of vehicle settings and activation of hidden functions.
- Follow the guided procedures carefully. Incorrect coding can lead to vehicle malfunctions.
- The device also supports Programmable Module Installation (PMI) for Ford, Lincoln, and Mazda vehicles, enabling data transfer to new modules during replacement.
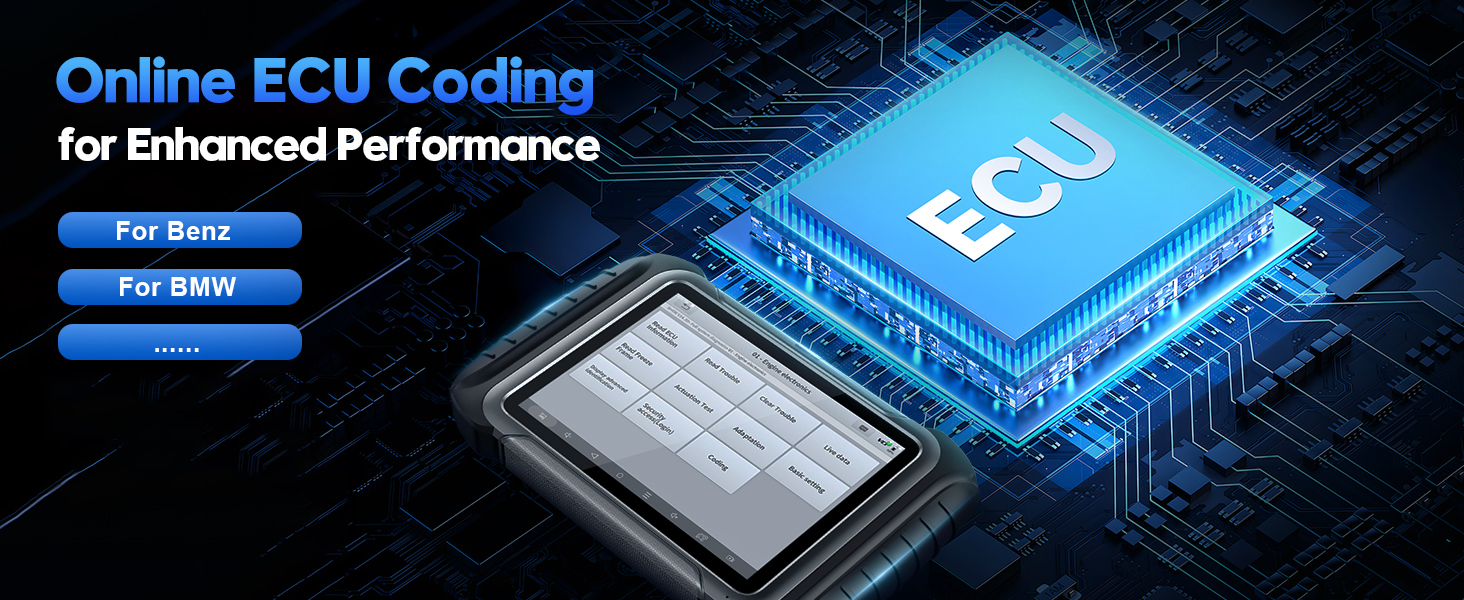
Figure 8: Online ECU Coding interface.

Figure 9: Programmable Module Installation (PMI) in progress.
3.7 Live Data Graphing and Recording
Monitor up to 8 live data parameters simultaneously with graphical display. Data can be recorded, played back, and exported as a CSV file for detailed analysis.

Figure 10: Live data recording and graphing interface.
3.8 Pre-Scan and Post-Scan Functions
Utilize the Pre-Scan function to identify potential issues and DTCs before repairs. After repairs, perform a Post-Scan to confirm all issues are resolved and validate vehicle performance.

Figure 11: Pre-Scan and Post-Scan diagnostic results.
3.9 Diagnostic Report 2.0
Generate comprehensive and customizable diagnostic reports (V2.0) that can be saved or emailed. These reports provide a clear overview of vehicle health and diagnostic findings.

Figure 12: Example of Diagnostic Report 2.0.
3.10 FCA AutoAuth
The D8W supports FCA AutoAuth for accessing protected modules in 2018+ Chrysler, Jeep, Dodge, and 2017+ Fiat vehicles. This requires an active AutoAuth account.
- Follow the on-screen prompts to log in with your AutoAuth credentials when prompted.
- Note: FCA support is primarily for North America. For other regions, an XTOOL 12+8 adapter may be required.

Figure 13: FCA AutoAuth login interface.
4. Maintenance
4.1 Software Updates
Regularly check for and install software updates as described in Section 2.4. This ensures your device has the latest vehicle coverage and diagnostic capabilities.
4.2 Cleaning the Device
Use a soft, damp cloth to clean the tablet screen and body. Avoid abrasive cleaners or solvents that could damage the device. Ensure the VCI is free of debris before connecting to the OBD2 port.
4.3 Battery Care
To prolong battery life, avoid fully discharging the device frequently. Store the device in a cool, dry place when not in use for extended periods.
5. Troubleshooting
| Problem | Possible Cause | Solution |
|---|---|---|
| Device does not power on. | Low battery; power button not pressed correctly. | Charge the device for at least 30 minutes. Press and hold the power button for 3-5 seconds. |
| VCI not connecting wirelessly. | VCI not properly seated; Wi-Fi disabled on tablet; VCI malfunction. | Ensure VCI is firmly plugged into OBD2 port. Check tablet Wi-Fi settings. Restart both tablet and VCI. |
| Vehicle communication error. | Incorrect vehicle selection; VCI connection issue; vehicle's ignition off. | Verify vehicle information. Ensure VCI is connected. Turn vehicle ignition to ON position (engine off). |
| Specific function not working. | Vehicle incompatibility; software not updated. | Check vehicle compatibility for the specific function. Perform a software update. Contact XTOOL support for assistance. |
| Slow live data refresh rate. | Network interference; large number of PIDs selected. | Ensure stable Wi-Fi connection. Reduce the number of live data PIDs being monitored simultaneously. |
For issues not listed here, please refer to the support section or contact XTOOL technical support.
6. Specifications
| Feature | Detail |
|---|---|
| Model | XTOOL D8W |
| Operating System | Android 10.0 |
| Memory | 4GB RAM + 64GB Storage |
| Connectivity | Wireless Wi-Fi VCI (up to 64 Mbps, 66 ft range), CANFD, DoIP |
| Display | 8-inch screen |
| Battery | 1 Lithium Ion battery (included) |
| Dimensions | 12.5 x 11 x 3.8 inches |
| Item Weight | 5.48 pounds |
| Supported Protocols | CANFD, DoIP, FCA AutoAuth |
| UPC | 753124715489 |
7. Warranty and Support
7.1 Warranty Information
The XTOOL D8W comes with a 24-month brand warranty from the date of purchase, covering manufacturing defects and malfunctions under normal use.
Additionally, the device includes 3 years of free software updates. After the initial 3 years, you can continue to use the last updated functions even without renewal.
7.2 Technical Support
XTOOL provides lifetime technical support for the D8W. If you encounter any issues or require assistance, please contact our support team.
- Email Support: xtoolofficial@hotmail.com (as indicated in product information)
- Support is available 24/7/365.
- When contacting support, please provide your device's serial number (S/N) for faster service.

Figure 14: Overview of warranty and support benefits.


