1. Important Safety Instructions
Please read all instructions carefully before using the H.Koenig HOMY90 Automatic Pasta Machine. Keep this manual for future reference.
- Ensure the appliance is connected to a grounded power outlet with the correct voltage.
- Do not immerse the motor unit in water or any other liquid.
- Keep hands and utensils away from moving parts during operation.
- Always unplug the machine before cleaning, assembling, or disassembling parts.
- This appliance is not intended for use by persons with reduced physical, sensory, or mental capabilities, or lack of experience and knowledge, unless they have been given supervision or instruction concerning use of the appliance by a person responsible for their safety.
- Children should be supervised to ensure that they do not play with the appliance.
- Do not operate the appliance if the power cord or plug is damaged, or if the appliance malfunctions or has been damaged in any way.
- Use only original accessories and parts provided by the manufacturer.
2. Product Overview
The H.Koenig HOMY90 is an automatic pasta machine designed for easy preparation of fresh pasta. It features an integrated scale, automatic programs, and various pasta dies.
Components
- Main Motor Unit
- Mixing Chamber
- Lid with Safety Lock
- Extrusion Head
- Dough Mixing Paddle
- 7 Pasta Dies (Spaghetti, Penne, Lasagna, Fettuccine, Tagliatelle, etc.)
- Ravioli Cutter
- Cleaning Brush
- Water Measuring Cup
- Flour Measuring Cup
- Integrated Storage Drawer for Dies

Figure 2.1: Exploded view showing the main unit, mixing chamber, extrusion head, various pasta dies, measuring cups, and cleaning brush.
3. Setup and Assembly
3.1 Unpacking
- Carefully remove all components from the packaging.
- Remove any protective films or packaging materials.
- Verify that all listed components are present and undamaged.
3.2 Cleaning Before First Use
Before initial use, clean all detachable parts that will come into contact with food. Refer to the 'Maintenance and Cleaning' section for detailed instructions.
3.3 Assembly
- Place the main motor unit on a stable, flat, and dry surface.
- Insert the mixing chamber into the main unit, ensuring it is securely seated.
- Attach the dough mixing paddle inside the mixing chamber.
- Select the desired pasta die and insert it into the extrusion head.
- Attach the extrusion head assembly to the front of the mixing chamber, twisting to lock it into place.
- Place the lid onto the mixing chamber and rotate it clockwise until it locks securely. The machine will not operate if the lid is not properly locked.
4. Operation
4.1 Powering On and Control Panel
Plug the machine into a power outlet. The LCD screen will illuminate. The control panel allows you to select programs and start/stop the process.
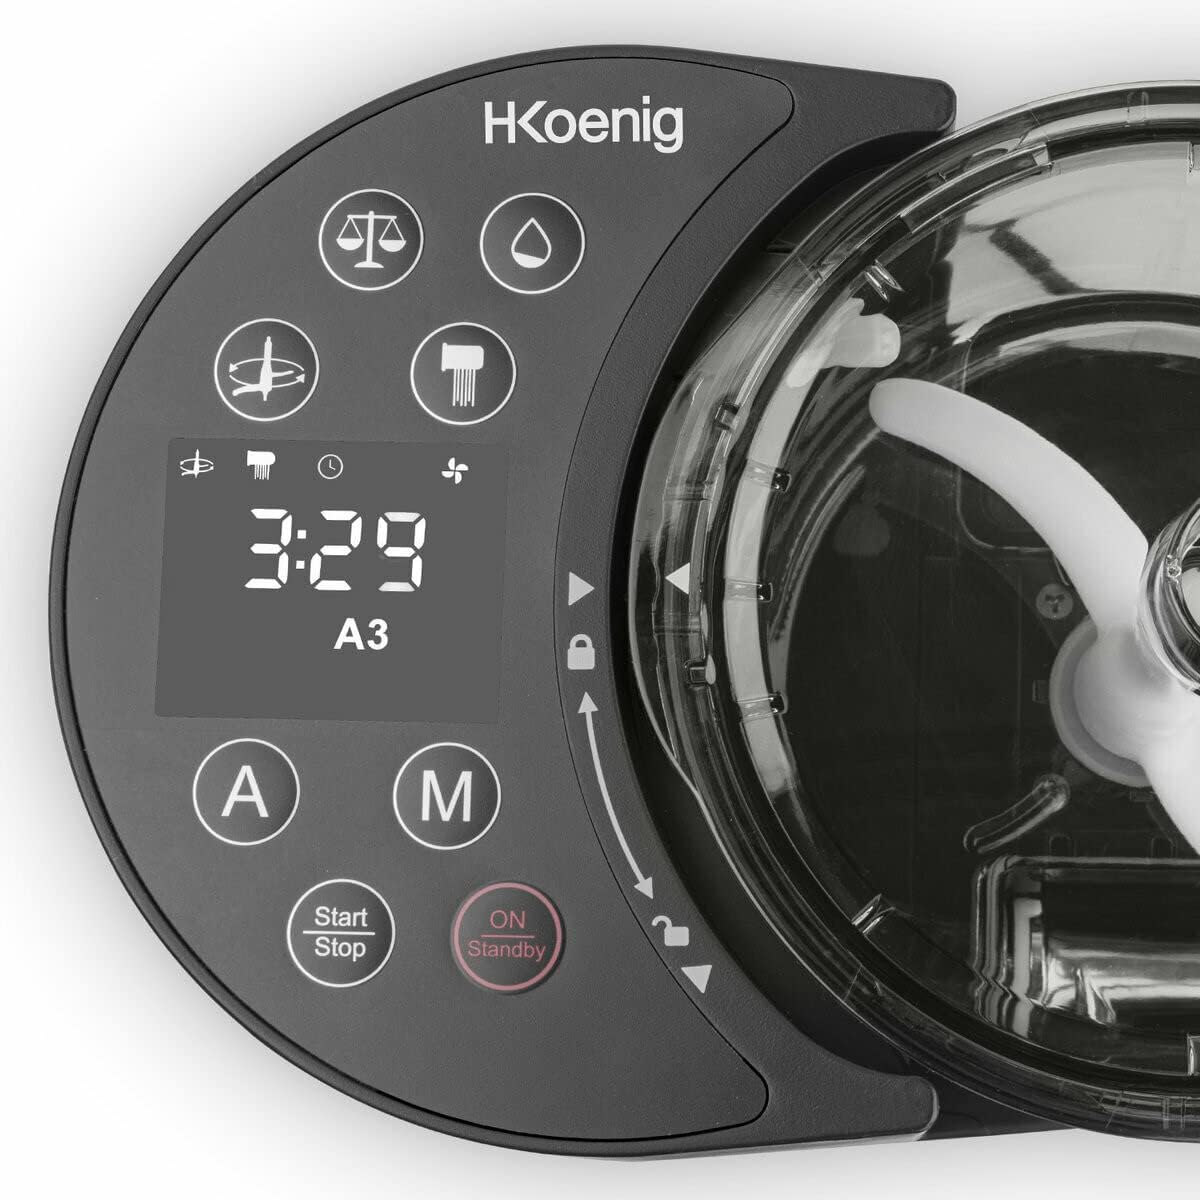
Figure 4.1: The control panel features an LCD display, automatic (A) and manual (M) program buttons, and Start/Stop/On/Standby buttons.
4.2 Preparing Ingredients
The machine has an integrated scale for precise measurement of ingredients. For optimal results, use the provided measuring cups and follow recommended ratios.
- Flour: Add up to 600g of flour directly into the mixing chamber. The integrated scale will display the weight.
- Liquid: For every 100g of flour, typically use 35-40ml of liquid (water or egg mixture). The total liquid capacity is 375ml.
- Gluten-Free Pasta: The machine supports gluten-free pasta. Ensure you use appropriate gluten-free flour and follow specific recipes for best results.
4.3 Selecting a Program
The HOMY90 offers 6 automatic programs and 2 manual programs.
- Press the 'A' button for automatic programs or 'M' for manual.
- Use the arrow buttons to cycle through the available programs on the LCD screen.
- Each program has a pre-set mixing and extrusion time.
- For gluten-free pasta, select the dedicated gluten-free automatic program.
4.4 Making Pasta
- Ensure the machine is assembled correctly and the lid is locked.
- Add the measured flour to the mixing chamber.
- Select your desired program.
- Press the 'Start/Stop' button to begin. The machine will start mixing.
- Slowly pour the liquid (water/egg mixture) into the small opening on the lid while the machine is mixing.
- The machine will mix the dough for a set period, then automatically switch to extrusion mode.
- As the pasta extrudes, use the provided ravioli cutter or a knife to cut the pasta to your desired length.

Figure 4.2: The machine extruding fresh spaghetti pasta.
4.5 Changing Pasta Dies
The machine comes with 7 different pasta dies for various pasta shapes.

Figure 4.3: Examples of different pasta shapes that can be made with the included dies.
- To change a die, ensure the machine is off and unplugged.
- Carefully remove the extrusion head assembly.
- Replace the current die with the desired one.
- Reassemble the extrusion head and attach it to the machine.
5. Maintenance and Cleaning
Regular cleaning ensures the longevity and optimal performance of your pasta machine.
5.1 Disassembly for Cleaning
- Always unplug the machine before disassembling.
- Remove the lid, then the extrusion head assembly.
- Remove the mixing paddle and the mixing chamber from the main unit.
- Separate the pasta die from the extrusion head.
5.2 Cleaning Instructions
- Detachable Parts: The mixing chamber, mixing paddle, extrusion head, and pasta dies are dishwasher safe. Alternatively, wash them by hand with warm soapy water and a soft sponge.
- Cleaning Brush: Use the provided cleaning brush to remove any dough residue from the pasta dies, especially from small openings. Allow dough to dry slightly on the dies for easier removal.
- Main Unit: Wipe the main motor unit with a damp cloth. Never immerse it in water.
- Ensure all parts are completely dry before reassembling or storing.
5.3 Storage
The HOMY90 features an integrated storage drawer for the pasta dies, optimizing kitchen space.

Figure 5.1: The integrated storage drawer keeps pasta dies organized and accessible.
- Store the cleaned and dried pasta dies in the integrated drawer.
- Store the machine in a dry, cool place, away from direct sunlight.
6. Troubleshooting
If you encounter issues with your H.Koenig HOMY90, refer to the following table for common problems and solutions.
| Problem | Possible Cause | Solution |
|---|---|---|
| Machine does not start. | Not plugged in; Lid not securely locked; Safety mechanism engaged. | Ensure power cord is fully plugged in. Check that the lid is rotated and locked correctly. |
| Dough is too dry/crumbly. | Insufficient liquid. | Add a small amount of liquid (1-2 teaspoons) gradually until dough reaches desired consistency. |
| Dough is too wet/sticky. | Too much liquid. | Add a small amount of flour (1-2 teaspoons) gradually until dough reaches desired consistency. |
| Pasta does not extrude or extrudes slowly. | Dough consistency incorrect; Die blocked; Machine overloaded. | Adjust dough consistency. Clean the pasta die. Reduce the amount of flour if exceeding 600g. |
| Unusual noise during operation. | Parts not assembled correctly; Foreign object in mixing chamber. | Turn off and unplug the machine. Check assembly of all parts. Inspect mixing chamber for foreign objects. |
7. Technical Specifications
| Feature | Specification |
|---|---|
| Model | HOMY90 |
| Brand | H.Koenig |
| Power | 220 W |
| Flour Capacity | Up to 600g |
| Liquid Capacity | Up to 375ml |
| Programs | 6 Automatic (including Gluten-Free), 2 Manual |
| Pasta Dies | 7 (Spaghetti, Penne, Lasagna, Fettuccine, Tagliatelle, etc.) |
| Dimensions (L x W x H) | 34.5 x 20 x 10 cm |
| Weight | 7 kg |
| Material | Stainless steel (blade), other parts as specified by manufacturer |
| Dishwasher Safe Parts | Yes (mixing chamber, paddle, extrusion head, dies) |
8. Warranty and Support
The H.Koenig HOMY90 Automatic Pasta Machine comes with an extended 2-year warranty.
This warranty covers manufacturing defects and ensures reliable performance for a prolonged period.
For warranty claims, technical assistance, or spare parts, please contact the H.Koenig customer service. A dedicated after-sales service workshop is available in France to provide support.
Please retain your proof of purchase for warranty validation.


