1. Introduction
This manual provides essential information for the safe and efficient operation of your Green Cell Off Grid Inverter with MPPT Solar Charger, model INVSOL03. This device integrates an inverter, MPPT solar charger, and battery charger functions to offer an uninterruptible power supply solution. Please read this manual thoroughly before installation and use, and retain it for future reference.
2. Safety Instructions
Always observe the following safety precautions to prevent injury and damage to the inverter or connected equipment:
- Installation must be performed by qualified personnel.
- Ensure all wiring is correctly sized and properly insulated.
- Do not expose the inverter to rain, snow, spray, or any liquids.
- Do not disassemble the inverter. There are no user-serviceable parts inside.
- Ensure adequate ventilation around the inverter to prevent overheating.
- Connect the inverter to a properly grounded electrical system.
- Before any maintenance or cleaning, disconnect all power sources (AC, DC, and PV).
3. Product Overview
The Green Cell INVSOL03 is a multi-functional inverter designed for off-grid applications, combining the capabilities of a solar charger, battery charger, and inverter into one unit. It provides a pure sine wave output, suitable for sensitive electronics.
3.1 Front Panel and Display
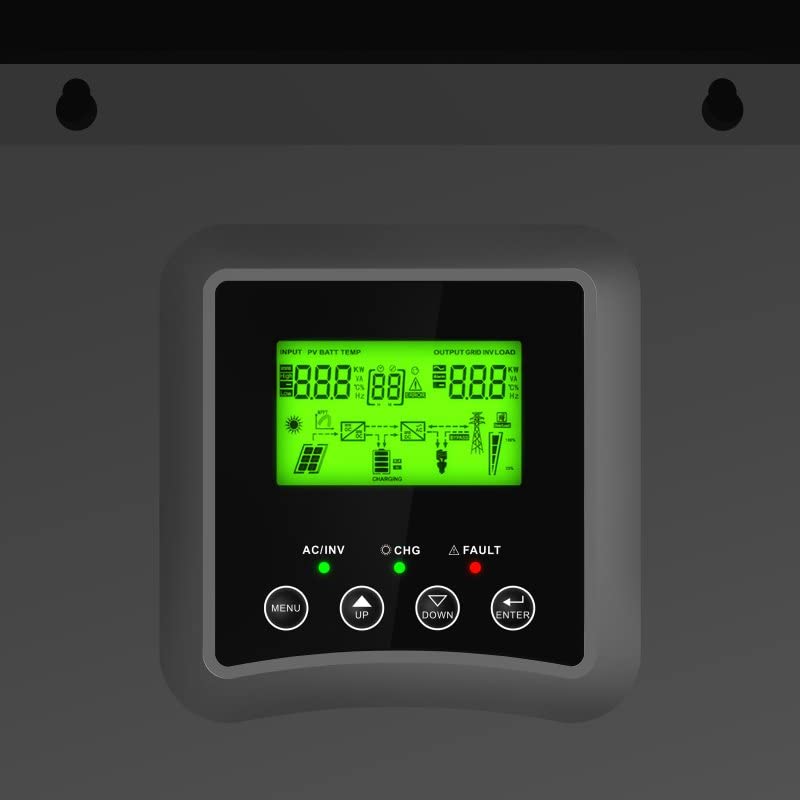
Figure 1: Front panel with LCD display and control buttons (Menu, Up, Down, Enter).
The LCD display provides real-time information on input voltage, battery status, output load, and operational modes. The control buttons allow for navigation through menus and setting adjustments.
3.2 Connection Ports
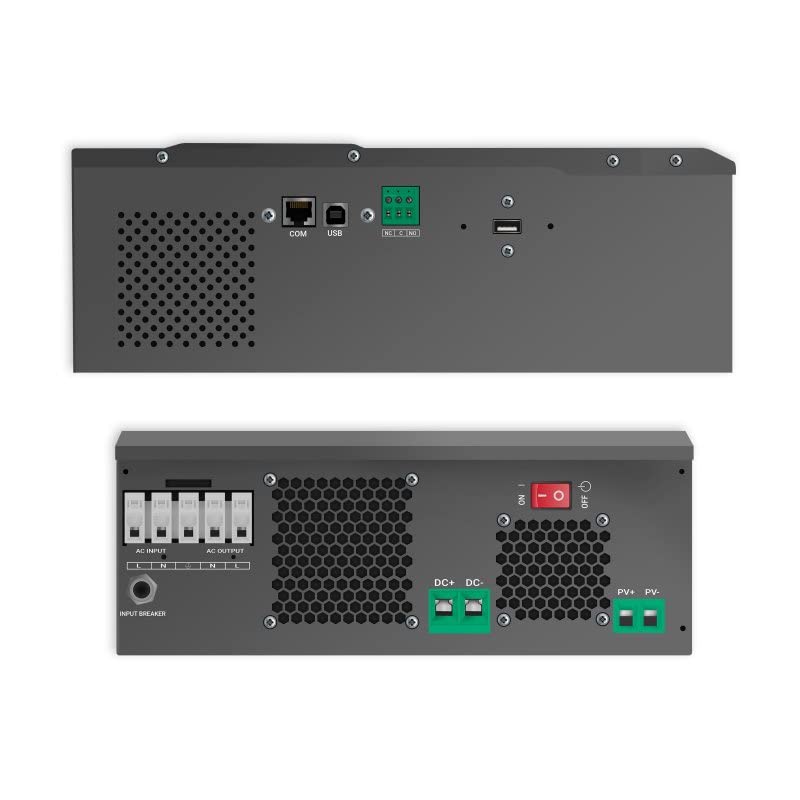
Figure 2: Top and bottom views of the inverter, highlighting AC input/output, DC input, PV input, and communication ports (COM, USB).
The inverter features dedicated terminals for AC input, AC output, DC battery input, and PV (solar panel) input. Communication ports (COM, USB) are available for monitoring and configuration.
3.3 System Diagram
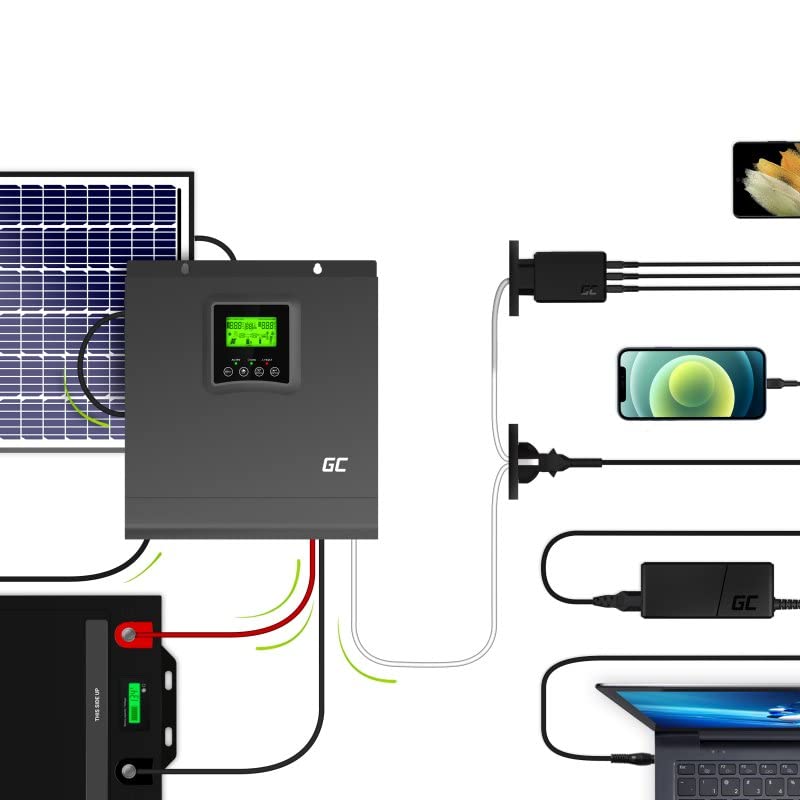
Figure 3: Example system setup showing solar panels, battery, inverter, and connected devices.
This diagram illustrates a typical setup where solar panels charge the battery via the inverter's MPPT controller, and the inverter supplies AC power to household appliances from the battery or directly from solar.
4. Setup
Follow these steps for proper installation of your Green Cell Off Grid Inverter:
- Mounting: Choose a suitable location indoors, away from direct sunlight, moisture, and flammable materials. Ensure sufficient clearance for ventilation. Mount the inverter vertically on a solid surface.
- Battery Connection: Connect the battery bank to the DC input terminals. Ensure correct polarity (+ to + and - to -). Use appropriate cable gauges and fuses. The inverter is designed for a 24VDC battery system.
- Solar Panel Connection: Connect the solar panel array to the PV input terminals. Observe correct polarity and ensure the open-circuit voltage (Voc) and short-circuit current (Isc) of your solar array are within the inverter's specifications.
- AC Input Connection (Optional): If using a grid or generator as a backup, connect the AC input to the designated terminals. Ensure proper grounding.
- AC Output Connection: Connect your AC loads (appliances) to the AC output terminals. Ensure the total load does not exceed the inverter's rated output power.
- Communication Connections: For monitoring and advanced settings, connect a USB cable to a computer or use the COM port for other communication devices.
After all connections are secure, you can proceed to power on the system.
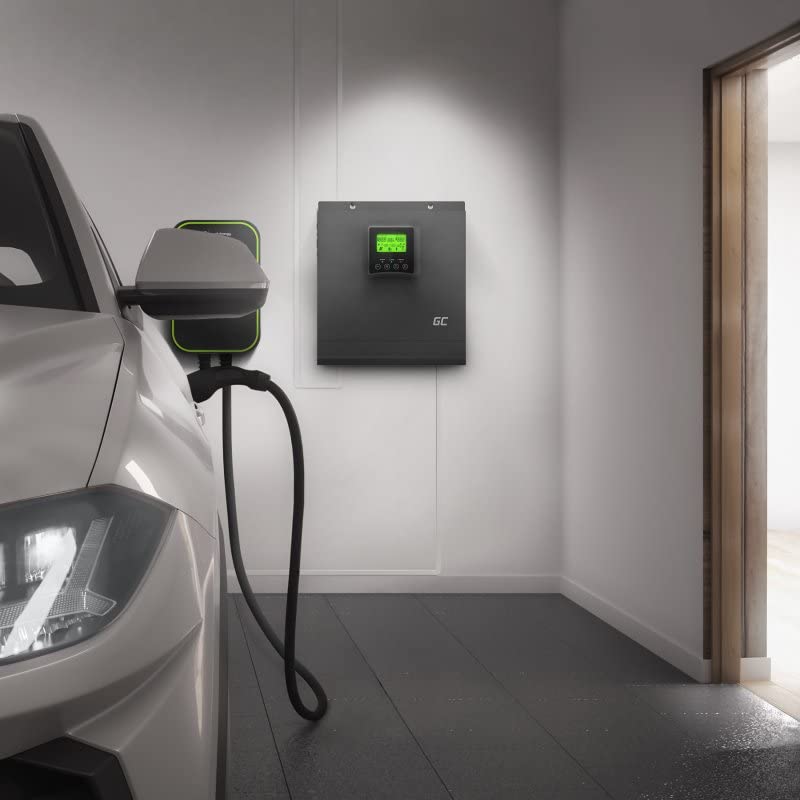
Figure 4: Example installation of the inverter in a garage setting, connected to an EV charger.
5. Operating Instructions
Once installed, the inverter operates largely automatically. Here are key operational aspects:
5.1 Powering On/Off
- To Power On: Ensure all connections are correct. Turn on the battery breaker first, then the PV breaker (if applicable), and finally the AC input breaker (if applicable). Press and hold the power button on the inverter until the display illuminates.
- To Power Off: Disconnect AC loads. Turn off the AC input breaker, then the PV breaker, and finally the battery breaker. Press and hold the power button until the display turns off.
5.2 LCD Display and Settings
Use the MENU, UP, DOWN, and ENTER buttons to navigate through the display screens and adjust settings. The display shows:
- Input voltage (PV and AC)
- Battery voltage and charge status
- Output voltage and load percentage
- Operating mode (e.g., Line Mode, Battery Mode, Fault)
Refer to the detailed settings section in the full product manual for advanced configuration options such as battery type, charging current, and output voltage range.
5.3 Monitoring Software

Figure 5: Monitoring software interface on a laptop, showing real-time data and system parameters.
The inverter can be connected to a computer via USB for detailed monitoring and data logging. The monitoring software provides a graphical interface to view system performance, historical data, and adjust advanced parameters.
6. Maintenance
Regular maintenance ensures optimal performance and longevity of your inverter:
- Cleaning: Periodically clean the exterior of the inverter with a dry cloth. Ensure ventilation openings are free from dust and debris. Do not use liquid cleaners.
- Connections: Annually check all electrical connections for tightness and corrosion. Loose connections can cause overheating and poor performance.
- Battery Inspection: Regularly inspect your battery bank for signs of damage, corrosion, or swelling. Ensure battery terminals are clean and tight.
- Environment: Ensure the operating environment remains within specified temperature and humidity ranges.
7. Troubleshooting
If you encounter issues, refer to the following common problems and solutions:
| Problem | Possible Cause | Solution |
|---|---|---|
| No output power | Battery low; Inverter off; Overload; Fault condition | Check battery voltage; Turn on inverter; Reduce load; Check fault codes on display. |
| Inverter beeping | Low battery; Overload; Over-temperature | Check battery; Reduce load; Ensure proper ventilation. |
| Solar charging not working | PV connection issue; Insufficient sunlight; PV voltage too low/high | Check PV wiring and polarity; Ensure panels are clean and unshaded; Verify PV voltage is within range. |
| AC input not recognized | AC input breaker off; Loose connection; AC input voltage out of range | Check AC input breaker; Secure connections; Verify AC input voltage. |
If the problem persists after attempting these solutions, contact Green Cell customer support.
8. Specifications
Key technical specifications for the Green Cell Off Grid Inverter (INVSOL03):
| Feature | Specification |
|---|---|
| Model Number | INVSOL03 |
| Output Power | 2000 Watt |
| Peak Output Power | 4000 Watt |
| Output Voltage | 230 Volt AC |
| Input Voltage (DC) | 24 Volt DC |
| Waveform | Pure Sine Wave |
| Efficiency | 90%, 93% |
| Product Dimensions | 27.2 x 35.5 x 10 cm |
| Item Weight | 8.5 kg |
| Included Components | MPPT controller, Inverter, Battery charger |
| Energy Source | Solar energy |
| Recommended Applications | Off-grid power supply, Solar energy storage, Emergency power backup |
9. Warranty and Support
Green Cell products are designed for reliability and performance. For warranty information, please refer to the warranty card included with your product or visit the official Green Cell website. For technical support, troubleshooting assistance, or service inquiries, please contact Green Cell customer service through their official channels.


